INTRODUCTION
GROWING FOOD IS NOT HARD!
Welcome to a guide on how to build your own homemade hydroponics system. Grow your own food completely out of vegetable scraps, household products and very cheaply, why not? But I know, a lot of people actually think of hydroponics as some kind of rocket technology…
In truth, the only tools that you need are a pair of scissors, tape, and glue. That simple. Before we start, I have a disclaimer to make – I am not an expert gardener or any sorts. I am just an average slightly (shameless) intelligent geek. So if I can grow some greens, so can anyone else.

NAVIGATION
TABLE OF CONTENTS

Section A |

Section B |

Section C |

Closing |
SECTION A
THE BASICS
All right, let us begin with some raw basic knowledge. Don’t worry, these are actually easy to understand stuff… that I learned after 6 batches of brown leaves. So save yourself from a lot of frustrations with 5 minutes of reading.
KRATKY METHOD
When it comes to hydroponics, people start to think of crazy water pumps, artificial lights, and adding expensive chemicals to the water. Yes, that is correct. But that is also high maintenance and not the “simple” we are talking about here.
The hydroponics setup that we are going to use is called the Kratky Method. So “what is Kratky” or “who is Kratky”? Well, Dr. Bernard Kratky is a smart guy from the University of Hawaii, and he is the inventor of the Kratky method.
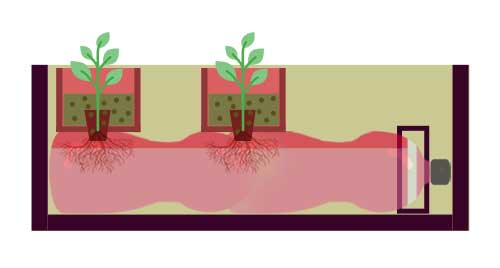
In a nutshell, the Kratky method is “passive hydroponics”. It is basically letting the roots of the plants sit in a pool of water, and that’s it – No crazy water pumps and lights. That simple, but there’s more which we will slowly walk through.
HOW KRATKY METHOD WORKS
Plants only need a few things to grow:
-
- Sunlight
- Water
- Air
- Nutrients
Notice that soil is not a requirement? Yep, that is where hydroponics replaced the soil with nutrient-rich water. So in the Kratky method, we attempt to give plants all 4 of these with a smart way of planting.
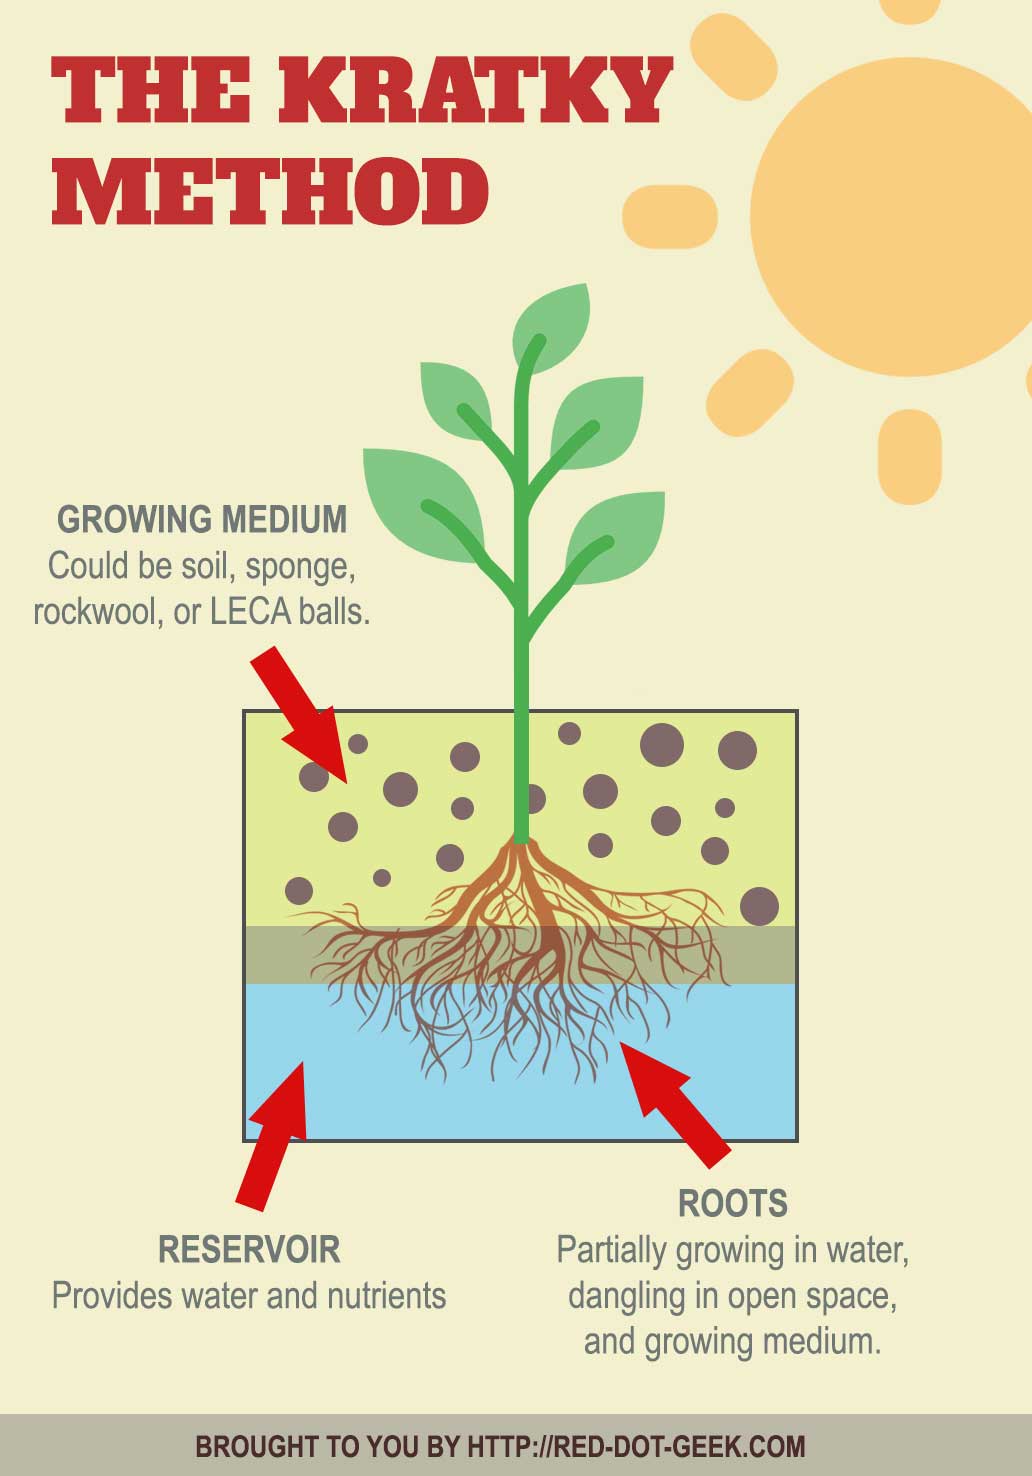
- The plant is placed in a sunny spot, of course – Sunlight requirement check.
- Roots of the plant are partially submerged in a reservoir of nutrient-rich water – Water and nutrient requirements check.
- Part of the root dangles in the open air – Air requirement check.
There you have it, the plant should grow happily with the requirements all in. However, the growing medium is still an issue that we shall address.
PARTIAL KRATKY – CHOOSING A GROWING MEDIUM
Yes, the Kratky method does not require soil. It is essentially using the growing medium just to hold the plant above the water and preventing it from blowing away in a storm. There are plenty of choices for the growing medium:
- Rock wool: Which I found out to be rather… environmentally unfriendly.
- Sponge: Becomes icky and stinky over time.
- LECA Balls: Expanded clay. These are good, and it provides air to the roots.
- Soil: The good old soil.
Normally in a hydroponics system, it would have been rock wool or LECA balls, because they are not “dirty” and do not encourage any bad bacterial growth. But here is also the problem – they do not contain any nutrients to support plant growth.
As water-based fertilizers are generally still more expensive, I have decided to use soil mixed with expanded clay (LECA balls) in this build. You can then use the “traditional” fertilizer on the soil, and think of this as a semi-Kratky system.
SECTION B
HOW TO BUILD
Ready to build your own hydroponics setup? Let us now walk through the build step-by-step, and you are going to need some tools. But don’t worry, these are common household stuff that you can find easily.
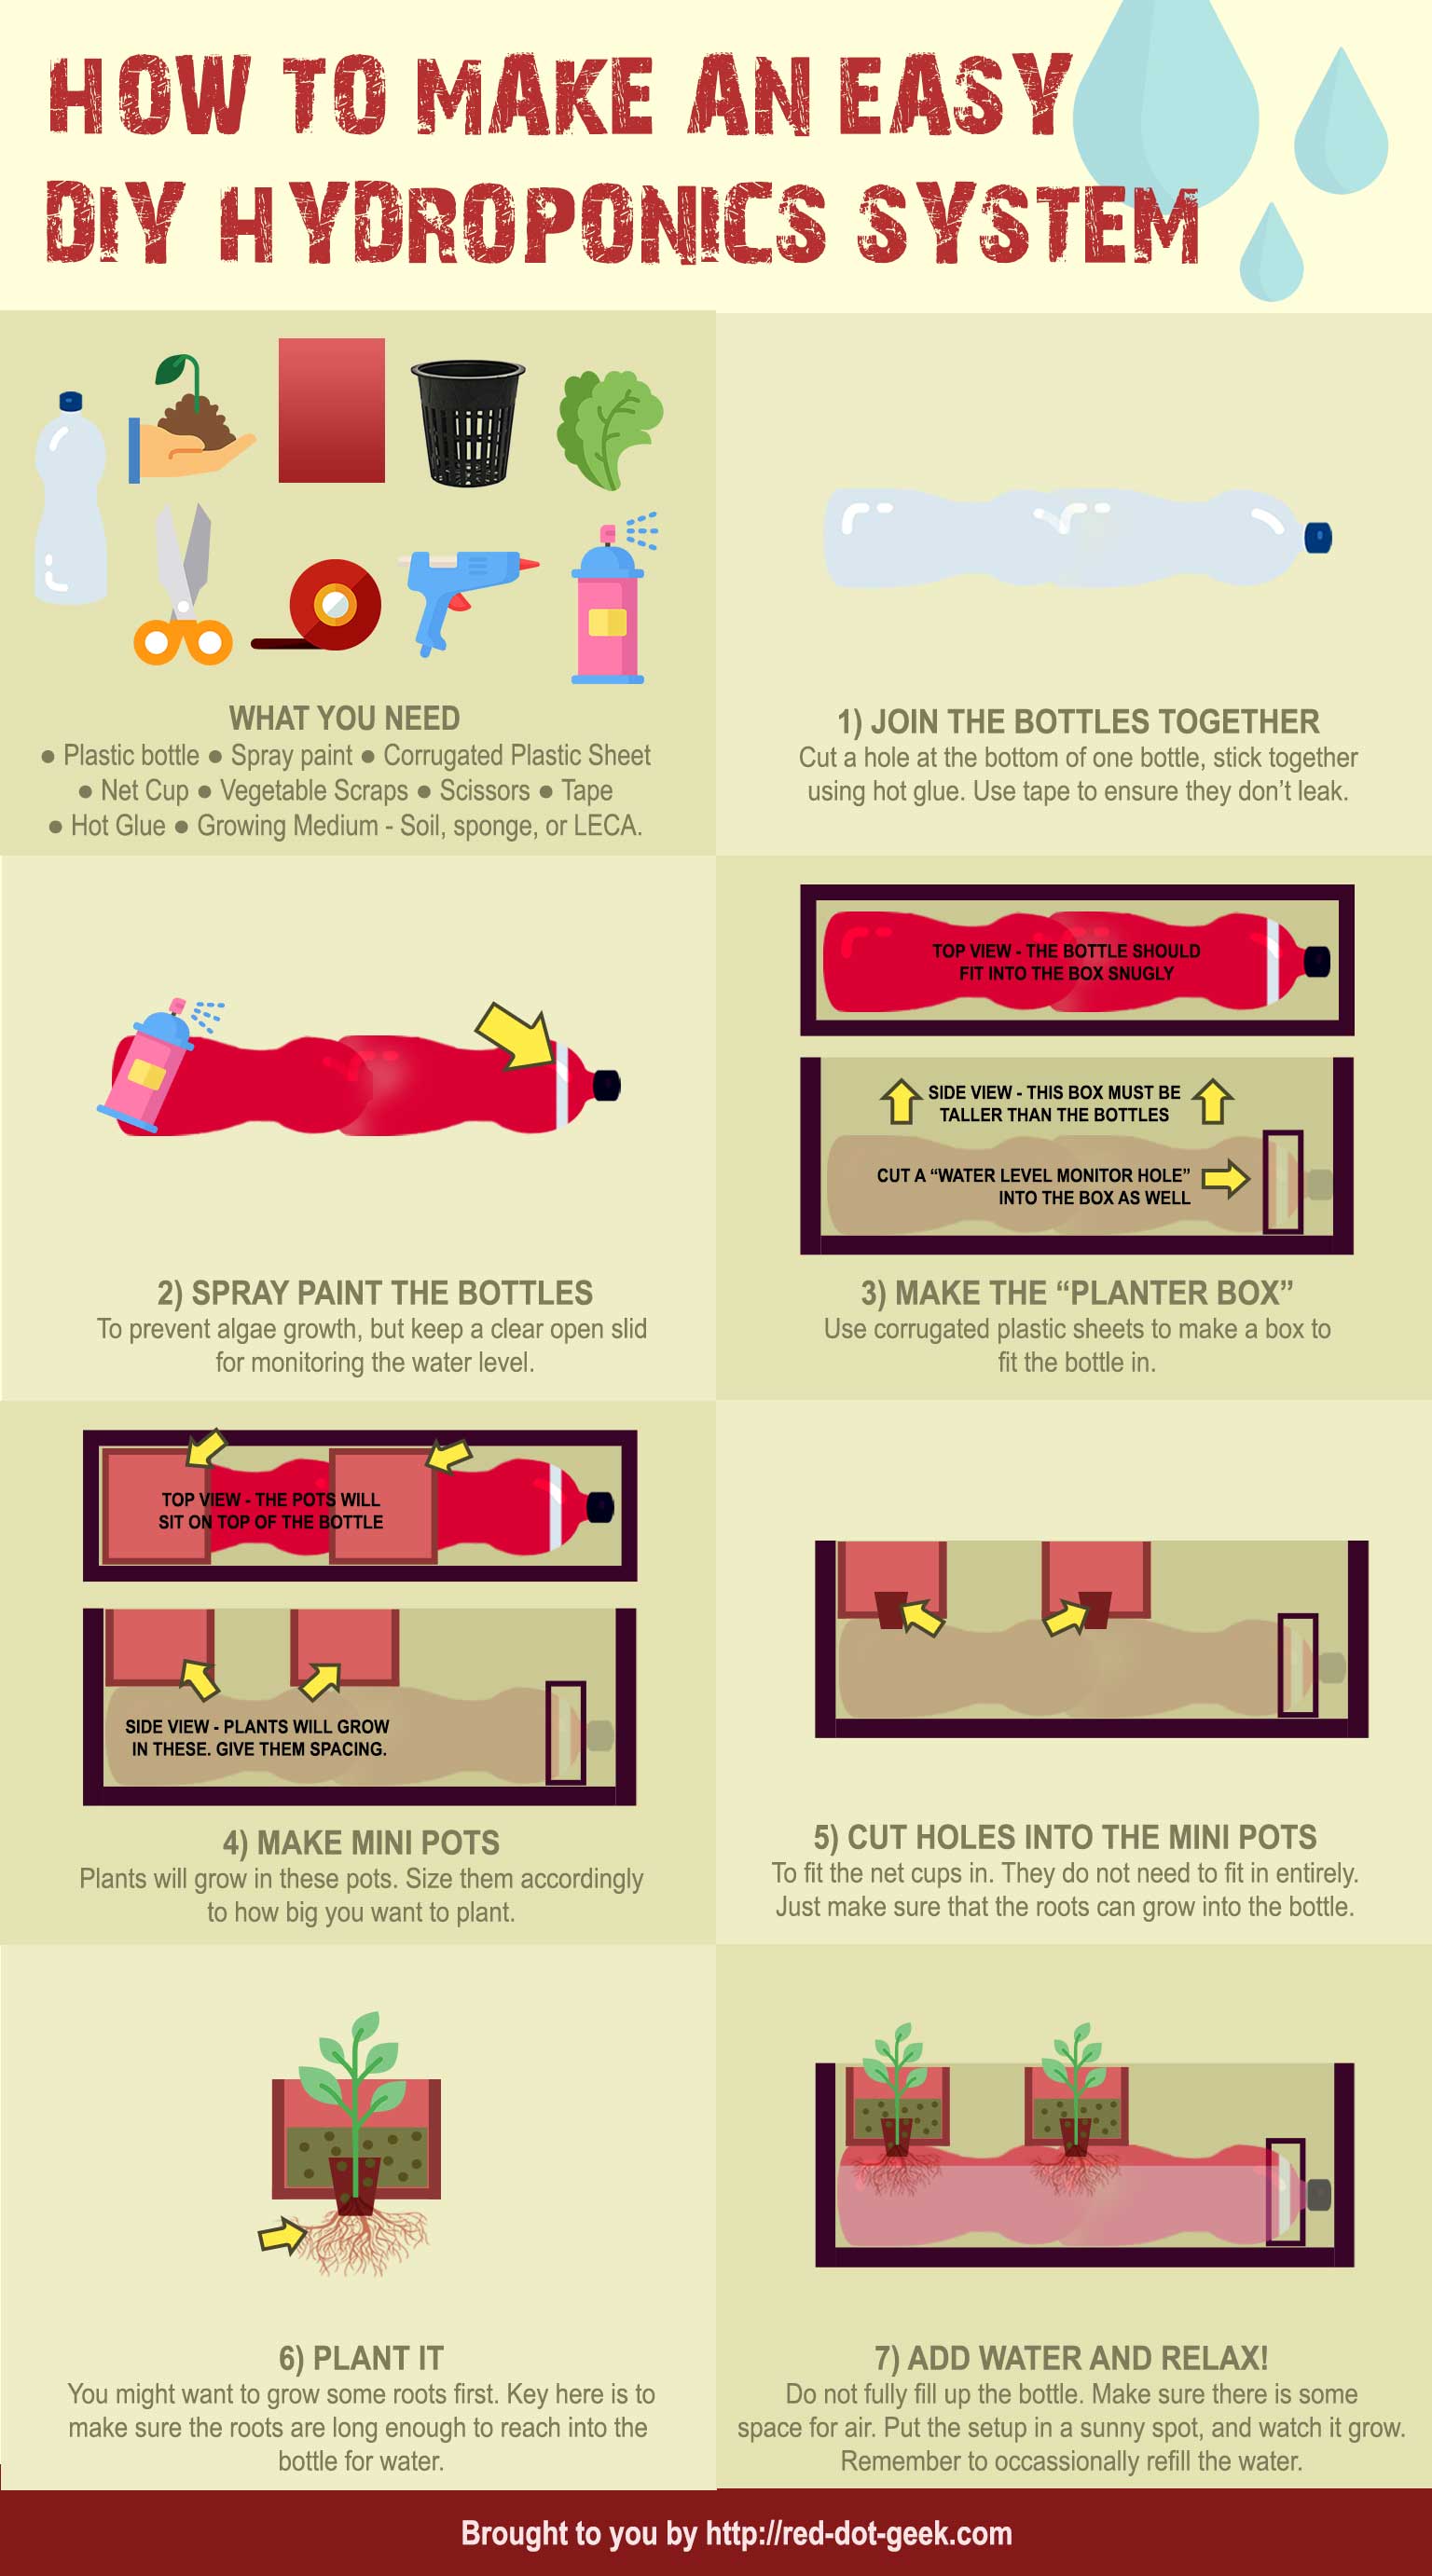
WHAT YOU NEED
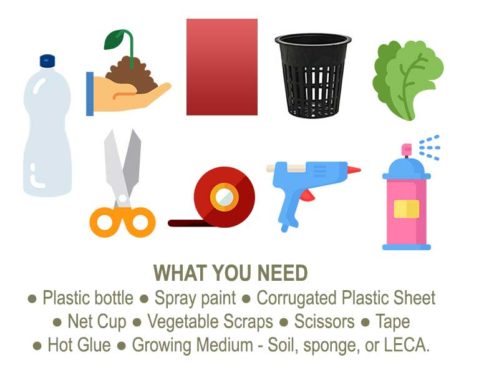
THE PARTS
- An empty plastic bottle. Finished that bottle of coke? Don’t throw it away, wash the bottle off the chemicals and sugar, then up-cycle it as a water reservoir. Just get more of these if you want a bigger setup.
- Growing medium. Something to grow the plant in. I used a mixture of soil and expanded clay. But if you want, you can also use rock wool or sponge.
- Vegetable scraps or greens. Not all scraps will re-grow, and not all greens will grow well in water as well. But so far, I had luck with lettuce, spring onions, and mint. Check out this guide on food you can re-grow.
- Netcups to grow your plants in. You can DIY these… but I got lazy and bought a few small net cups for cheap anyway.
- Corrugated plastic sheet. Don’t buy them online, you can get these at any DIY craft store for cheap. You only need a piece big enough to cover up your bottles.
THE TOOLS
- Scissors/cutter. To cut the bottle, of course.
- Tape – Clear tape, electric tape, or duct tape. As long as they hold things together.
- Hot Glue – Non-toxic… not until you want to poison yourself. I actually use hot glue which holds things together much better.
- Spray paint – Optional, but good to have.
STEP 1: JOIN BOTTLES

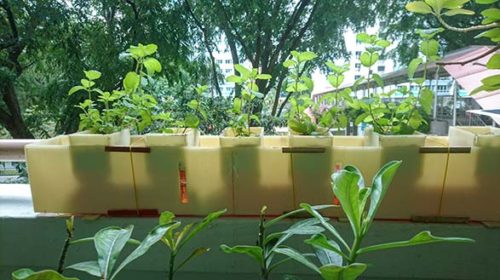
This step is optional but recommended. If you have many bottles, you can combine them all together to make one giant reservoir. You need to top up less often with a larger reservoir too. Personally, I just cut, glue, and tape the bottles together. Just make sure that they don’t leak, and the finished product should look like one long pipe.
STEP 2: SPRAY PAINT BOTTLES
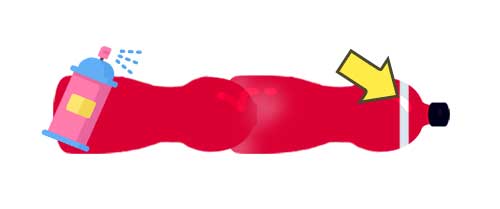
If you have spray paint, please paint all the bottles. This is to prevent too much sunlight from entering the bottle and causing an algae growth explosion… Which is bad for overall plant health. Just remember to keep one small clear spot for monitoring the water level.
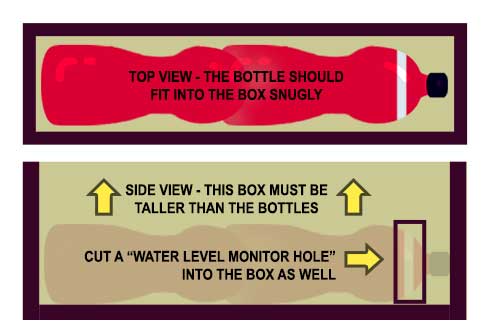
STEP 3: MAKE THE “BOX”
In my “early version” of this hydroponics build, I simply cut a hole in the bottle and squeezed the net cup in. It worked for a while, but I later lost all the plants in a storm overnight. The strong winds literally toppled the bottle, and the plants got blown away.
So learn from my mistakes, do not use the flimsy net cups alone and do more to secure that bottle down. What I did next, is to simply build a “box” to fit the bottle in, and tied it down with some strings.
- The “walls” of the box should be higher by a few inches than the bottle.
- Leave the top of the box open.
- Remember to cut a small “water level monitoring hole” in the wall as well.
STEP 4: MAKE THE “POTS”
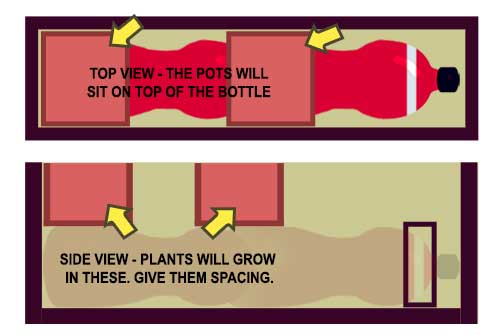
Aside from the “box”, I also built some “extensions” for the net cups. This is literally the same corrugated plastic sheet open top small box.
STEP 5: PUT THE NET CUPS IN
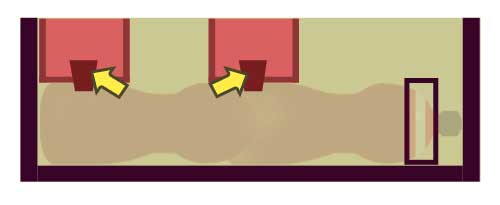
Now cut holes in the middle of the small pots, and into the bottle to fit the net cups in. You do not need to fit the cup entirely into the bottle, just give sufficient depth for the roots to grow out of the net cup.
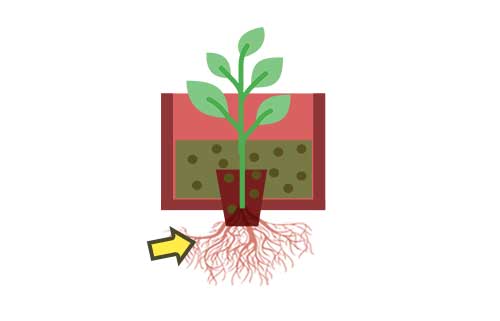
STEP 6: PLANT IT
If you do not already have a rooted plant, scroll back up to see the list of food that you can re-grow. Simply put them greens into a small container, add some water and leave it in a sunny spot. Change the water every few days, and roots will grow out in a couple of weeks. This part is rather tricky, so pay attention.
- The roots of the plant must be sufficiently long enough to be planted firmly.
- Place the plant into the net cup, with the roots sticking out from the bottom.
- Avoid having the stem of the plant poking out of the net cup. I once did that, and it suffered rot from the dampness.
- Add a layer of LECA balls, fill it up with soil. Repeat this until the young plant is nearly covered.
STEP 7: ADD WATER & RELAX
The final step. Add water to the reservoir (do not fully cover up the roots), put your self-watering gadget in a sunny spot, relax and watch them grow. Remember to tie the setup down with string if you do not want it to get blown away.
UPDATE) PET BOTTLES ARE NO GOOD UNDER THE SUN!?
This is a small update on my recycled bottle build, and some people have mentioned to me that plastic bottles degrade under the sun. Melted plastics into the root system? No good. I have since modified the build a little and expanded the size of the “pots” to fully cover up the top part of the bottle – That extra size and soil should shield the bottle from the sun, and prevent nasty melted plastics.
SECTION C
MAINTENANCE
While this system is pretty much low maintenance, it is not totally hands-free. You still need to do some manual tasks. No worries… these are pretty much no-brainers simple checks.
SEMI-REGULAR MAINTENANCE
- If the roots don’t grow fast enough and the water gets too low, the plant will dry out.
- Top up the water once every week. Depending on how fast the water depletes.
- Check for pesky insects inside the reservoir, especially mosquitoes – I only leave one opening to refill the reservoir and have it covered up at all times.
THE FERTILIZERS
The beauty of using soil as a growing medium, you can use the “regular” fertilizers on it. Yes, the soil part still needs to be watered periodically and fertilized.
SUNLIGHT
Not all plants love strong direct sunlight. If your plants are dying from the strong light, it’s time to move them somewhere shady. The key, do your homework.
ROOT ROT
This is actually a common problem in hydroponic systems where the root is submerged in water. What is root rot? Simply as the name implies, the root of the plant dies and start to rot. They can be identified with brown roots that are slimy, stinky, and easily break apart with a touch.
Once a plant gets root rot, it is nearly impossible to cure. So when you spot a rotted plant, quickly remove it from the system and change out the water. Root rot spreads, and it spreads fast in a closed system.
WIND DAMAGE
I once had small cuttings placed in the growing medium, and overnight, they are gone in a storm. Wind damage can be a pain at times, even to fully grown plants. If your area experiences some strong winds, you might want to add some simple cardboard wind-shields to protect the plants.
CLOSING
GO GREEN!
If you have built your own upcycled hydroponics – Congratulations! With some luck and effort, you will be harvesting your own food in no time. But sometimes, things just won’t work out the way you want it to be. If the plants are still browning, it could only be a few things.
- Sunlight – Too much light or too little light.
- Temperature – Too hot or too cold.
- Fertilizer – Not enough, or too much.
- Water – PH value is wrong, or too many contaminants.
- Air – Roots are not getting enough air… or too much water.
- Disease – Root rot, fungi or pests.
Whatever is the problem is, learn to take care of it one at a time, and you will get your greens in due time. Happy gardening!