INTRODUCTION
AUTOFOCUS IS NOT AUTOMATIC
Welcome to a beginner’s guide on the autofocus basics in photography. So, have you been taking photos on a camera, poked around only to find that there are a ton of different autofocus settings? Why are there controls for autofocus? Shouldn’t autofocus be automatic!?
Yep… This is one of the nasty surprises that beginners face. Autofocus is not really automatic. Just what are these autofocus modes and areas used for? When should we use them? Read on to find out!

NAVIGATION
TABLE OF CONTENTS

Section A |

Section B |

Section C |

Section D |

Closing |
SECTION A
AUTOFOCUS MODES
Let us start with the different kinds of autofocus (AF) modes. The common AF mode that most people know is probably to select a spot and let the camera do the focusing magic – But there are other ways AF will work and here are the common modes.
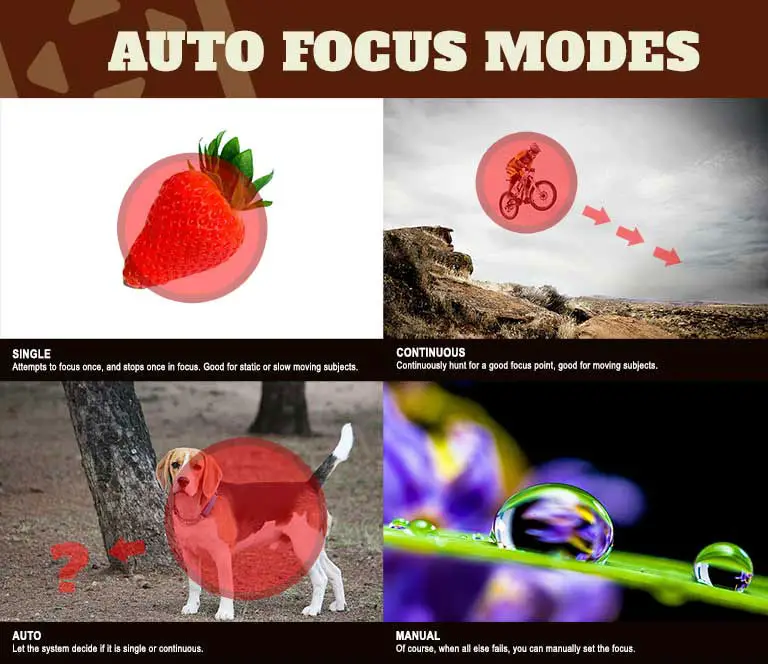
Single Mode
How it works: Known as “AF-S” on Nikon and Sony cameras, “one-shot AF” on Canon cameras. This is the most straightforward autofocus mode that most people probably already know. It attempts to focus on something and stops once it is in focus.
Good for: Static or slow-moving subjects. The single-mode is not suitable for fast-moving subjects as it does not track the subject nor continuously seeks to focus on something.
Continuous Mode
How it works: Known as “AF-C” on Nikon and Sony cameras, “Al Servo” on Canon cameras. The continuous mode will repeatedly try to hunt for a good focus point.
Good for: Moving subjects, since AF-C can also be configured to lock on and track moving subjects.
Hybrid/Full Auto Mode
How it works: Known as “AF-A” on Nikon and Sony cameras, “Al Focus AF” on Canon cameras. This mode allows the camera to fully take over and decide if it is single or continuous.
Good for: Even though this seems to be the better “easy mode”, even though technology has advanced over the years – The AF-A mode can still get rather confused, especially when shooting a busy scene.
Full-time Servo Mode
How it works: This is “AF-F” on Nikon Cameras, and it is “specialized” to Nikon only. This mode is basically the same as the continuous mode, except that it is meant for videos – It will automatically do continuous focus without holding onto the focus button.
Good for: Taking videos.
Manual
How it works: Human eye power and finger yoga on the focus ring!
Good for: When the auto-focus system fails to work properly, or when you want to create deliberately blurred creative shots.
SECTION B
AUTOFOCUS AREAS
On a smartphone, we can tap on a spot on the screen to focus on it. But when we press the focus button on a “full-fledged” camera, it will sometimes attempt to find a subject somewhere else instead. Ever notice that? That is because we can specify the AF area and this section will explain how it works.

Single Point
How it works: Specify on a single spot in the frame to be in focus.
Good for: When the focus is on a single subject (or single spot) only.
Dynamic
How it works: Similar to the single point, but takes the immediate surrounding of the chosen point into consideration.
Good for: A group of objects/subjects that are closely packed together, or a single subject that occupies quite a lot of space in the frame.
Auto
How it works: Lets the camera fully decide what needs to be in focus.
Good for: During events, where we don’t have too much time to switch the modes around. Autofocus systems these days do a pretty good job, but you still need to be careful when using auto – It can still get confused when you have a complicated or busy frame.
SECTION C
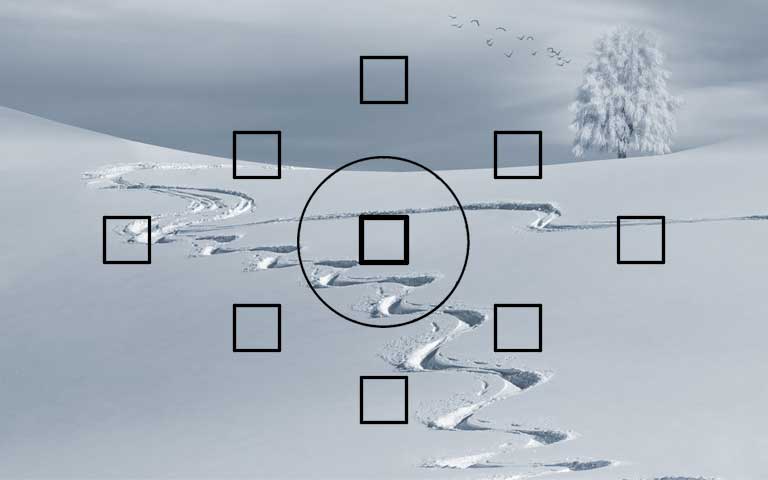
AUTOFOCUS POINTS
Autofocus points are simply the “squares” that we select on the screen to focus on. Probably not very exciting, but here are some good-to-know trivial.
NOT ALL CAMERAS HAVE THE SAME AF POINTS
Before some of you guys start to assume that all cameras have the same auto-focus points, they don’t. If you pick up different cameras, you will notice a somewhat different layout to the AF points. Especially when it comes to older cameras, they may only have 5 selection points, while the newer systems have hundreds of AF points.
Technically, more AF points will make a better AF system. Since it means that the camera will be able to better track moving subjects across the frame. But at the same time, the underlying technologies matter too.
NORMAL VS. CROSS TYPE
You will probably hear this a lot in the world of photography – Cross-type and normal focal points. We will not go into the technical parts, but in a nutshell, each AF point works by trying to match mirrored images.
HOW NORMAL AF POINTS WORK
The “normal” points only have 2 mirrored images, on the horizontal axis. It usually works well enough with things like taking portraits, but what happens when we are taking a photo of the horizon on the beach?
HOW CROSS-TYPE AF POINTS WORK
Horizontal matching probably will not work as well now, since it is difficult to match a horizon horizontally. This is where cross-type sensors shine, as they match both horizontally and vertically.
CONTRAST VS PHASE DETECTION
Following up with more “rocket science”, this section will explain the 2 types of auto-focus systems that are commonly used in cameras these days – Contrast detection and phase detection.
HOW CONTRAST DETECTION WORK
Well, I don’t think anyone is going to like the technical bits. So here goes the human version – In contrast detection, the system continuously adjusts the focus point and compares which is better. This is why we see that “hunting back-and-forth” when focusing on cameras that use contrast detection.
HOW PHASE DETECTION WORK
Phase detection is a slightly more complicated system, but in simple terms :
- Phase detection uses something called a beam splitter.
- When the light beams are not converged, a “mirror image” is created and it is not-in-focus.
- The camera simply has to adjust the focus accordingly by “matching the mirror images”.
WHICH IS BETTER?
So which is the better auto-focus system? Should you buy a camera just because of the AF system? Personally, I do think that phase detection has a slight edge over detection speed, and it is better for videos. But performance-wise, phase detection is poor in low light, while contrast-detection is poor when it comes to a flat picture (e.g. An empty sky).
Each system has its own strength and weakness, so it is all up to you to decide – If you like videography more, then maybe cameras with phase detection will work better for you.
SECTION D
EXTRAS & AUTOFOCUS TIPS
In this final section, we will run through a few autofocus tips, techniques, some kick-ass kung fu to taking some of those very sharp photos.
GENERAL TIPS FOR STABILITY
How do we get a good shot without blur? By simply holding the camera right… which most beginners get it wrong. Here are a few general tips for steady shots:
- If the camera is heavy, try to keep it closer to your body.
- Rest your arms against your body instead of holding it mid-air. This will add to the stability.
- Lean against something stable for more support- a wall, chair or railing.
- Open your feet a bit wider to create a stable base.
- Holding your breath while shooting handheld will add to the stability too.
- If you cannot deploy a tripod at certain locations, use the railing, chair or even rubbish bin as a temporary support.
FOCUS AND RECOMPOSE
Ever find yourself in a situation where the autofocus does not work? Here’s what to do when AF refuses to work properly – Use the center AF point. This is because the center point is usually the “best” and most sensitive. Simply frame your subject in the middle of the frame, autofocus on, readjust the frame, then take the shot.
USE THE BACK BUTTON FOCUS
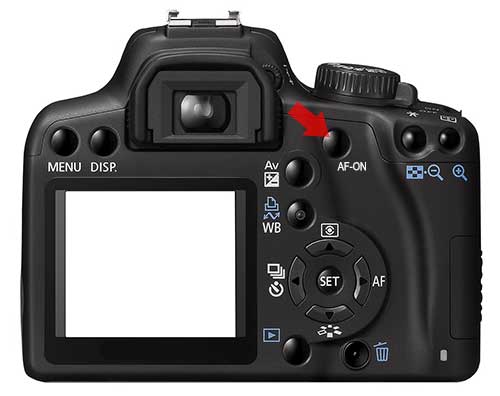
Normally, cameras have “by default”, set the auto-focus to trigger by half-pressing the shutter button. While that is not wrong, the better way will be to use a dedicated back button to activate AF. Why so? Because it prevents us from accidentally taking a shot while half-pressing, and it also makes focus-and-recompose easier.
The true advantage of using the back-focus button in shooting fast-moving subjects in the continuous focus mode. We can easily track and lock the focus using the back button, while taking photos with the shutter button. In the half-press scenario, it will be clumsy to do so with only one button.
SHARP. TACK SHARP.
Landscape photography lovers, this one is for you to get very sharp photos, or what we call “tack sharp”. We are going to need a tripod and remote shutter release.
- Start with a sufficiently small aperture like f/8.
- If you are using a DSLR, set the camera to the “mirror up” mode.
- Mount the camera to the tripod, use a wireless release.
- Frame and auto-focus 1/3 into the scene.
- Switch to the live view, zoom into the foreground and background to check the sharpness. Manually adjust the focus if required.
- If you cannot get everything sharp with f/8, use a smaller aperture.
- When you are comfortable with the sharpness, take the photo.
LINKS & REFERENCES
That’s all for this guide, and here are a few extra links that may be useful to you:
- Focus Mode Help Guide – Sony
- Focus Modes – Nikon
- Understand AF modes – Canon
- Autofocus Modes Explained – Photography Life
- Autofocus – Wikipedia
CLOSING
WELL DONE, WHAT’S NEXT?
Thank you for reading, and we have come to the end of this tutorial. I hope this has helped you to better understand autofocus a little more, and whoever said automatic is easy? Well, it sure isn’t straightforward.
But all you need to do is to try shooting in the different modes on your camera, and figure out which one works best for you. If you have anything to share, please feel free to leave them in the comments section below. Good luck and happy shooting!