SAVING BOOKMARKS
Welcome to a beginner’s tutorial on how to backup and restore bookmarks in Google Chrome. So you are looking for ways to save your bookmarks as a backup copy, and maybe transfer them to another computer. Well, the good and bad news is – There are a few ways we can backup bookmarks in Google Chrome:
- Exporting them to an HTML file.
- Sync the bookmarks with your Google account and save them into the cloud.
- Sync with another service provider, and possibly use them across many different platforms.
- Manually copying the bookmarks file out.
So just how do we do each of these? Which is the recommended method? Read on to find out!
TABLE OF CONTENTS
 Method 1 Method 1Export to HTML File |
 Method 2 Method 2Sync With Google |
 Method 3 Method 3Sync With Other |
 Method 4 Method 4Manual Copy |
 Extra ExtraUseful Bits |
 Closing ClosingWhat’s Next? |
EXPORT TO HTML FILE
This first method involves manually exporting the bookmarks to an HTML file and saving it to wherever you feel safe – You can also share your bookmarks with your friends using this method if you want to.
HOW TO EXPORT BOOKMARKS
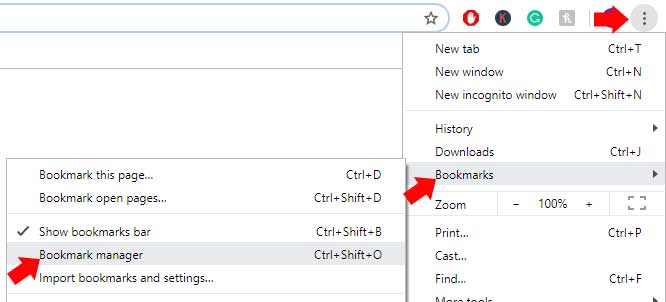
First, open the Bookmark Manager using the shortcut keys Ctrl + Shift + O (Command + Shift + O if you are on a Mac). If you somehow prefer to use the mouse or the touchscreen – Hit the ⁝ button at the top-right corner > Bookmarks > Bookmark Manager.
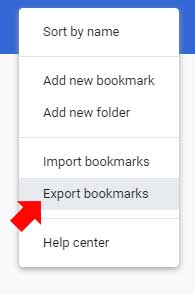 Then in the Bookmark Manager, hit the ⁝ button (in the blue navigation bar) at the top-right corner > Export Bookmarks.
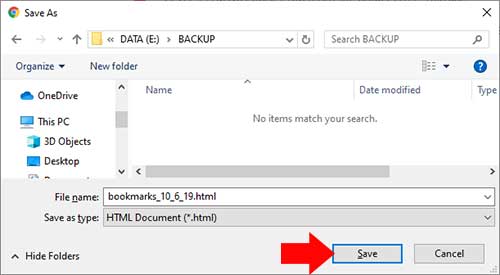
That’s all to the “complicated export process” – Simply select where you want to save the bookmarks to and hit “Save”.
WHERE TO SAVE THE BOOKMARKS?
Well, apart from the hard disk, you can also save it to your flash drive or memory stick… Just don’t lose it and keep it somewhere safe. Alternatively, there are a number of free cloud drives (free storage space on the Internet) that you can upload to:
Heck – If you want, you can even email this bookmark file to yourself or to your friends.
HOW ABOUT IMPORTING?
Sharp computer ninjas – You should have already spotted it. Just do the “reverse” of exporting. Fire up the Bookmark Manager > Hit the ⁝ at the top-right corner > Import Bookmarks > Choose the exported HTML file.
SYNC WITH GOOGLE
Next stop, good old Google does provide a free sync service. Just enable it, and your bookmarks will be saved to your Google account – then you can retrieve it on any of your devices with Chrome installed.
HOW TO SYNCHRONIZE
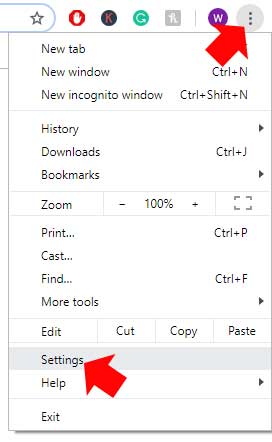
Hit the ⁝ button at the top-right corner > Settings.
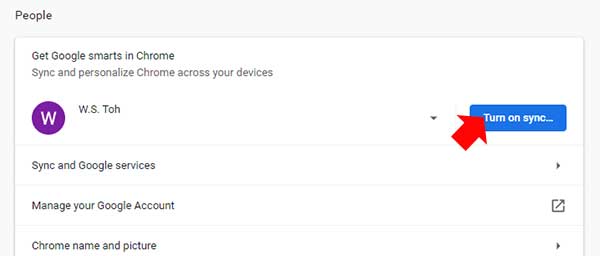
Press the “Turn on sync” button. Chrome may ask you to sign in to your Google account or create one if you don’t already have one.
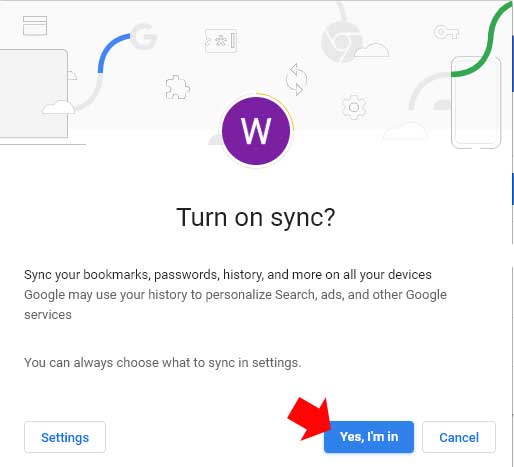
Finally, just hit the “Yes, I’m in” button – Once sync is enabled, Chrome will automatically save all your bookmarks, passwords, and history to your account online.
HOW TO RESTORE?
Simply do the same on other devices, sign in and enable sync in Google Chrome – Chrome will synchronize and restore all the previous bookmarks, passwords, and history.
NOPE. NO SHARING.
Yep. This is Captain Obvious, but you do not want to sync your account on your friend’s computer and give them your saved passwords and search history… Keep this to your own devices.
SYNC WITH OTHER SERVICES
So what happens if you use Chrome on one device, and want to transfer to Firefox on another device? Thankfully, there are 3rd party sync services.
EVERSYNC – CROSS BROWSER SYNC
To synchronize (or transfer) your bookmarks across Google Chrome, Mozilla Firefox, and Android – I will recommend using a third-party extension called EverySync. Simply download, install and enable the plugin.
EVERSYNC SETUP
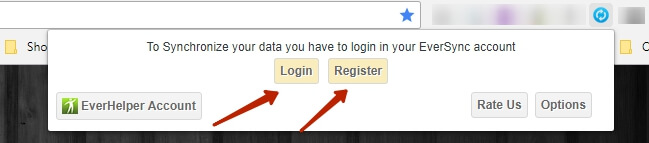
Instructions from Everhelper – After you have enabled the EverySync extension, click on the EverSync icon. Either sign in if you already have an account, or register for a new one.
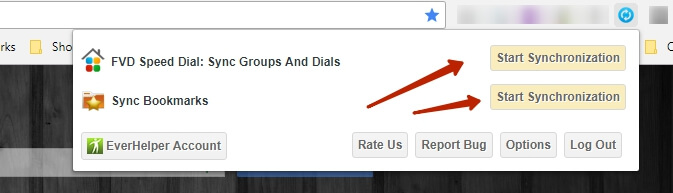
Once signed in, simply click on the “Start Synchronization” button.
EVERSYNC RESTORE
To restore, simply do the same – Install the extension, sign in, and synchronize.
MANUALLY COPY
Oops. Chrome has crashed and refuses to start. The only option left is to manually find the bookmark files and copy them out – Here’s how.
SHOW THE HIDDEN FILES
First, you will very likely need to enable the “show hidden files” option on your computer to be able to access the bookmark files.
- On Windows
- Mac
- It differs on Linux, depending on which desktop environment you are using… But here’s how for Ubuntu.
WHERE THE BOOKMARKS FILES ARE AT
Once you “unhide” the hidden files, you should be able to access and manually copy out the physical bookmark files.
- Windows –
C:\Users\YOUR-NAME\AppData\Local\Google\Chrome\User Data\Default\Bookmarks - Mac –
/Users/YOUR-NAME/Library/Application Support/Google/Chrome/Default/Bookmarks - Linux –
/home/YOUR-NAME/.config/google-chrome/Default/Bookmarks
USEFUL BITS
That’s all for this guide, and here is a small section on some extras and links that may be useful to you.
WHICH IS THE BEST METHOD?
Well, all of the above works.
- Exporting to an HTML file is probably one of the most hassle-free methods, without having to sign up for any accounts and stuff. Good for privacy, and if you just want to share bookmarks with a friend.
- Google Sync is not so much of a hassle if you already have a Google account. Once enabled, it will automatically save your bookmarks online, and synchronize with all your devices – This is good in the long run… Although this is not for sharing.
- EverSync is good if you use different browsers across different devices. No sharing too… Not until you don’t mind.
- Manually copying is the most troublesome method, use it only if Chrome refuses to start.
LINKS & REFERENCES
- How to Back Up Chrome Bookmarks to an HTML File – MUO
- Turn sync on or off in Chrome – Google
- In What Folder Are Google Chrome Bookmarks Stored? – It Still Works
WHAT’S NEXT?
Thank you for reading, and we have come to the end of this guide. I hope this has helped you to better understand, and if you have anything to share with this guide, please feel free to comment below. Good luck and may the cyber force be with you.