Welcome to a guide on how to create smoke for photography. Want to add some drama and epic to your photos? Smoke and fog is probably one of those answers, but most photographers will run into a wall with this – Where do we even get smoke from?
Over the many years, I have searched the Internet and actually tried some methods with various degrees of success. Here is a quick compilation of my experience, plus my thoughts on each method. Read on!
TABLE OF CONTENTS
 Good Methods Good Methods |
 Unverified Methods Unverified Methods |
 Useful Bits & Links Useful Bits & Links |
 The End The End |
GOOD VERIFIED METHODS
These are the methods that I have personally tried and verified to be working… Ok, maybe some of these are not perfect, but they still work sufficiently well. If you are looking for a good volume of smoke, these are your best bets.
1) USING A FOG MACHINE

Good: Very easy to operate. Good volume and quality of fog.
Bad: Fog machines need power and fog juice to operate. Not great for outdoor shoots.
This is one of the easier methods and produces good results. While some people think that fog machines are expensive – No, they are not, a decent fog machine only costs about $35 to $50. The only downside is that fog machines require fog juice and power to operate.
They are pretty much limited to studio shoots, unless you are willing to carry a huge battery pack and bottles of fog juice around. While there are portable fog machines, they cost quite a bit and don’t quite produce as much smoke.
P.S. You can DIY your own fog juice with cheap glycerin. I will leave a video in the extras section below.
2) HAZE CAN
Advantages: Very portable, good quality fog without the need for electricity.
Disadvantages: Limited volume, expensive in the long run.
The haze in a can is another one of my favorites – It produces thick smoke, it is also lightweight and portable. Although they are not exactly cheap, a can of haze can actually last pretty long.
P.S. I have considered using cheap hair spray as an alternative, but they did not stick in the air for long.
3) FOG CAKES
Advantages: Good volume of smoke, extremely portable.
Disadvantages: Fire hazard. Once started, it is hard to stop and control.
Fog cakes are quickly becoming my next favorite. At about $3.50 per piece, these things can burn for a full 3 minutes, and easily fog up an entire room. It will be wise to break the fog cake into smaller pieces to control it and increase its lifespan as well.
4) INCENSE

Advantages: Extremely portable and affordable. Insect repellent.
Disadvantages: Fire hazard. Need to burn a whole bunch at once.
One of the craziest ideas that I have tried. Burn a sh*t load of those aromatic stick incense, spread it around, and there you have it – A lot of smoke. Good insect repellent too. But be warned, they catch on fire when you fan it too much.
5) PHOTOSHOP
Advantages: No need to burn nor bring anything around.
Disadvantages: Needs time and some skills to get it right.
If all else fails, there’s always Photoshop. Find a good fog brush, and just paint it in!
UNVERIFIED METHODS
These are the methods that I have not personally tried, but heard from others that they work… Otherwise also known as “I have watched YouTube videos but never really tried it”. Most of these methods should work as well, but they are just a hassle to try out.
6) WATER AND DRY ICE
Advantages: The fog is cold and sinks. Good for creepy and spooky shots.
Disadvantages: Indoors only. Difficult to lug water and dry ice around.
Yes, mixing water and dry ice does work. But I have not used this method in photography for a very obvious reason – You will need to lug a load of dry ice in an icebox, and a big barrel of water to the shoot location.
These do not last long either. Once started, there’s no way to stop until the dry ice has fully melted. The only redeeming factor is that dry ice and water produce cold fog that sinks low to the ground. Good for horror scenes.
7) BABY POWDER / FLOUR
Advantages: Easily available.
Disadvantages: Messy, does not look like fog.
Just throw some baby powder or flour. This is a cheap and cool way to get “smoke”, but it gets very messy. Be prepared to clean up afterward. I have only tried this method once before and it failed miserably. Also, take note that baby powder is kind of thick, it does not look like fog at all.
WARNING – Flour is flammable when scattered.
8) MOSQUITO FOGGER
Advantages: Cheaper than fog machines, portable.
Disadvantages: Gas-powered, noisy.
Mosquito foggers are sort of the cheaper alternative to portable fog machines. They are powered by butane gas cans, which you can easily get from supermarkets. But remember to replace that pesticide with fog juice.
9) PING PONG SMOKE BOMB
Advantages: Easily available, portable.
Disadvantages: Fire hazard, toxic smoke.
This one looks interesting as a science experiment. But just a quick note – The smoke is toxic.
USEFUL BITS & EXTRAS
Regardless of which method you use, you still need to control the smoke in one way or another for photography. So here are a few nuggets for “smoke photography”.
WIND BENDER
- The wind is your number one helper and enemy.
- Predict the direction of the wind, you don’t want to blow smoke into your subject directly.
- You can use a reflector to somewhat control the smoke, or use multiple portable USB fans.
- If you are shooting at an overly windy location, just forget the smoke. Seriously. It will be gone in a second.
HELLO DARKNESS MY OLD FRIEND
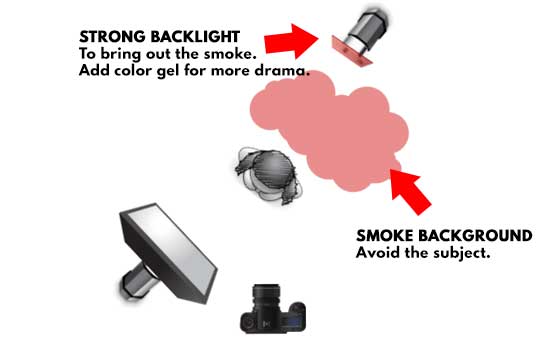
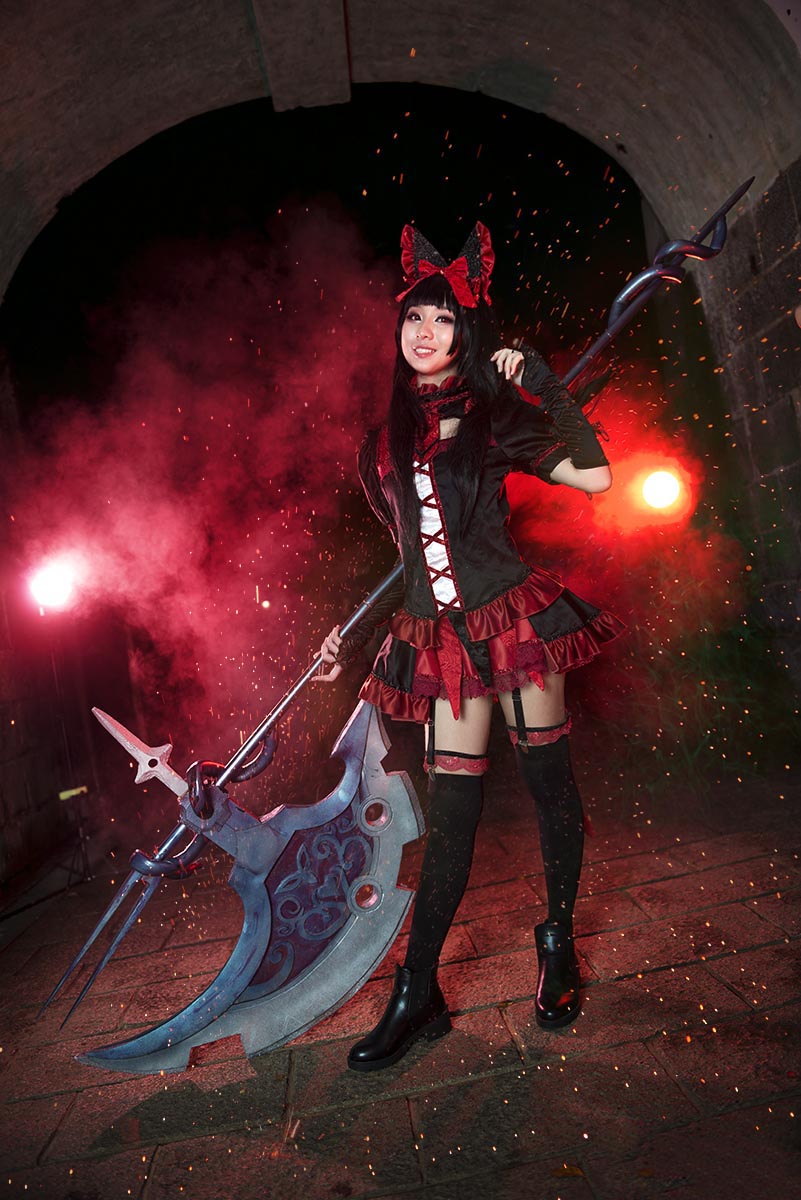
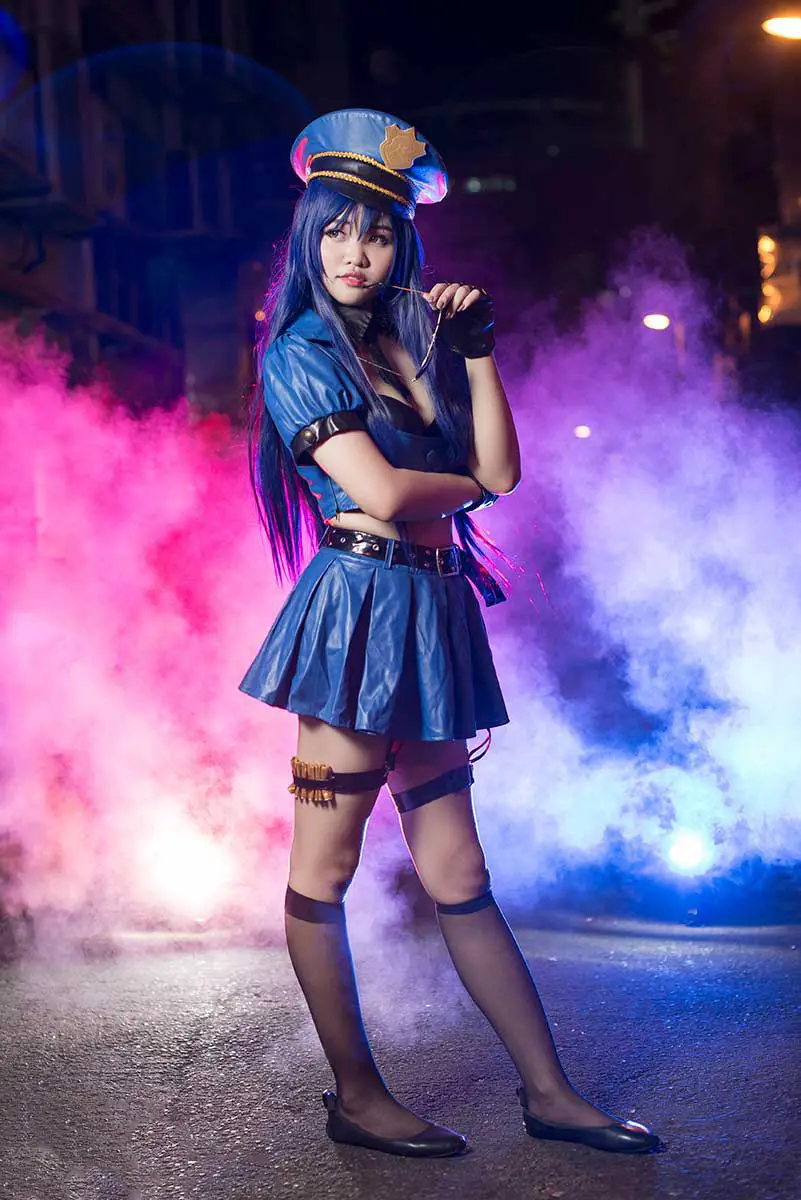
For my shoots so far, I had the best results with the smoke in a dark environment. A dark environment with strong backlight on the subject. Feel free to use color gels to add even more drama to your shots.
SMOKE POSE SMOKE
- Always use a little smoke to test the effects first, and see where the winds are carrying it.
- Then set up your lights and pose your subject accordingly.
- The “actual smoke” comes last when you are satisfied with the lighting and setup.
DIY FOG FLUID
THE END
All right, that’s all the ways to create smoke/fog that I know of. Well, there are a few more not-so-bright ideas such as burning wood and spraying a fire extinguisher, but let’s just leave those out for safety reasons.
I hope this guide has given you some inspiration, and if you have more ideas to share, please feel free to comment below! Now go smoke some photos.