INTRODUCTION
NO MAGIC, ONLY A WORKFLOW.
Welcome to a guide on how to edit cosplay photos… With Photoshop, that is. Now, I get these questions quite a lot – “How do we edit cosplay photos”, “how do we use Photoshop”, and “how can we add effects”. While I don’t intend to keep any of these a secret, it’s just that I don’t have a secret ninja scroll nor a sealed 9-tailed fox to unleash.
Every photo is different and it requires various different editing techniques; There is no “one sure way to win in Photoshop”… Moreover, I don’t see myself as a master of Photoshop, just someone who has used Photoshop for a long time. That said, I may not have a Photoshop miracle pill, but there is still a method. Every photo is different, but the post-process workflow is the same.
That, I can share that with you guys. Although it does require a lot of patience, mastering it is well worth all the effort for some Photoshop awesomeness – Read on to find out! 😉

NAVIGATION
TABLE OF CONTENTS

Step 1 |

Step 2 |

Step 3 |

Step 4 |

Step 5 |

Step 6 |

Step 7 |

Extra |

Closing |
STEP 1
THE PLAN COMES FIRST
Before starting on anything, we need to have a master plan. To dominate the world, we need an evil plan. To take an epic photo, we need a legendary plan. So before starting the shoot, you have to open your Chakra circuits, Sharingan, Byakugan and take control of the next move.
What’s the concept!?
Do not blindly shoot and do Photoshop, know what you want first. Fire effect? Water bending? Throw in some lightning? Editing is not about randomly throwing in some effects, and pray for the best. It is ok to not have a solid idea. At least get some inspirations from reference pictures, at least know where you are headed… or you will end up with a WTF photo in the end.
Shoot in RAW
Yes, JPEG files do work, but they tend to lose a lot of details when you process them “too hard”. RAW is still the best file format to work with, and it retains a ton of data.
Get things right in the shoot
Don’t forget your photography skills as well! The more you get right in your original shot, the less you have to do in Photoshop to fix things. Spend 5 minutes to correct a pose or lighting, and not 5 hours in Photoshop to fix it.
The most important thing here is, do your shoot right. If you intend to blend your character against a different background in Photoshop, shoot against a green screen or clean background.
Not everything needs to be “Photoshopped”
It’s easy to say “just Photoshop that in”, “just fix that in Photoshop”, and “just add more unicorns with Photoshop”. But here’s the thing – not everything can be “Photoshopped”, and some things are still easier to do in real life. Take smoke for example. I used to think it is easy to Photoshop those in… but I was wrong.
To create realistic smoke in Photoshop, you will need to spend a lot of time thinking about the direction of the wind, brightness, and even color cast on the smoke. Yep, it is easier to plan and do “real-life effects” sometimes.
STEP 2
COOKING THE RAW
Now for my “secret sauce” to making cosplay photos great. For those who have not realized yet – I only use Photoshop, and there is no Lightroom involved. But this is ultimately a sharing of my own editing process, so please feel free to disagree with “Photoshop only”, and change parts of the flow to fit your own.
I always begin by cooking the photo in Photoshop Camera Raw. Assuming you shoot in RAW, that is. The goal here is to get your photo as good looking as possible, without burning it into crisp.
Move them sliders
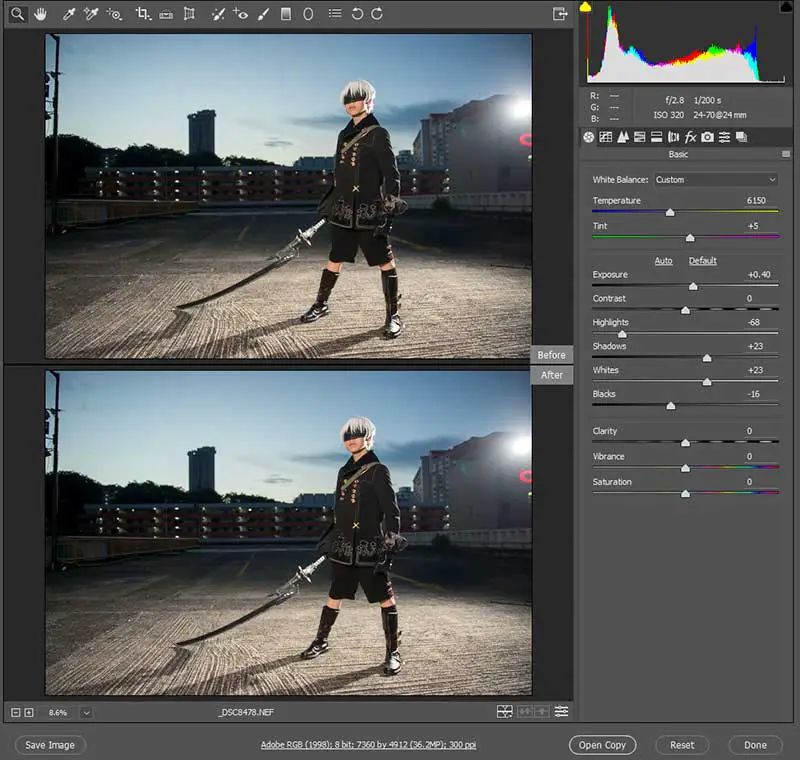
The first step starts with exposure correction, and the trick here is to not overly bump the saturation or correct the colors too much at this stage. Keep things as neutral as possible, so editing will be easier later.
Sharpen
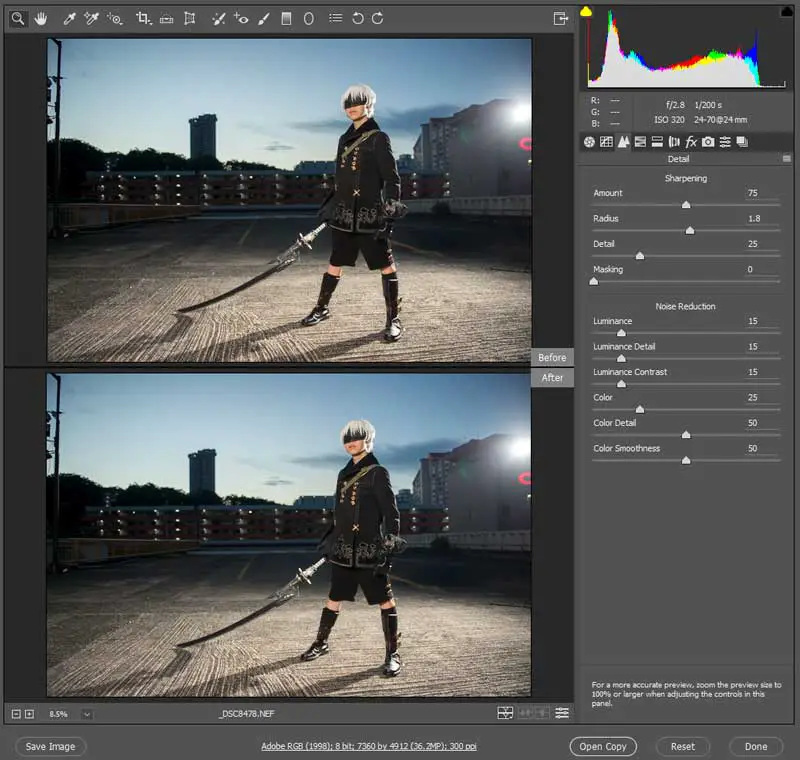
I am quite a sharpness freak. My usual settings for the sharpness tab :
- Sharpness: 75
- Radius: 1.4 (You can push this higher if your camera has more megapixels)
- Detail: 25
- Luminance, Luminance Detail, Luminance Contrast: 15
What about lens distortion?
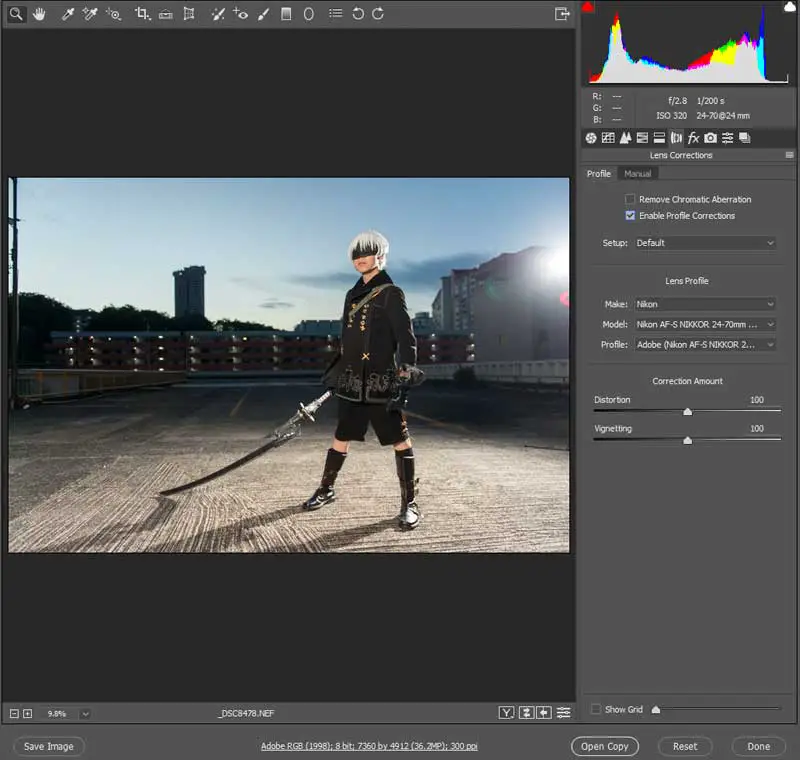
Lastly, depending on the lens you use, you might need to do some distortion correction. My usual Sigma 35mm / 24-70mm has negligible distortion, so I don’t bother with it. If you need to, just use the auto lens profile correction.
STEP 3
BODY TRANSFORMATION
This is the part that draws a lot of debate, and there will always be 2 schools of people on this – The ones that say photographers should use Photoshop to make people have that perfect “hourglass” figure… and those that say no.
Well, I leave it up to you to decide if this is the “right thing to do”, or to skip this part entirely.
Body Transformation
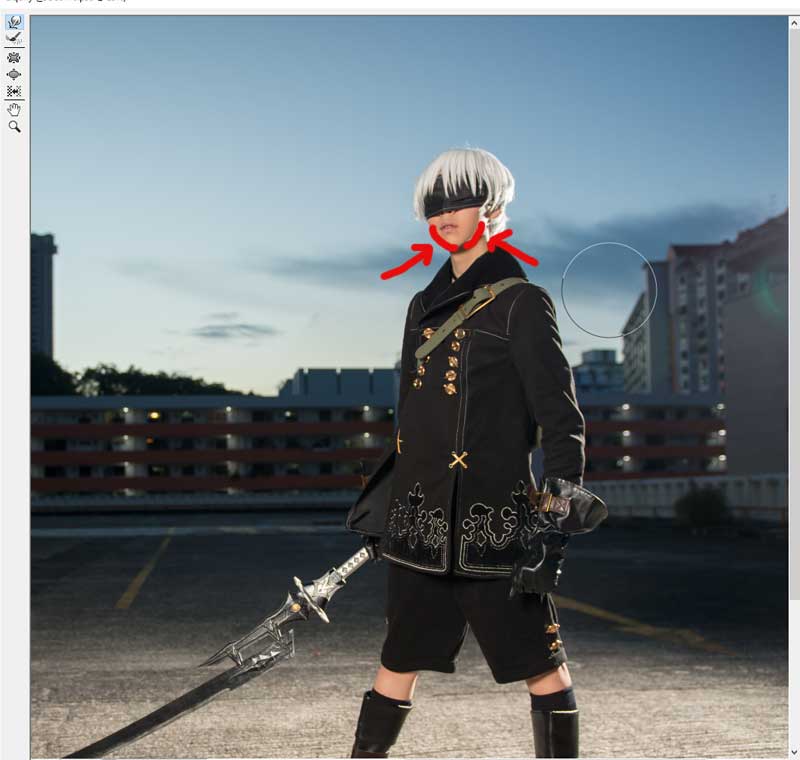
Should you decide to go ahead with this step, one simple trick is to shape the chin to make the face look a little sharper. But do remember not to overdo this.
Just make people look a little slimmer, taller and less flabby with the liquify tool. Don’t reduce that waistline to an impossible level, don’t enlarge boobs to look like Jackfruits, don’t be a perverted uncle (or auntie).
Baby Smooth Skin
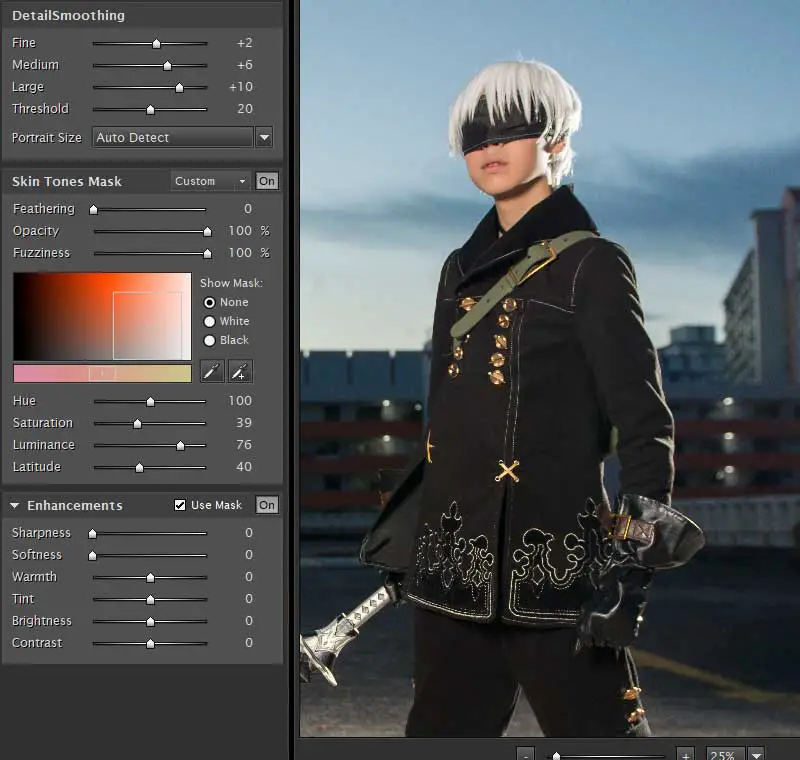
It is so very rare to have someone with perfect skin, and so we need some magic in Photoshop. Again, don’t overdo this and turn your talents into plastic dolls… especially not on guys. There is an easier way of using Photoshop plugins, which I will recommend Portraiture, but that is not a free plugin.
Otherwise, there are plenty of manual ways to do skin smoothing in Photoshop.
STEP 4
CHARACTER EXTRACTION
When you are happy with how your basic photo looks, it’s time for the heavy lifting Kamehameha… Well, that is if you intend to change the background. The basic idea of this step is to “remove” the background and later swap another one in.
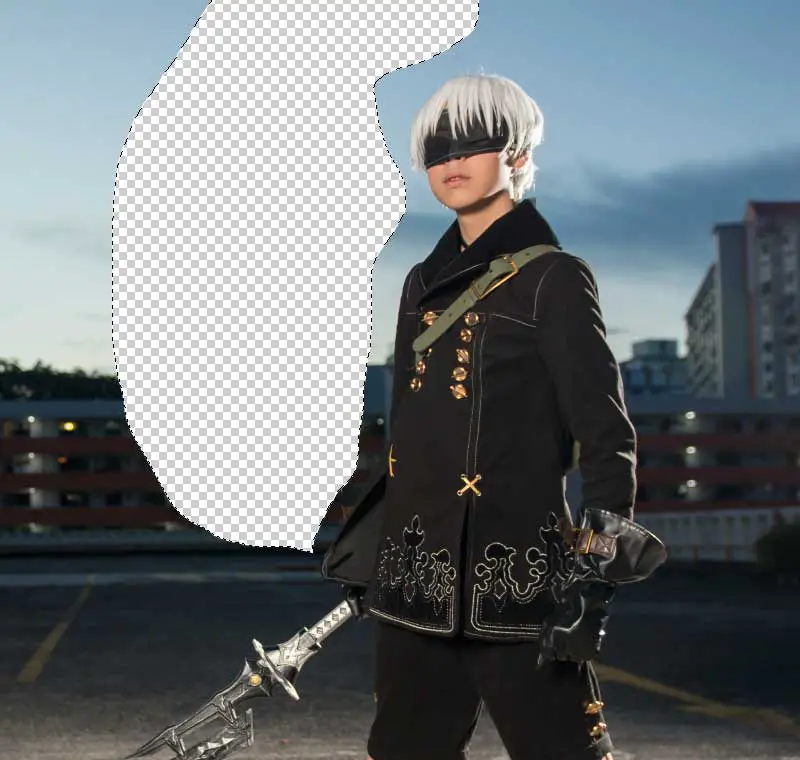
If you have a clean background, you should be able to extract the character fairly easily with the magic wand tool. If not, there are plenty of other ways to clean out the background – manual lasso, magnetic lasso, manual brush, etc… I am not going to go through all of them, but here’s one video tutorial:
STEP 5
BACKGROUND BLENDING
Now we have the background removed. What’s next? Replacing it with another background. This is the easiest and hardest part, depending on how much work you want to do.
Sure you can just slap a stock photo into the background and say “done”. But that is probably going to look bad… The last I remember, the title of this guide is “epic”, so much work there will be.
Insert the new background
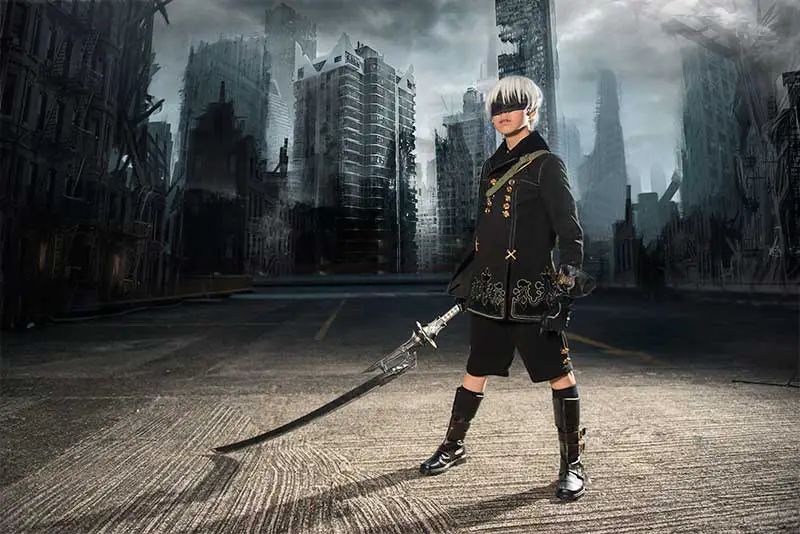
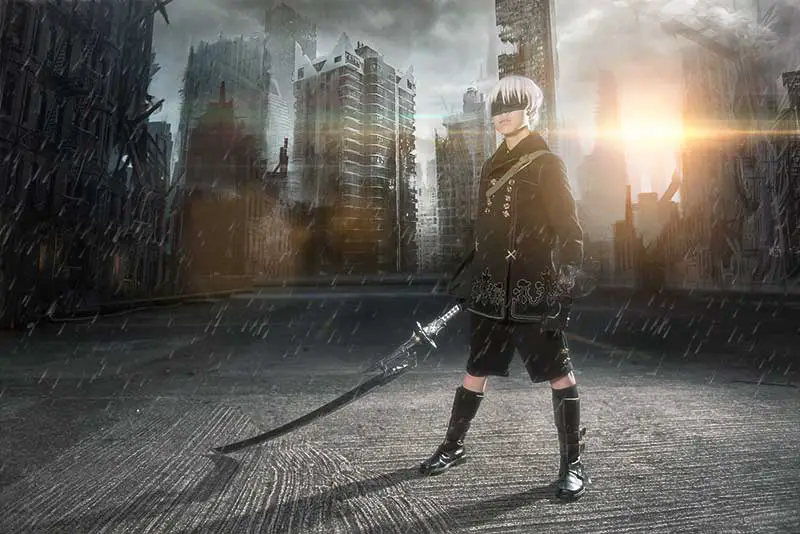
No rocket science required. Just paste the new background in. Hopefully, you have done your homework, because even before the shot, I already know what I wanted as the end result. You might need several stock photos to make a good background. Don’t be lazy. In my above photo, I have used 4 different stock photos to stack into the background.
Blending

Notice that the original city ruins the stock photo that I slapped in is cold (bluish), and my photo is warm (orange)? This is where most newbies fail. They just paste the extracted character onto a new background and done.
We just need to do a little more work to make things look realistic. Make sure that the character and background blend together nicely, and make sure that the lighting is accurate as possible. I did this with a few simple color balance, curves, and photo filter adjustment layers.
STEP 6
EFFECTS
Think we are done with editing? Hardly. This is the most exciting part – the effects and the finer details. Well, there are 99999 effects out there, and I really can’t put every one of them here. So just know that “wind, water, fire, earth, light, and darkness” goes into this step.
Dramatic lights

The original photo is too boring? My personal favorite is to add some dramatic cinematic light streaks… But don’t overdo it. Note the direction of the shadows cast as well.
Dramatic elements
Still too plain? Add more dramatic elements – Rain, sparks, smoke, fire, dust, the list is endless. Again, restrain from adding too much. Sometimes, less is more.
More Blending
Sometimes at this stage, you would have added way too much lighting, and need to reconsider the shadow plus color cast adjustments. Quite a pain, but necessary if you want to make epic edits.
STEP 7
COLOR GRADING
The final step, color grading. This really affects the “look-and-feel” of your final masterpiece. Just don’t be lazy, this can really give that extra “kick” when done right. Remember to clean up any awkward spots, and “finalize” the edit.
FINAL TOUCH

In this example, I chose to go with a rather desaturated, rain-in-the-warm-sunlight apocalyptic feel… which I think fits Nier Automata. A different feel could have been a greenish superhero movie. Point being, there’s no right-or-wrong. Test and see for yourself.
EXTRA
USEFUL BITS
That’s all for this guide, and here is a small section on some extras and links that may be useful to you.
SUMMARY – STEPS ON HOW TO EDIT COSPLAY PHOTOS
- Do your homework and plan your shoot.
- Recover the details and do some basic adjustments in Camera Raw.
- In Photoshop, use the liquify tool to make people look even better.
- Extract the character from the background.
- Replace the background and blend the character in.
- Add effects – Wind, water, fire, earth, etc…
- Clean up and color grade your photo.
- Put in your watermark, and all done!
USEFUL LINKS
- Photoshop Lady is a good website to learn all kinds of Photoshop effects.
- Check out this YouTube Channel for plenty of Photoshop Tutorials.
If not, check out a free editing app called GIMP.
CLOSING
WHAT NEXT?
I understand. It’s confusing, it’s overwhelming. I was a level 1 noob before too. Photoshop can take a lot of time to learn, and processing a single photo can take up to days. No joke.
So my advice to those who are seriously interested – don’t overwhelm yourself. When you don’t know what to do, you don’t see any result, it kills all the fun and you will just stop entirely. Don’t attempt to conquer all the steps at one time, and just take one step at a time:
- Learn how to do simple corrections in Photoshop Camera Raw first.
- Learn how to smooth skin, not make plastic dolls.
- Start playing with the puppet tool and liquify, make people look better.
- Play with Photoshop effects! Bend wind, water, fire and earth like an avatar.
- Learn extraction and change the background.
- Blend like a boss.
Practice makes perfect. If you are curious about where I learn all my Photoshop skills, it’s actually everywhere on the Internet over the years. Just have fun, keep going, and you will master it one day. Good luck and keep shooting!