INTRODUCTION
PANORAMA PHOTOGRAPHY IS NOT STARTED BY A HIPPIE
Welcome to a guide on how to shoot panorama photography. Before we start, I have an embarrassing confession to make. Know what? I used to think panorama as “pan-o-rama”, invented by some hippie photographer who wore an artist beret hat and panned the camera around to create a panoramic photo.
Well, I was wrong. Panorama is a Greek word, and it meant wide or “all sight” of that sorts. That is all to it, and panorama photography simply meant “very wide photography”. Now that you know the proper origins, it’s time to dive into the method itself.
NAVIGATION
TABLE OF CONTENTS

What You Need |

Step 1 |

Step 2 |

Step 3 |

Extra |

Closing |
WHAT YOU NEED
THE EQUIPMENT
To get started, all you need is a smartphone camera. But since we are going to do something more advanced in this guide, you will need some proper gear to do proper panorama photography.
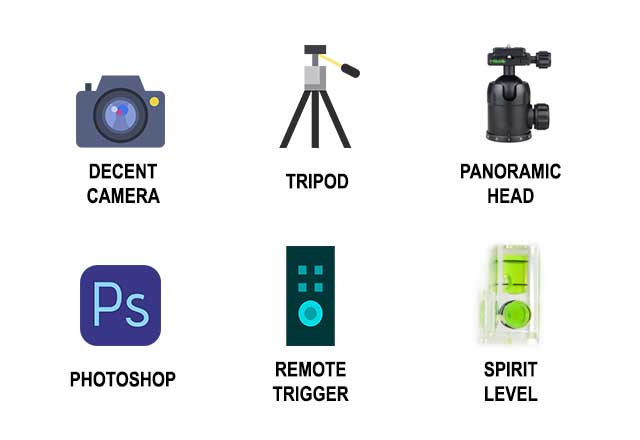
REQUIRED EQUIPMENT
- A decent camera
A DSLR or mirrorless camera. - A decent tripod
Although optional, I still highly recommend the use of a sturdy tripod. [Selens] offer decent tripods at an affordable price, if not, go for the old reliable [Manfrotto]. - Panoramic pan head
These are not your “normal” tripod heads, but one that allows you to pan the camera on the tripod. [Get one from eBay] - A copy of Photoshop
You will need Photoshop to stitch the Panorama together. If you do not already have a copy, click on the banner below to get an offer.
DON’T HAVE PHOTOSHOP? HERE ARE A FEW ALTERNATIVES
No Photoshop? No problem. There are free alternatives out there that can do the same photo editing.
- There is an independent application called Hugin that does a pretty good job of making panorama photos.
- Otherwise, I will recommend GIMP, a free alternative that is on the “Photoshop” level. You will also need the Panorama plugin for GIMP.
RECOMMENDED EQUIPMENT
- Remote shutter release
To reduce camera shake. [Nikon] [Canon] [Sony] - Bubble spirit level
These simple gadgets can save you from unwanted slanted horizons. If you are too lazy to fumble around to get the camera’s virtual horizon. [Bubble spirit level]
STEP 1
SETUP AND COMPOSITION
Every masterpiece begins with a plan, and so it is the same with panoramic photography. The first step is not so much of an action, but rather, using your brains and eyes to visualize the final photo.
THE BASIC IDEA – STITCHING
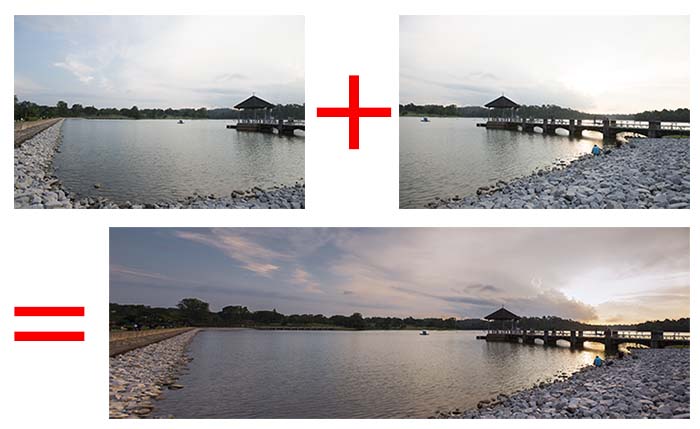
Just what is stitching? It is an old school method that involves panning the camera around and taking a bunch of photos. We then combine these photos together in Photoshop (or alternative free applications) to make one panoramic photo.
If you find this somewhat familiar, yes, the “panoramic sweep” feature in smartphones these days automatically does stitching on-the-fly. Strangely though, this feature is not adopted in professional cameras, and thus, we have to do it semi-manually in Photoshop.
START WITH THE COMPOSITION
A panoramic photo does not mean that composition rules do not apply anymore. Keep a good eye open for shoot opportunities, and there is are plenty to think about – Symmetry? Reflections? Patterns? Interesting objects? Striking colors?
This is essentially the same composition thought process as any other photo. Except that since the photo is longer than the usual 35mm frame, you need to decide where is the “starting point” of your panorama is and where to “end” it.
PORTRAIT OR LANDSCAPE ORIENTATION – WHICH IS BETTER?
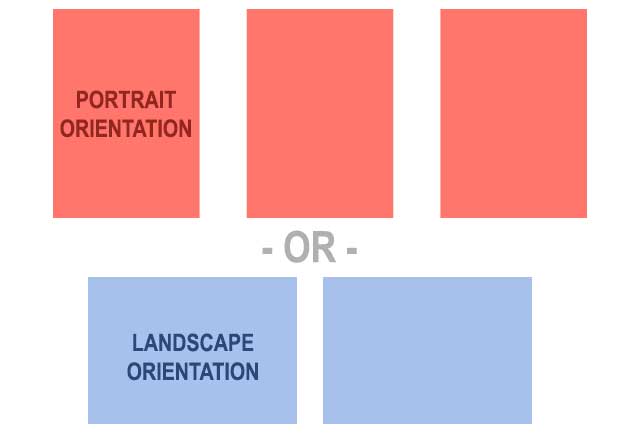
After you are done with the composition, the next million dollar question is to frame it in landscape or portrait. Instinctively, some of you guys who are used to the smartphone sweep will say that landscape orientation is the way to go.
That is not wrong, but portrait orientation is a much better choice. Why? Because the portrait orientation will include more vertical space, and give us more room to crop and play around in Photoshop later.
NINJA MOVES

Lastly, you need to decide on which ninja move to take. Most of you guys probably already know that you need to “pan the camera”, but there are actually a couple of different ways that you can move the camera around to take panorama pictures.
- Pan the camera on a fixed spot.
- Pan the camera around a fixed spot.
- Trucking the camera, or more commonly known as side-stepping.
Tripod users, you are stuck to panning, unless you are using one of those rails for movie production… or you can ask your friend to push you on a trolley. 😆 But technically speaking, trucking the camera will give you the least distortion. There really is no right-or-wrong to using each method, just try out and see which one works for you.
STEP 2
TAKING THE SHOTS
Panorama photography is not about taking a random bunch of photos and praying for the best. There is a certain process to it, and here the few things that you need to take extra care of.
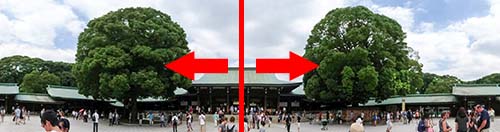
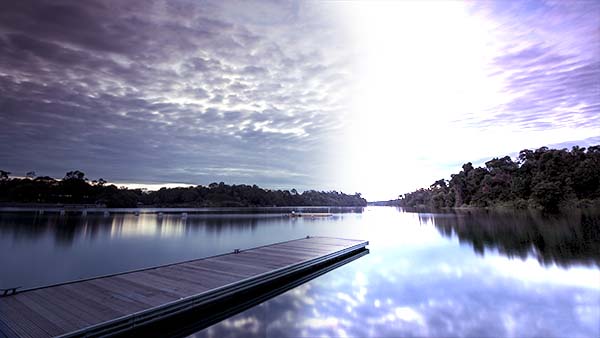
SHOOT IN MANUAL MODE
Make sure that you are shooting in full manual. Why must we use manual? The problem with automatic while taking multiple photos is that settings are going to change as you pan around. If the scene is bright on one side, and dark on the other end, you will end up with an unbalanced exposure like this:
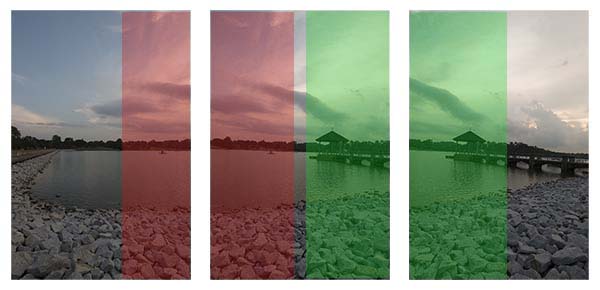
AVERAGE OUT THE EXPOSURE
If you are unsure about the exposure settings, you can use the in-camera metering to help you.
- Keep the ISO as low as possible.
- Switch to the aperture priority mode, I usually set mine between f/8 to f/11 for landscape.
- Pan the camera around and take note of the shutter speed.
- Average out the shutter speed, for example, the slowest is 1/100 sec, and the highest is 1/200 sec. We should be using an average shutter speed of about 1/160 sec.
- Switch to manual mode, and dial everything back in – ISO, aperture, and average shutter speed.
People who are not using the tripod, you will want to keep the shutter speed comfortably fast to reduce camera shake. Boost the ISO a little or use a wider aperture if you must.
OVERLAP THOSE PHOTOS
Start with taking the left-most frame, and work the way towards the right. Make sure that there is sufficient overlap in between each frame, or you will have trouble stitching them together later in Photoshop.
I will recommend at least a 1/4 crossover in between each frame. But to be on the safe side, I usually have a crossover of 1/3 to even 1/2 the frame. Will it work if you went from the right to left instead? I have not tried before, but it probably will still stitch together in Photoshop with no problems.
STEP 3
STITCHING WITH PHOTOSHOP
The final part of the process is to combine all the photos together to make a panorama; This is what we call “stitching”. Sorry to the folks who don’t have Photoshop, this section will only cover stitching with Photoshop.
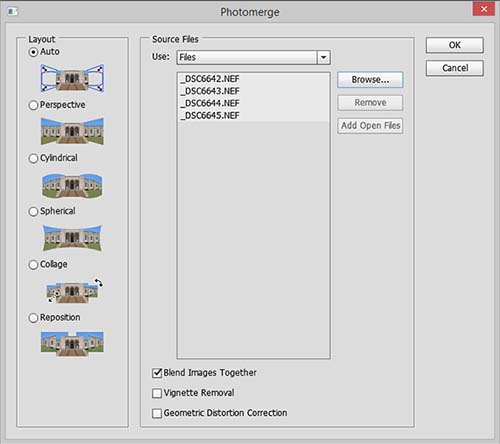
GOTTA MERGE THEM ALL
- File > Automate > Photomerge > Browse and select the files.
- I usually leave the layout to “auto”, and it seems to do a pretty good job. If things turn out looking a little strange, you can always change the layout.
- Check the Vignette Removal and Geometric Correction if you must, but I usually leave them off.
- The merging part is pretty resource intensive. It will take some time, depending on how much processing power your PC has.
CUT IT, CROP IT
When Photoshop is done, a “broken looking” photo will be generated.
- Save this image as a PSD file first, the following process will be pretty destructive.
- Merge all the layers (select all layers > Layers > Merge Layers)
- Crop to an acceptable frame and try to straighten the horizon (it is OK to have some “empty spots”)

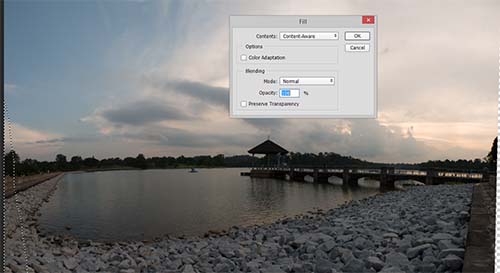
FILL IN THE BLANKS
- Use the lasso tool to select the “empty spots” or “places that feel wrong”, content aware fill (Edit > Fill > Make sure it is Contents: Content Aware)
- Clean up the image, remove dust spots using the spot healing brush.
MAKE IT LOOK PRETTY
- Filter > Camera Raw > Do your own adjustments
- We are done! Save this as a different file if you want… or you will need to re-merge all the files again.
- Add more adjustment layers and your own editing if you want.

EXTRA
PANORAMA PHOTO TIPS
For this section of the guide, we will be going through some of the stuff to take extra care of during the shoot, and stuff that will help you take better photos.
BACKGROUND MOVEMENTS
Watch out for movements before you take the pictures. A rapidly changing and moving background can be very difficult to stitch together later, and you might get some parts that will not “gel” together nicely. Avoid multiple fast moving subjects, for example, a busy street with people and vehicles.
LEVELING AND HORIZON
Whether you are using the tripod or not, watch out for the horizon by panning the camera around first. Don’t just shoot blindly and return home with a slanted horizon. A horrible mistake to make.
REMOVE UNNECESSARY FILTERS
Remove all unnecessary filters that may cause vignetting. They can be a pain to clean up in Photoshop. If you want to use filters, I will recommend using rectangular one. They are slightly more expensive, but they do not introduce as much vignetting as circular filters do.
TAKE MULTIPLE SHOTS
Don’t just shoot “one set” of pictures. After you are done with the first set of panorama photos, reset back and try a slightly different setting. It’s the digital age. No harm taking more spare photos, and no worries about how much film is left.
SHOOT IN RAW
Always shoot in RAW. They contain a lot more data than JPG and are very useful for editing/stitching. Also with RAW files, you don’t have to worry about the white balance – They can be easily adjusted in Photoshop without any loss of quality.
MIRROR UP
The final tip I can give on the settings for DSLR users – Shoot in the mirror lock-up mode, hands off the camera and use a remote trigger. That will give you tack sharp photos.
CLOSING
GO OUT AND SHOOT!
Congratulations, you have finished reading this long guide and give yourself a pat on the back. I have imparted my ninja knowledge to you, and there is only one last thing you need to do – Go out there and try to shoot some panorama photos. Nothing beats the actual practice.
If you have any questions, feel free to drop them in the comments section below. Have fun, and keep shooting!