INTRODUCTION
USEFUL BUT LESS KNOWN FEATURE
Welcome to a beginner’s guide on exposure bracketing, and congratulations, you have stumbled on one of the “underrated parts” in photography. Yep, bracketing is actually a very useful technique, but yet, it is not that widely known to many beginners. Just what does it do, and how does it help to improve photography? Read on to find out!
NAVIGATION
TABLE OF CONTENTS

Section A |

Section B |

Section C |

Closing |
SECTION A
WHAT IS BRACKETING?
In the layman terms, bracketing is simply a technique in photography that takes many shots of a single subject or scene, but with different settings. The various shots are then combined together in an editing application such as Photoshop.
WHAT IS BRACKETING USED FOR?
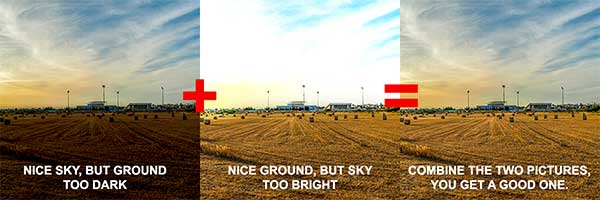
Still confused about what bracketing is all about and what it is used for? Let us walk through an actual example here to better explain it – One of the common problems that most beginners face is actually trying to get the correct level of exposure. It can be very challenging if the sky of a scene is very bright, and the ground is dark.
- When we try to take a shot, the sky is too bright.
- After some adjustments, we bring the sky back but the ground becomes too dark.
So here comes photo editing to the rescue, we combine the 2 shots together – Take the good sky from one photo, combine it with the good ground from the other. A happy ending.
- This process of taking many shots of the same scene, but with different exposure settings is called bracketing.
- The process of combining many photographs together is called stacking.
STACKING IS A DIGITAL TECHNIQUE
For you guys who are into film and vintage photography, so sorry that stacking is not really possible… Unless you have some ways to double expose a film, or combine them with some crazy science experiment.
Yep, stacking is pretty much a “digital-only” technique. However, there are still creative ways to mess around with the exposure, such as using an ND filter or using the black card technique.
THE VARIOUS KINDS OF BRACKETING
Now that you guys have an idea of what bracketing is, it is not just reserved for exposure settings. Here are the few kinds of bracketing in photography:
- Exposure bracketing
As with the example that we have gone through, taking photos with different exposure values. - Focus bracketing
This is more used in macro photography, where it is impossible to get a totally sharp photo from front to back in a single shot – We take photos with different focus points, and “focus stack” them in Photoshop. - White balance bracketing
A rather odd kind of bracketing, taking pictures with various white balance settings. This is not really popular as digital RAW files these days contain a lot of data, and we can easily tweak the white balance settings in photo editing software.
SECTION B
HOW TO DO BRACKETING
When we mention bracketing, it usually refers to exposure bracketing, and that is what we are going to explore in this section. As focus bracketing is kind of an entirely different ball game, I will just leave a link in the extras section below.
STEP 1) COMPOSITION & USE A TRIPOD IF POSSIBLE
Captain Obvious step number 1, frame and compose your shot… But I will recommend using a tripod with bracketing. The key to getting good bracketed shots is to fix the frame and have as little movement as possible; If the scene is rapidly changing, we will have trouble combining them together in Photoshop later.
P.S. We can also do bracketing hand-held, just make sure to take the multiple shots quickly, with as little motion as possible.
STEP 2) CAMERA SETTINGS – TURN ON BRACKETING
After you have composed the shot and set the camera on the tripod, it is time to dial in the exposure settings – It does not really matter if you use the auto or manual mode.
- Exposure settings – As usual, just set the aperture, shutter speed, and ISO. Use the auto mode and let the camera decide if you are not confident… Most of the time, I personally just use the aperture priority mode for convenience.
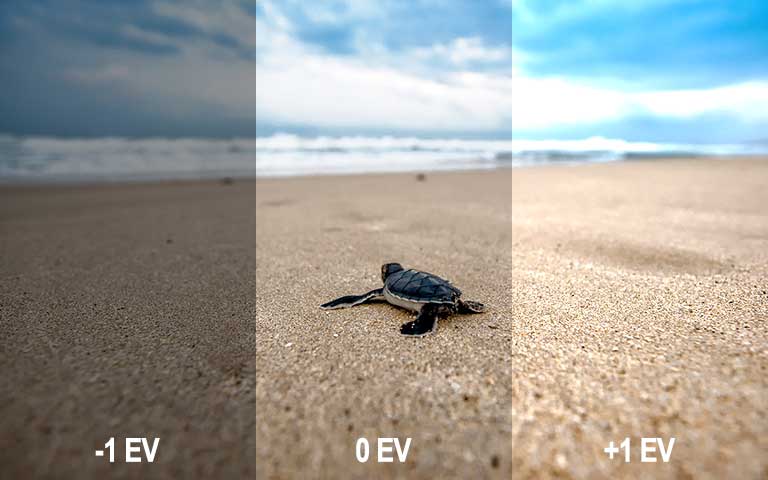
- Switch on exposure bracketing – As this is different for every camera, please check your camera’s manual instead. Take note that we can configure the number of bracketed shots. For example, a set of 3 bracketed shots. The first shot will be at your set “base exposure”, second at +1 EV, and lastly -1 EV. We can also set 5 shots from -2 EV to +2 EV, or even 0 to 5 EV. 3-5 shots should be good enough in most cases.
- Continuous (burst) shoot mode – This is optional, but I will also recommend switching it on – Remember that less motion means better result?
STEP 3) TAKE THE BRACKETING SHOTS
Well, just snap away! But just keep track of the bracketed shots… You do not want to take 2 out of 3 shots and miss out on the last one.
STEP 4) COMBINING THE SHOTS
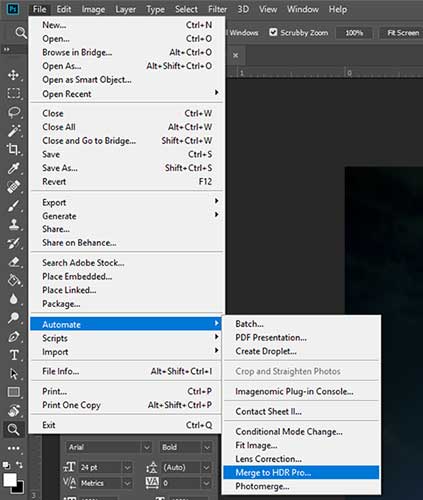
The final step of the process involves the use of photo editing software to combine the photos together. In Photoshop, that will be File > Automate > Merge to HDR Pro > Select all the photos > Tweak the settings. That’s all to exposure bracket, not really that difficult, but just a few more steps.
EXTRA) MANUAL BRACKETING
What happens if your camera does not have the exposure bracketing feature? Don’t worry, it is still possible to do bracketing manually. Not much of a difference, except a little bit more of a hassle:
- Do the exposure settings, as usual, then take the “base shot”.
- Turn the exposure compensation to -1 EV, take another shot.
- Finally, turn the exposure compensation to +1, take the final shot.
Of course, you can always take more shots if you want.
EXTRA) BRACKETING WITH FLASH
Next common question, can we do bracketing with a flash? Of course, we can. There really isn’t much of a difference in the process, except that we will have to factor the flash into the equation as well. That is, there is a “recycle time” and “power setting” on the flash.
- Don’t use burst mode with the flash… Not unless you have a million-dollar flash that can fire continuously without pause.
- I will recommend putting the flash onto manual mode – So that it will be consistent and not try to compensate when the camera does exposure bracketing.
SECTION C
USEFUL BITS
That’s it for this guide, and here are a few more links and tutorials that may be useful to you.
YOUTUBE TUTORIAL
Too much text to read? Here is a YouTube tutorial video:
FOCUS BRACKETING
As promised, here is focus bracketing:
LINKS & REFERENCES
- What is Exposure Bracketing? – How-To Geek
- Exposure Bracketing: What It Is and How to Do It – Fstoppers
- Bracketing and How To Use It Correctly – Picture Correct
CLOSING
SHOOT ON!
Thank you for reading, and we have come to the end of the tutorial. Hopefully, it has helped you to understand more about bracketing. But remember, bracketing is not all about spamming a ton of shots to get a winning shot. It is about properly planning the composition and stack beforehand. The best way to learn is to go out there and shoot.
If you have anything to add to this guide, please feel free to comment below. Good luck and happy shooting!