INTRODUCTION
THE MIND-BOGGLING QUESTIONS
Welcome to a guide and tips on how to reduce noise in photos. So just what is noise? We hear a lot about it in digital photography, but just what does it mean? Why is it bad? Why don’t we have this problem when using film? How do we prevent and reduce noise then? This guide will explain all these mysteries – Read on to find out!
NAVIGATION
TABLE OF CONTENTS

Section A |

Section B |

Section C |

Closing |
SECTION A
WHAT IS ISO & NOISE?
First, let us start with a section on the basics for the beginner photo ninjas – What is ISO, and why noise a problem in digital photography. If you are already an advance photo ninja, feel free to skip this section.
WHAT IS ISO?
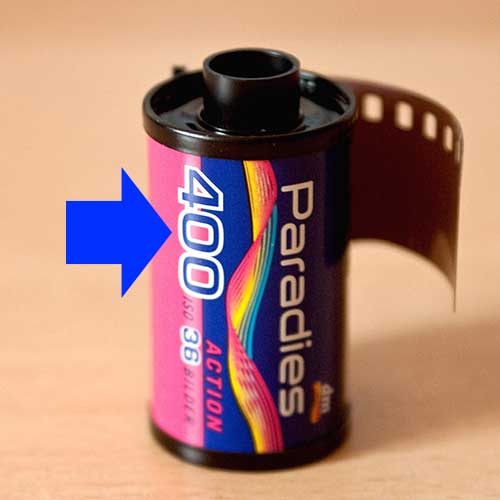
Once upon a time in the Iron Age of photography, there were no memory cards nor digital cameras. How did photography work then? Cameras were mostly mechanical, and photos were taken by exposing a piece of film to light. As the film is sensitive to light, an image will be “burnt” onto it… These rolls of film will later be processed in a dark room, and out comes the photos.
Now for the mystery of ISO. Yes, we are referring to the International Organization for Standardization. Every roll of film is graded according to how sensitive it is to light, and thus called the ISO film speed – The higher the ISO film speed is, the more sensitive the roll of film is. That is, for example, a photographer will use a roll of ISO 100 film in broad daylight and ISO 800 while shooting indoors.
Today, we no longer use film, but “ISO film speed” still lives on as a digital equivalent. In layman terms, the higher we set the ISO number, the more sensitive we set the electronic light sensor to be; Setting a higher ISO will help to get a brighter photo, it will help to shoot better photos in dark places.
Most modern digital cameras these days usually come with the lowest possible ISO of about 100 to 200, and this is called the base ISO. Similarly, there is also a maximum ISO, which can go up to an insane ISO 102400 for some professional cameras.
RELATION BETWEEN ISO AND NOISE
A higher ISO will help us to take brighter photos in dark places, but there is also a catch to it. Digital cameras are not like a physical film by any means… A film with a higher ISO number only means “more sensitive to light”, the final photo will still be “as it is captured”.
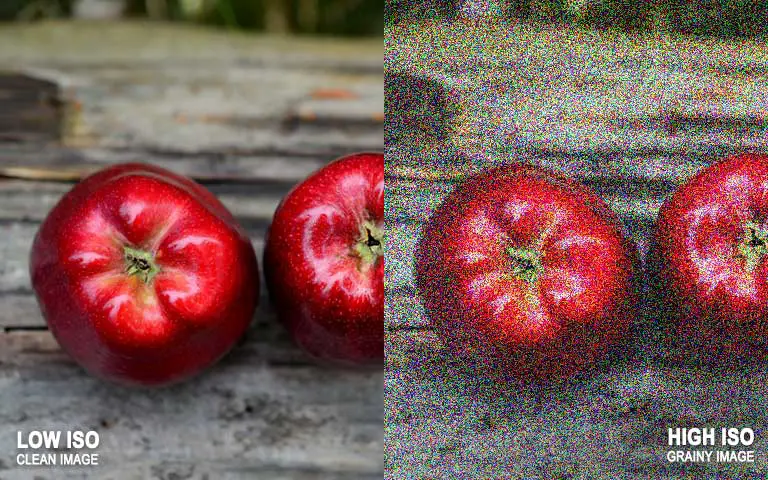
But when it comes to digital cameras, raising the ISO also means adjusting the sensitivity of the electronic sensor. This is where the digital world falls short. At higher ISO, sensors also tend to pick up more electronic noise, producing grainy images.
Now that you know – Always consider this trade-off before bumping the ISO unnecessarily and pushing it beyond the camera’s limits. Naturally, not all digital cameras are built the same, and some are better than the others. Professional cameras generally have better sensors that produce better image quality and are more “resistant” to noise when pushed to higher ISO.
WHAT IS NOISE? WHAT CAUSES IT?

Just as with the above examples, noise is that “unwanted grainy stuff” that appears on photos when we push the ISO way too much. As you might already know, electronic sensors turn light into electronic signals. But whenever there are fluctuations in those electronic signals, they will appear as “speckles” in the photo. There are a few ways in which noise can occur:
- Technical limitations and build quality of the sensor.
- Electronic circuits of the camera adding noise to the photo.
- Overheating of the sensor and electronic circuits as you push the ISO.
So yes, there is still noise even when we use the lowest possible ISO in a digital camera, but it is only kept at a bare minimum.
NOISE VS SENSOR SIZE
Every electronic sensor is made up of a massive array of tiny light sensors called “photosites”. For example, a 20-megapixel camera is going to have a sensor that has about 20 million photosites. Yep, technology is that crazy, and each photosite will eventually turn into a “pixel” on your digital photo. Generally and technically speaking, the size of the sensor and photosites will correspond directly to the image quality:
- The bigger the sensor is, the bigger the photosites are, the better the image quality.
- Bigger sensors naturally get more area and more light…
- The smaller the sensors are, the smaller the photosites, the more noise the photos get.
For example, we have a 20-megapixels smartphone and 20-megapixels full-frame camera. The full-frame camera will definitely perform much better in the dark since the sensor size is a few times bigger than the tiny little smartphone.
So now you know – Megapixels are not everything in the world of photography. The sensor, electronics, and image processor within the camera make all the differences.
SECTION B
NOISE PREVENTION
So far so good? Noise is icky in digital photography, so in this section, we will walk through a few ways to prevent and reduce noise.
1) USE A LOWER ISO
Even though the performance of cameras these days are pretty good (even for smartphones), that does not mean we should abuse the ISO. As mentioned above, the higher the ISO, the more noise the image will get. So the best solution is to keep the ISO as low as possible when shooting.
To keep a lower ISO, we can try to use a wider aperture, a slower shutter speed, and deploy a tripod if required. Keep in mind that image noise is difficult to totally remove even with “advanced editing techniques” these days. Always keep the ISO bump as the last resort, after you have tried shifting all the other settings around.
2) SHOOT AT SOMEWHERE WITH BETTER LIGHTING
Light is the photographer’s best friend when it comes to reducing noise, simply because it brightens the scene up and allows us to use a lower ISO. So by simply introducing a flash, LED light, fluorescent light, or moving to a well-lit area, you are helping yourself to take a better photo.
However, adding artificial light to the scene can be tricky at times. If the light source is brighter than the surrounding, we will get a blown-out subject and dark surroundings. If the light source is too weak, it will not help a lot – It is all about balance.
3) SHOOT IN THE RAW FILE FORMAT
If your camera supports the RAW file format, then you should definitely use it. Some beginners seem to be daunted by the “RAW file” thing, by how post-processing is required on RAW files – It really isn’t such a big deal. If you are still puzzled over which file format to use, then set your camera to shoot in RAW + JPG. The reason behind why I avoid shooting in JPG files is because they are what we call “lossy” files.
Compression techniques are used on JPG files which adds some noise and reduces the overall image quality. RAW files are superior on the other hand because they contain a lot more information than the JPG files; RAW files are a lot more suitable for editing, we can bump the exposure and brightness without losing too much image quality, and without introducing a lot of extra noise.
4) SWITCH ON THE CAMERA’S BUILT-IN NOISE REDUCTION
In most good cameras, there is a function called “High ISO Noise Reduction” or “Long Exposure Noise Reduction”. When we switch these options on, the camera will analyze the photos as we take a shot and attempt to reduce the noise.
- For Nikon cameras – Both options are under the shooting menu as “Noise Reduction” and “Long Exposure NR”.
- For Canon cameras – The options are also under the shooting menu as “High ISO speed NR” and “Long exp. noise reduction”.
- For Sony cameras – Similar to Nikon cameras, the options are under the shooting menu, “Long Exposure NR” and “High ISO NR”.
However, please take note that the noise reduction is far from perfect. While it does help to reduce some noise, the process is still based on software. If we switch it on, the camera will take a little longer to process and “clean up” the images after taking the shot.
Also, the more we push the noise reduction (set the noise reduction to high), the softer the image tends to become. This is why some photographers prefer to switch it off instead and do their own correction in Photoshop or Lightroom.
5) GET A BETTER CAMERA AND LENS
This is probably the easiest, the most obvious, and most difficult solution. Get a newer high-end camera that has better performance. Although expensive, newer cameras (almost) always have a better performing sensor that requires less light and generates less noise.
Remember that a larger sensor usually means better performance? Go for the full-frame cameras if you really want a good camera that can shoot well in the dark… If you have a lot of extra money to splurge, get yourself a medium format.
As for the lenses, pick a wide-aperture lens. They have larger openings that allow more light into the camera and thus allow us to use a lower ISO. Sadly, wide-aperture lenses usually cost more, but thankfully, there are always the cheap-and-good 50mm prime lenses.
6) REDUCE NOISE LEVELS IN PHOTOSHOP
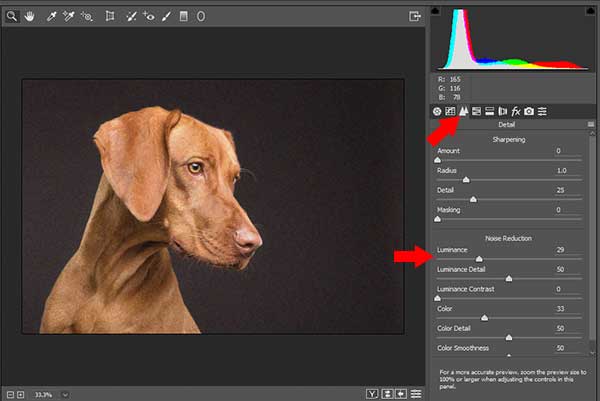
Not all hope is lost after you have taken a noisy image. If you use the RAW file format as I have recommended earlier, you should be able to fix it to a certain degree in post-processing. When you open the RAW file in Photoshop or Lightroom, Camera Raw should launch.
On the right side, there should be a “details” tab, and under it, the noise reduction sliders. There are 6 sliders that you can play with, and while it looks complicated, we are really only dealing with 2 types of noise here – Luminance and color.
- Luminance
This reduces the luminance noise which comes from over-exposed and/or underexposed pixels. Luminance noise is more commonly seen in long exposures. - Luminance Detail
Sets the threshold of the luminance noise reduction. A higher value will preserve more details but produces noisier results, while a lower value produces cleaner results but removes the details. - Luminance Contrast
This will control the luminance contrast. A higher value will preserve the contrast but can produce blotches. A lower value will produce smoother results but can make the image look “dry and flat”. - Color
This reduces the color noise which happens more in the underexposed regions of an image. - Color Detail
Sets the threshold of color noise reduction. A higher value will attempt to retain the color information, but results in color speckles. Lower values will remove the color speckles but may result in color bleeding. - Color Smoothness
This will attempt to smooth out the colors in the image, especially good if the above corrections result in some weird spots of colors.
EXTRA) REDUCING NOISE WITH FILTER
What if the photo is in the JPEG format? Don’t sweat, here’s a YouTube tutorial that will walk through noise reduction using a filter.
SECTION C
USEFUL BITS
That’s all for the guide, and here is a small section on some extras and links that may be useful to you.
LINKS & REFERENCES
- How to Avoid and Reduce Noise in Your Images – Digital Photography School
- 5 Great Ways to Reduce Noise in Your Photos – Improve Photography
- 8 Ways to Reduce Noise in Your Photographs – Light Stalking
CLOSING
WHAT’S NEXT?
Thank you for reading, and we have come to the end of this guide. I hope it has helped you to better understand noise and take better photos in the future. There are no fixed “magic settings” nor “magic post-process” that will make noise disappear into thin air.
But stick with the basics of keeping a low ISO, use better lighting, and you will do just fine. If you want to share anything with this guide, please feel free to comment below. Now go try out the new techniques, happy shooting!