INTRODUCTION
EXPOSURE TRIANGLE, NOT A CONSPIRACY.
Welcome to a beginner’s guide on the exposure triangle in photography. I understand, some people can’t wait to snap away with their new camera – But just can’t seem to get it right with photos that are either too bright or too dark. That was how I was as a beginner too, and I figured that learning some of the basics is necessary for better photos.
I then looked at the many online tutorials and “how to control the exposure triangle” was the very first thing to pop out. Yes, it sounds like some kind of a conspiracy theory thing at first, but it is about balancing between 3 basics settings – Aperture, shutter speed, and ISO; Master this triangle, and you will turn into a legit photo ninja. Just how does the exposure triangle work? Read on to find out!
NAVIGATION
TABLE OF CONTENTS

Section A |

Section B |
Section C |

Section D |

Section E |

Section F |

Closing |
SECTION A
THE BASICS
What in the world is exposure? What about aperture, shutter speed, and ISO? Why the heck is this triangle so important? Take it easy, and let us walk through all these step-by-step.
WHAT DOES EXPOSURE MEAN?
In photography, exposure is the amount of light which reaches your camera sensor or film. It is a crucial part of how bright or dark your pictures appear.
Yep, this one should be straightforward and easy to understand. It is just a more technical way of saying “take a photo”.
OVER & UNDER EXPOSED
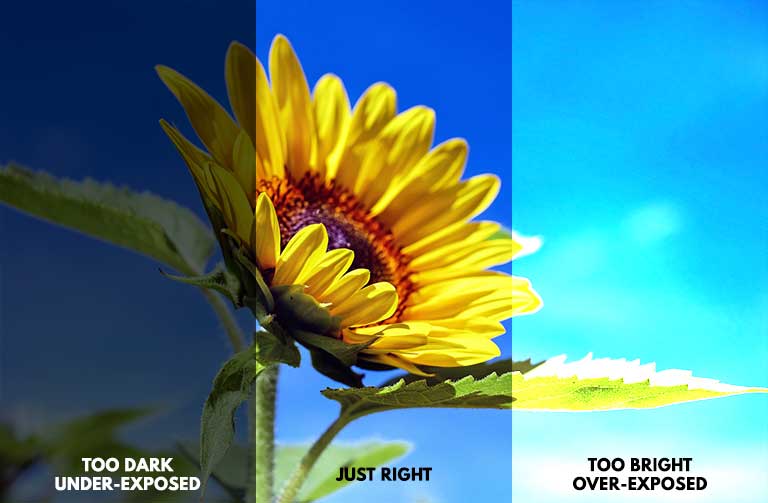
- When a photo is too dark – We call it “under-exposed”. Meaning, the camera’s sensor did not get enough light.
- Vice-versa, when the photo is too bright – We call it “over-exposed”. Meaning, the sensor received too much light, and the photo gets blown-out.
- Just right is… just right. Or what we also call “well-exposed”.
WHAT IS THE EXPOSURE TRIANGLE THEN?
The exposure triangle is where one exposes the evil plans of 3 different organizations to take over the world… NOT! As above, “exposure” simply means “to take a photo”. But how the photo turns out will depend on 3 different settings:
- Aperture – How much light we let into the camera.
- Shutter Speed – How long to expose the sensor.
- ISO – How sensitive the sensor is set to.
Just how can we control each of these settings? Let go through them below.
SECTION B
APERTURE
We shall now dive into the first setting called aperture… No need to be intimidated by this technical term, it is actually something fairly simple.
WHAT IS APERTURE?
Aperture, noun. An opening or open space : HOLE
Yes, the dictionary has described aperture perfectly. It is nothing but that hole in the middle of the lens:
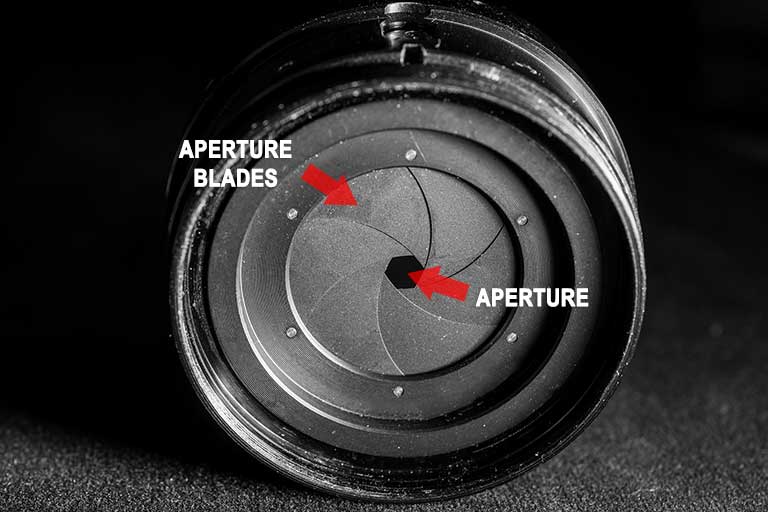
But you should also have noticed those blades thing around it. Those are called aperture blades, and they open/close to certain sizes. What this does, is to control the amount of light going into the camera.
F-STOP OR F-NUMBER
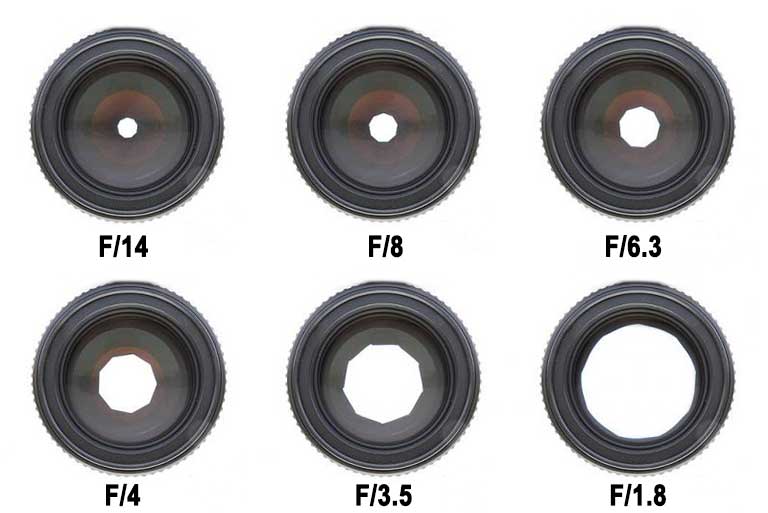
Yes, those aperture blades don’t just open to random diameters. We use a standardized unit called f-stop or f-number. E.g. f/1.8, f/2.8, f/8, f/22.
- The smaller the f-number, the wider open it is.
- The bigger the f-number, the narrower it is.
For you science buffs, the formula goes like this F-number = Focal length / diameter. I shall leave a link to Wikipedia in the extras section below if you are interested to read more.
DEPTH OF FIELD
It is Captain Obvious that as the aperture blades open up, we enlarge the aperture and let more light into the camera; As we close the aperture blades, less light goes in. The smart photo ninjas may be thinking “Oh, why all the trouble? Let us just set it wide-open all the time, so that we can shoot better in dark places with more light”.
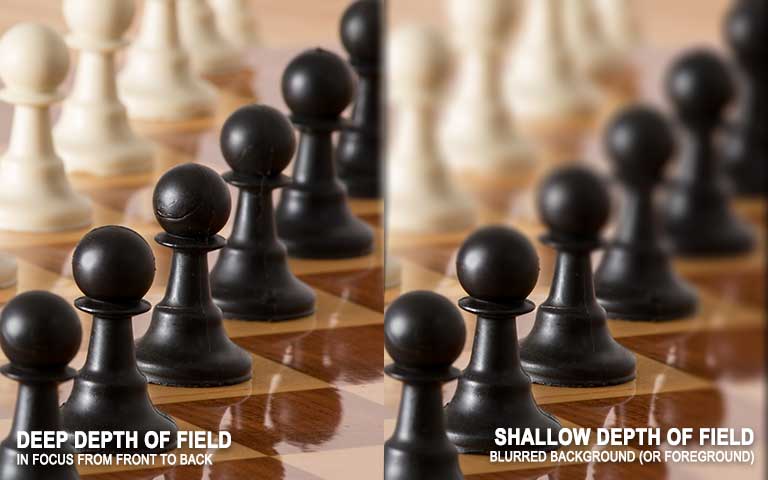
Well, that line of thought is partially correct, but there is also another “side-effect” to changing the aperture – The depth of field also changes. From the above example, you should already know what “depth of field” means.
- The smaller the f-number, the thinner the depth of field it is (blurred background).
- The bigger the f-number, the deeper the depth of field it is (sharp background).
So now that you know, if you don’t want a blurred background, close down on that aperture.
SECTION C
SHUTTER SPEED
The next setting we have is called shutter speed. This is much easier to understand than aperture, and some of you sharp ninjas should have already figure out just from the name itself.
WHAT IS SHUTTER SPEED?
Shutter speed is how long an image is exposed to light — it can be milliseconds, or even minutes.
There, self-explanatory. Following up from the above, aperture is “how much light”, shutter speed in “how long to expose”.
THE EFFECTS OF SHUTTER SPEED

This is kind of common sense too, but here goes:
- Fast shutter speed will “freeze frame“. Good for capturing fast-moving subjects.
- Slow shutter speed usually ends up with motion blur. Good for creative shots, such as following a moving subject to create background motion blur.
SECTION D
ISO FILM SPEED
Onto the last element, ISO Film Speed. Some of you guys are probably confused now. What has the International Organization for Standardization got to do with this, and how is film speed related to digital photography? Well, there’s a bit of history to it.
WHAT IS ISO?
Once upon a time, cameras use rolls of film to take photos (not memory card). The film is just a piece of media that is sensitive to light. When exposed to light, an image will be burned in the film, effectively taking a photograph. Every roll of film is graded by an “ISO Film Speed” number, in the simple terms:
- The lower the ISO number, the less sensitive the film is to light.
- The higher the ISO number, the more sensitive the film is to light.
Of course, using film has become past time, but “ISO Film Speed” still remains as the modern-day equivalent to adjust the sensitivity of the electronic sensors.
THE EFFECTS OF SETTING ISO FILM SPEED
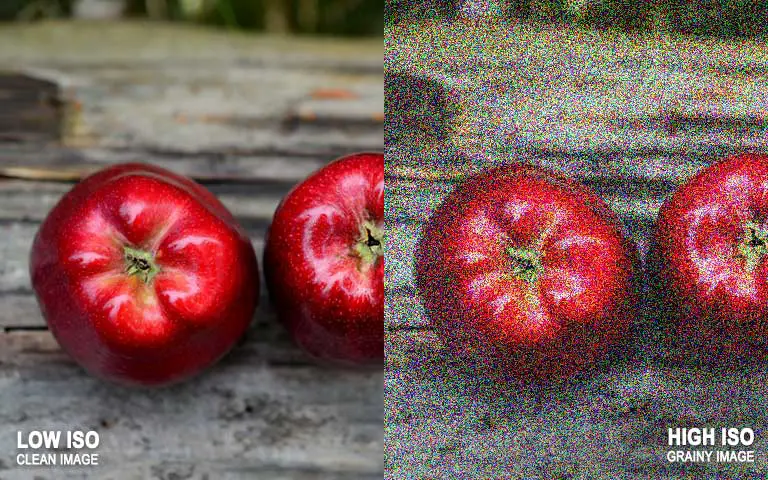
Again, some sharp ninjas may be thinking “why so much trouble, let’s just set to the highest ISO, so we can shoot in dark places”. Well, there is a catch with ISO in digital photography – The higher the ISO number, the more electronic noise the camera will generate.
Yes, noise is that grainy side-effect that we don’t desire. So in summary, keep the ISO as low as possible. Push it up only when you are forced to.
SECTION E
BALANCING THE TRIANGLE
So far so good? Now that you know, the exposure triangle is all about balancing these 3 settings to get the photo that you want.
HOW TO BALANCE?
So how do we learn to balance the exposure triangle? What settings should we use? This is the part where I will say “it is like riding a bicycle”. Going “fully manual” can be extremely challenging for a beginner, so I will recommend taking the “divide-and-conquer” approach instead.
- Start shooting in the aperture priority mode first, see for yourself how a large and small aperture affects the depth of field.
- Then try shooting in the shutter priority mode, see for yourself how fast shutter speed can “freeze frame”, slow shutter speed to create light trails.
- Whenever unsure, just switch back to the auto mode. Copy the camera’s metered setting, switch to manual mode, tweak those setting and see the difference.
It is ultimately all about the experience, experimenting, what you want the photo to look like and finding your own style.
JUST-RIGHT IS NOT ALWAYS RIGHT
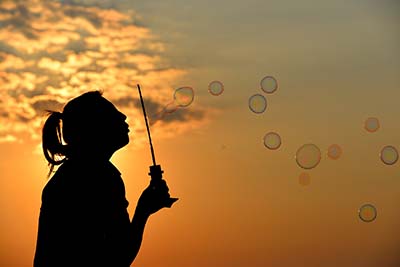
Just a small end-note. Some beginners may be thinking “just-right exposure is the correct way to go”. No, that is wrong. There are times when we deliberately over-expose or under-exposed photos for creative effects – A classic example will be silhouette photos, where we under-expose the subject.
Every photographer will mention this, and so shall I – There are no perfect exposures. The only perfect exposure happens when you master the exposure triangle and freely produce the images you have in your mind.
SECTION F
BALANCING THE TRIANGLE
That’s it for this guide, and here are a couple of links that may be useful to you.
LINKS & REFERENCES
- Aperture – Wikipedia
- Shutter – Wikipedia
- ISO Film Speed – Wikipedia
- The Exposure Triangle: Understanding How Aperture, Shutter Speed, and ISO Work Together – Fstoppers
- 3 Ways to Guarantee Good Exposures – DPS
CLOSING
WHAT’S NEXT?
Thank you for reading, and we have come to the end of this guide. It may be difficult to fully understand the exposure triangle at first, and it takes many tries to get the manual exposure right. But the most important thing is to go out, shoot, and practice.
It can be frustrating at first, but once you master it, all the settings will come naturally. If you have anything to add to this guide, please feel free to comment below. Now go crash over this barrier and have fun!