INTRODUCTION
THE CAMERA ANATOMY
Welcome to a beginner’s guide on the basic parts of a camera. Cameras these days come in many different shapes and sizes, often with plenty of confusing buttons, switches, connectors, and parts. While having many functions is a plus, but that also makes it very daunting for beginners to pick up photography.
So here it is, let us walk through some of the common camera parts in this guide. Hopefully, help you to better understand and to enjoy photography even more. Read on to find out!
NAVIGATION
TABLE OF CONTENTS

Section A |

Section B |

Section C |

Section D |

Section E |

Section F |

Section G |

Section H |

Closing |
A) THE BASICS
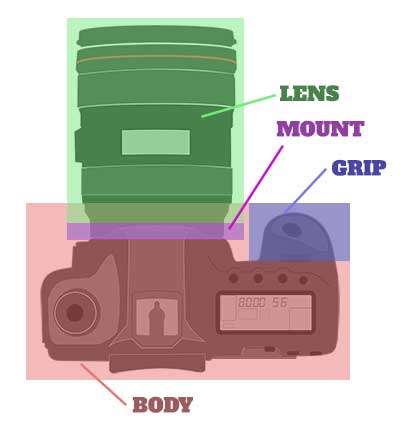
1) Lens
Lenses are the “eyes” of the camera, and they bend light to make things appear closer or further. Depending on the type of camera, lenses can either be fixed or interchangeable (detachable). But please do take note that interchangeable lenses are not universal.
We cannot fit a Canon lens on a Nikon camera, nor a Sony lens on a Canon camera. Some lenses and cameras of the same brand don’t even fit among themselves, so always check for the compatibility before buying.
P.S. We can use a “converter” to mount lenses of different brands, but that may result in some compatibility issues.
2) Mount
This is the point where we attach/detach the lens, and obviously, only cameras with interchangeable lenses will have a mounting point. Different brands and camera types have different mount systems. For example, Nikon uses the F-mount and Z-mount, Sony uses the A-mount and E-mount, while Canon uses the EF mount systems.
3) Body
The “entire camera” minus the lens. This can be a little weird for beginners, but that is what we call cameras with interchangeable lens. When you see a “body only” when buying a new camera, it means that you are only getting the camera, without any lenses.
4) Grip
Where we keep a firm hold on the camera. A non-slip rubber pad is usually wrapped around the grip, but sadly, most cameras only have a grip on the right-hand side. Lefties will just have to get used to it.
B) THE CONTROLS
Note: The buttons layout of every camera is going to be different, so you might find the illustrations here to be different from your own camera. Well, the illustrations here are for… illustration purposes. But here are some common “universal” controls that every camera probably has.
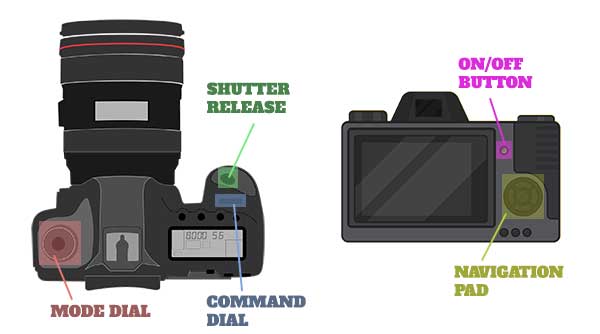
5) On/off button
Captain Obvious number one button that everyone should know. Switches the camera on and off.
6) Navigation Pad
Used to navigate the menu system of the camera. Depending on the camera and model, this may also be used for quick access for setting stuff like the flash, video mode and applying filters.
7) Shutter release
Half press this button to focus, full press to take a photo. Depending on the camera, one can disable the half-press, and dedicate another button to trigger the auto-focus instead.
8) Mode dial
Used to switch between various shooting modes. Depending on the model and manufacturer, there will be different shoot modes. For example, most beginner cameras will have an array of auto modes (portrait, landscape, night, macro, etc…), but most professional cameras will only have the auto, semi-auto, and manual shoot modes.
9) Command dial
Used to dial in settings (aperture, shutter speed, ISO, white balance) for the manual shoot mode.
C) FRAMING & INFORMATION
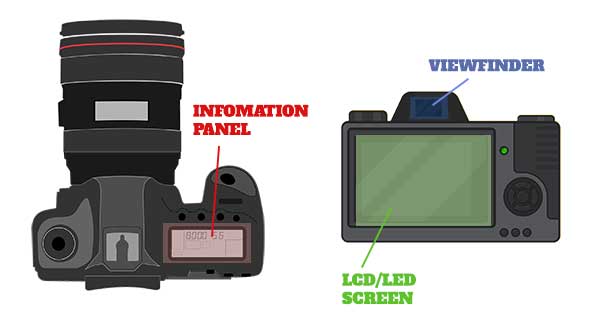
10) Viewfinder
This is where we look through to frame the shot. Traditionally, the viewfinder is optical (meaning, we are looking through a piece of glass). But as technology is progressing, the viewfinder is slowly getting replaced by electronic viewfinders (meaning, we are looking at an electronic LCD screen instead).
Also depending on the brand and type of camera, one may be able to change the “viewfinder attachment” – Some cameras have an eyecup for the viewfinder so we can see better in bright sunlight, while a few others have an impressive “submarine periscope” for us to shoot at awkward angles.
11) LCD/LED screen
This is where we access the camera’s main menu and do our magic stuff.
12) Information panel
Displays the current settings and critical information, without having to access the main menu. Some of the beginners may be confused as to why this information panel is necessary – The LCD screen actually drains quite a lot of power, and as you might already know, have difficulty under bright sunlight.
The information panel, on the other hand, runs on the good old “calculator LCD” technology. We can leave this on for ages, and it hardly even drains the battery. No problems with using it under the sun too.
D) LIGHTS
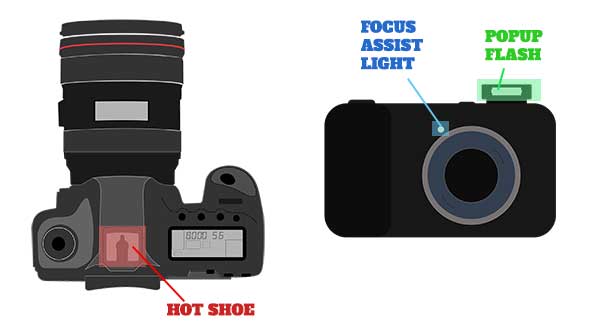
13) Hot shoe
This is where we mount an external flash or an external microphone. Not all cameras have a hot shoe, and just like lenses, hot shoes are not really universal. Nikon, Canon, Pentax, and Fuji adopt the international standard, but they all have their own customizations.
We may be able to mount different brand flash units, but some functions may not work properly. Lastly, Sony is the odd one out that totally uses its own proprietary technology. So good luck, Sony users.
14) Focus assist light
A tiny LED light that is built into the camera. This light is not used to actually take the photo, but to help the camera auto-focus to work better in the dark. Only some cameras have a focus assist light.
15) Popup Flash
Or sometimes called a built-in flash. This tiny flash is convenient to have but often frowned upon by professionals for not being very useful. Hint – Go get yourself a better flash unit, this tiny popup flash sometimes do more harm than good.
E) MOUNTING
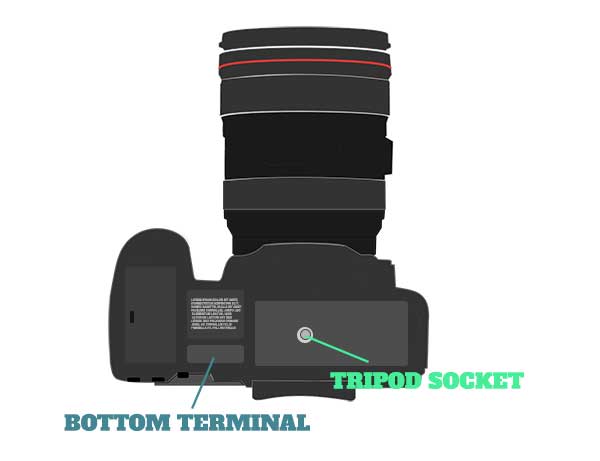
16) Tripod Socket
This is where we mount a tripod base plate. Most standard photography equipment screw thread size is either 1/4-20 (1/4 inch, 20 threads per inch) or 3/8-16 (3/8 inch, 16 threads per inch).
17) Bottom Terminal
If a camera has this terminal, it will allow us to attach an optional vertical grip to the camera. These are basically just some connector pins, and yes, they are not universal. It differs from brand-to-brand, camera-to-camera again.
F) CONNECTIONS
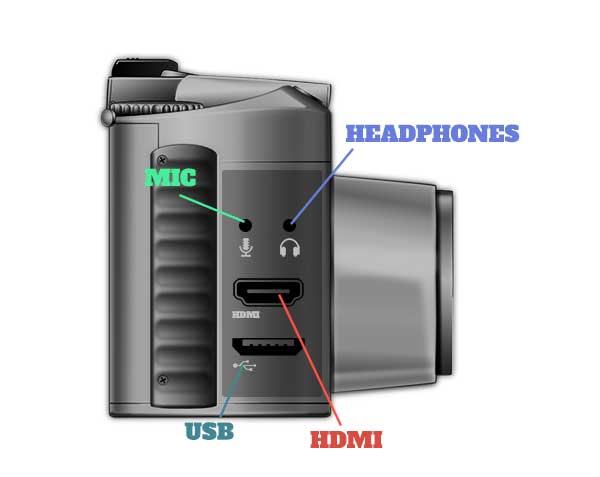
18) Microphone Jack
This is normally a standard 3.5mm audio jack, and where we attach a microphone for taking videos. Sadly, most compact cameras don’t seem to have this.
19) Headphones Jack
This is where we attach a headphone, for the purpose of monitoring while taking videos as well… Alternatively, we can use the camera to watch movies. 😆
20) HDMI Output
Puts the photos and videos out from the camera directly onto a big screen. Good for presentations and live shoots.
21) USB Port
The ever-useful and conventional USB port. Connects the camera to a computer, so that we can back up the photos, or directly post them online.
G) THE INSIDES
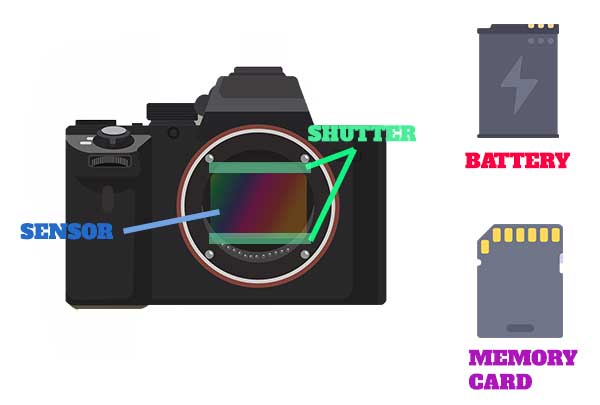
22) Sensor
One of the most critical components of a camera, this is what captures the light and converts it into a digital image. The image quality that a camera produces depends on the lens and the sensor itself. So try not to touch this sensor with bare hands, leave smudges, or even worse, scratch it.
As an extra note – Only digital cameras use electronic sensors. The analog cameras use rolls of film (a light-sensitive material).
23) Shutter
Shutter, as in “window shutters”. The shutter is nothing more than a “protective cover” for the sensor; It is normally closed to protect the sensor from dirt and dust. It flips open/close when we take a photo, and that is the “click” noise that we hear.
Extra note – There is no shutter in the smaller compact cameras and smartphones. Since the lens is fixed anyway, and we cannot access the sensor directly… Not until we tear everything apart.
24) Battery
Captain Obvious, everyone should already be familiar with this one. The battery is where the power comes from.
25) Memory Card
Where the pictures are stored into. But please do be aware of the plethora of memory cards available today, and you do not want to buy one that your camera does not support – SD card, Micro SD card, CF card, XQD card, etc…

Ever wonder how the viewfinder works? How are we able to see through a black box? This is how an SLR works generally.
26) Mirror
Reflects light upwards, towards the viewfinder. Flips away when we take a shot, so don’t freak out when it blacks out temporarily as the shot is being taken.
27) Pentaprism
If we look through the mirror directly, the image reflected by the mirror will be inverted – This is what happens on the “ancient cameras”. Today, we use another pentaprism to invert the image back.
Take note that only certain cameras (SLR and DSLR in particular) have a mirror and pentaprism. Smartphones and compact cameras don’t have a mirror, pentaprism, nor viewfinder – They display the frame directly on an electronic screen.
H) LINKS & REFERENCES
- 10 Basic Camera Parts – Steve’s Digicams
- What are the Basic Camera Parts and How Do Cameras Work? – Photographytalk
- How Cameras Work – The Parts of a Camera – Easy Basic Photography
CLOSING
WHAT NEXT?
Thank you for reading, and we have come to the end of this short chapter. I hope that it has helped you to better understand the cameras. If you have anything to add to this guide, please feel free to comment below. Good luck and happy shooting!