Welcome to a guide on how to auto-refresh webpages in Google Chrome. So you are accessing a certain website with the information that you need, but there is one very annoying problem. It needs to be monitored periodically, and the webpage does not auto-refresh itself.
There are a few ways to auto-refresh a webpage in Google Chrome:
- Use a Chrome extension such as Easy Auto Refresh.
- Use an online tool such as Page Refresher.
- Create a simple HTML page with an iframe and use Javascript to auto-reload.
<iframe src="http://site.com"></iframe><script>setTimeout("location.reload(true);", 3000);</script>
- Use a Chrome macro extension to auto-reload the webpage.
But just how does each of these methods work exactly? Read on to find out!
TABLE OF CONTENTS
 Using Extensions Using Extensions |
 Online Service Online Service |
 Simple HTML Simple HTML |
 Using a Macro Using a Macro |
 The Best? The Best? |
1) USING CHROME EXTENSIONS

All right, let us now move into the first method, using Chrome Extensions to help you reload the page automatically.
WHAT ARE CHROME EXTENSIONS?
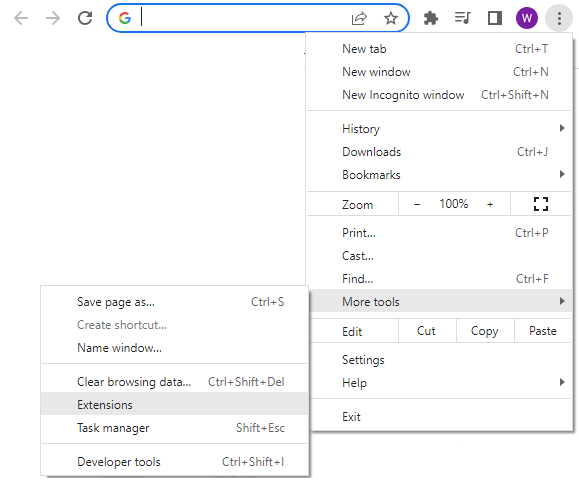
New to browser extensions? They are simply “plugins” that will add more features to the browser. Extensions are not “illegal hacks”, and they are officially supported – All the recommended extensions in this guide are from the Chrome Web Store, managed by Google themselves.
P.S. You can manage and uninstall your Chrome Extensions anytime by clicking on the ⁝ button at the top-right corner > More Tools > Extensions.
AUTO-REFRESH EXTENSIONS
Just do a search for “Chrome auto-refresh extension” and there will be plenty on the Chrome Web Store. I will list a few of the popular ones here:
- Easy Auto Refresh – One of the top-ranking and most downloaded.
- Auto Refresh Plus – Another of the popular ones.
- Chrome Reload Plus – Yet another highly rated one.
SIMPLE USAGE
The usage of all the extensions should be pretty much foolproof, and here is an example with Auto Refresh Plus – Just install any of the extension from the Web Store first, then:
- Navigate to your desired website.
- Click on the auto-refresh icon beside the address bar.
- Set the auto-refresh timer.
- Then just hit start.
2) USING ONLINE SERVICES

Next, this is probably the simplest way without having to install anything. Just visit any of the “free auto-refresh online tools” and enter your required website address.
THE ONLINE AUTO-REFRESH
There is plenty of these free auto-refresh “online tools”, and here are a few:
If you need more, just do a search on the Internet for “auto-refresh online”.
SIMPLE USAGE
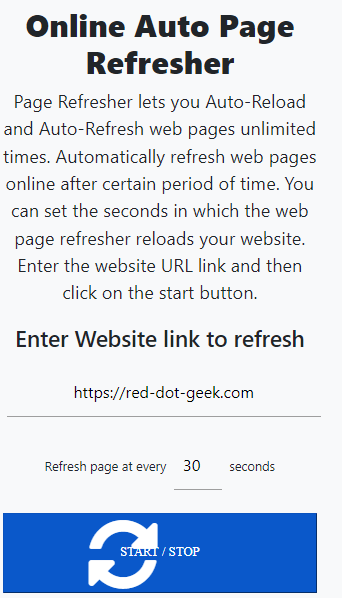
The usage of the online refresh tools should be straightforward as well. Here’s how to do it with Page Reboot:
- Set your website URL.
- Set the refresh time.
- Hit refresh, that’s all to it.
But personally, I really don’t like these “online tools” – They often spam a ton of advertisements… and funky ones at that.
3) SIMPLE HTML PAGE

Following up, this method is a little more on the “code ninja” side – Creating a simple HTML page that will self-reload… That is pretty much what the above “free online auto-refresh” websites do, MINUS all the annoying ads. So why not?
THE DUMMY HTML PAGE
<!DOCTYPE html>
<html>
  <head></head>
  <body>
    <iframe src="https://en.wikipedia.org/wiki/Aha_ha" style="width:100%;height:100vh"></iframe>
    <script>
    setTimeout("location.reload(true);", 3000);
    </script>
  </body>
</html>
WHAT TO DO NEXT?
Some of you guys may be thinking that HTML is a little bit on the “dangerous side”, but here’s the top-secret – HTML is actually nothing more than plain text. We don’t need to install any complicated code editors or developer tools… HTML files can be created and edited using just the default Windows Notepad or Mac TextEdit.
- First, here’s the above dummy reload page in a zip file.
- Open up the above dummy HTML page in your preferred text editor.
- Change
<iframe src="https://en.wikipedia.org/wiki/Aha_ha">to your preferred website address. - Change
setTimeout("location.reload(true);", 3000)to your preferred refresh time – This is set to 3000 milliseconds (3 seconds). - Save the updates (Captain Obvious).
- Finally, just open this HTML file in your web browser.
That’s it. No more annoying ads.
4) USING A MACRO RECORDER

For this final method, we are going to use a slightly different Chrome Extension for recording macros. For those who have not heard of it, macros are simply recording whatever you have previously done and replaying them – It is particularly good for websites where you need to click on a tab or picture upon reload.
THE MACRO EXTENSION
Again, there are various Marco extensions on the Web Store:
Do a search for “macro” or “automation”, and you will find more.
SIMPLE USAGE – IMACROS
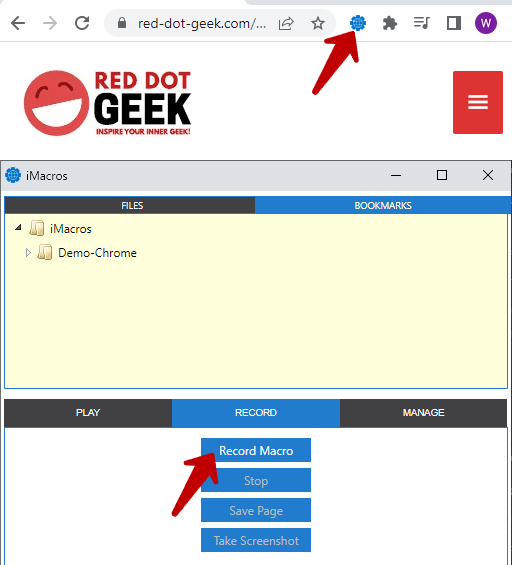
For this example, we will be walking through the iMacros extension. After installing the extension from the Web Store > Click on the iMarcos icon beside the address bar > Under the “Record” tab > Record Macro.
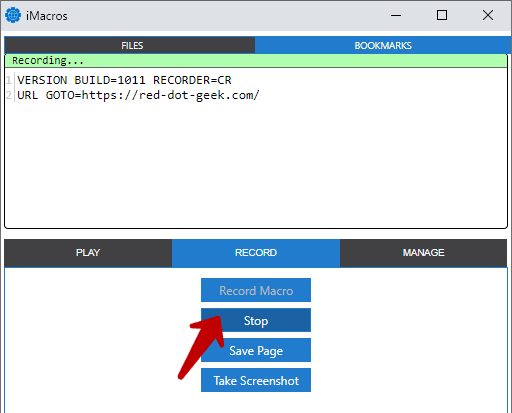
Navigate the website as you normally would > Click on “Stop” when you are done.
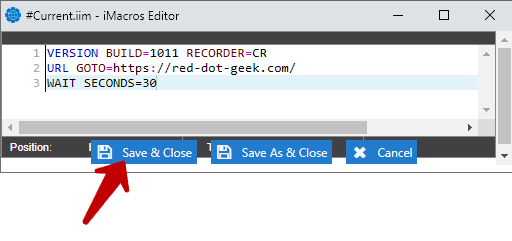
Another dialog box should show you all the steps that you have taken. Simply add WAIT SECONDS=XX to the bottom, then hit “Save & Close”.
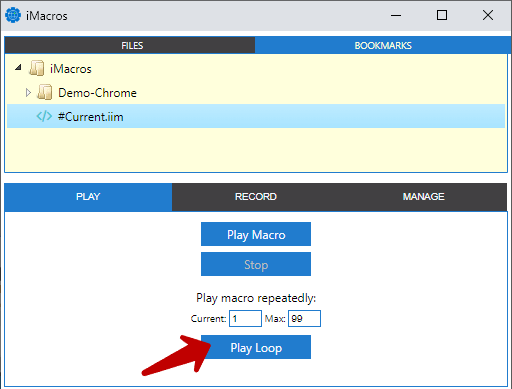
Finally, all that is left is to replay and repeat the macro. Click on the iMacros icon > Under the “Play” tab > Select the previously recorded macro > Then just set to repeat as many times as you like > Play Loop.
DOCUMENTATION
For you guys who want more, you can actually manually edit the macro and add in your own commands. Check out the iMacros Wiki for the official documentation.
WHICH IS THE BEST?

Personally, I am leaning towards using macros. It may be quite a hassle to set up at first, but it offers a lot of flexibility – They can also automatically sign in, click on tabs, etc… But if you want simplicity, then just install any of the auto-reload extensions.
Thank you for reading, and we have come to the end of this guide. I hope this has helped you to better understand, and if you have anything to share with this guide, please feel free to comment below. Good luck and may the cyber force be with you.

You are promoting malware… read the extension reviews…
Not sure which extension you are referring to, but if it is indeed malware – Please report the abuse directly to Chrome Store and show them sufficient proof. That will raise a red flag and get it removed. I obviously don’t run the Chrome Store, and reading through hundreds of reviews is going to do nuts (and not the smartest use of time either). Cheers! 😆
Yes !!! this is the best post of all time
Cant thank you enough!!
I was searching for an solution to refresh the Sunny portal of a solar system.
thank you, really a life saver:
setTimeout(“location.reload(true);”, 50000);