Welcome to a quick guide on how to stop ads in Goggle Chrome. Ads are everywhere on the Internet these days, and I can totally understand as a blogger. It is necessary to keep a business alive, and we follow good ad practices to not piss people off. But then, comes the black sheep. People who spam and don’t give a hoot about respect nor privacy.
Here are a couple of ways to prevent ads from showing in Google Chrome:
- Install an AdBlock extension.
- ⁝ (top-right) > Settings > Search for “ads” > Site Settings > Additional Content Settings > Ads > Block sites that show intrusive and misleading ads (toggle switch).
- If ads are popping up periodically, use an adware removal tool.
- ⁝ (top-right) > Settings > Search for “reset” > Restore settings to original defaults.
- Lastly, an extreme measure to install an advertisement blackhole in the physical network to remove all potential ads.
That covers the quick basics, but let us walk through more details in this guide – Read on!
TABLE OF CONTENTS
 Adblocker Adblocker |
 Disable Ads Disable Ads |
 Remove Adware Remove Adware |
 Manual Cleaning Manual Cleaning |
 Ad Black Hole Ad Black Hole |
 Useful Bits Useful Bits |
 The End The End |
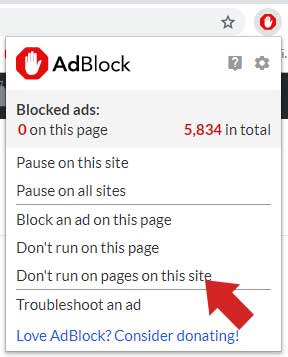
1) ADBLOCKER
Let us start with the simplest first – Just install an adblocker extension to stop the advertisements. This will effectively block out most ads and less the hassle.
THE VARIOUS ADBLOCK
- AdBlock – This is what I use and recommend.
- Adblock Plus – Another reliable Ad Blocker.
- Adaware Ad Block
NOT ALL ADS ARE BAD… WHITELIST!
I know, the point of an adblocker is to stop displaying advertisements, but that is also what keeps the content creators alive. If you find this page useful, and you want to support your favorite YouTuber, Blogger, or Instagrammer – Remember to add them to the whitelist.
2) DISABLE ADS
Next, Google Chrome actually has its own built-in ad filter. Yes, it is mostly contributed by the community to block blacklisted websites and intrusive ads such as pop-ups, redirection, videos, or sudden loud sounds.
DISABLE POPUP ADS
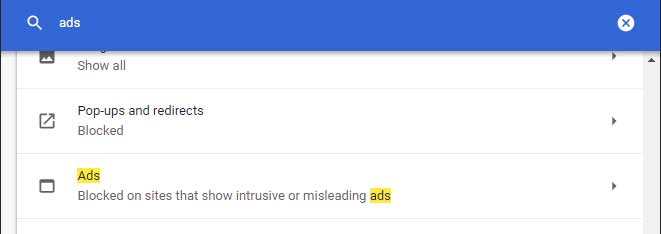
Click on the ⁝ button at the top-right corner > Settings > Search for “ads” > Site Settings > Additional Content Settings > Ads.
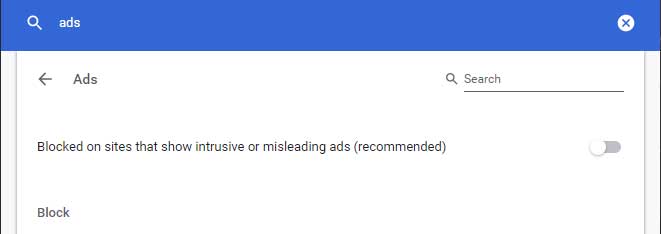
Click on the toggle switch to set “Blocked on sites that show intrusive or misleading ads”.
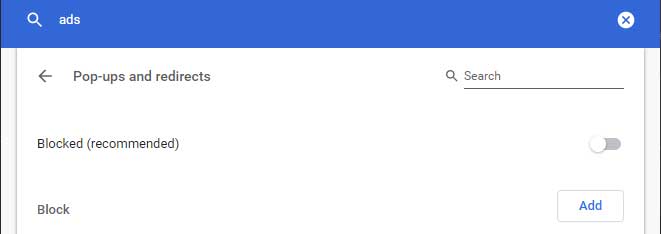
Then hit the back arrow > Pop-ups and redirects (directly above the ads menu item) > Make sure that it is set to “Blocked”.
3) REMOVE ADWARE & MALWARE
If you are getting random advertisement popups, sudden redirections while browsing the Internet – Then you most probably have an adware (or malware) somewhere in your computer. The removal requires an adware cleaner, which, there are thankfully a number of free ones.
ADWARE & MALWARE CLEANERS
Fear not, Adware and Malware cleaners to the rescue! There are many to choose from on the Internet, and here are a few of the reputable ones.
- MalwareBytes – For Windows and Mac
- Avast Anti-Malware – For Windows and Mac
- Bitdefender – Windows and Mac
- Adaware – Windows
- Emisoft Anti-Malware – Windows
- Super Anti-Spyware – Windows
Just download, install, and let the cleaners do the magic.
WHAT IF THE REMOVAL TOOL FAILS?
This is not a sponsored post, but please do try out the Emsisoft emergency kit. That should be able to wipe out most of the “bad stuff” and restore your system. In the worst-case scenario where the malware refuses to give up – The only way is to reset your entire computer back to factory default.
4) MANUAL CLEANING
Now that the bad guys are removed, a few things remain to be done. The startup page of Google Chrome may be replaced by malware, and settings changed without your knowledge or permission. It is time to clean up Chrome itself.
EASIEST FIX – RESET TO DEFAULTS
The easiest way is to reset Chrome back to the factory default. While this is the safest and fastest method, but take note, you might lose all your existing bookmarks and saved passwords.
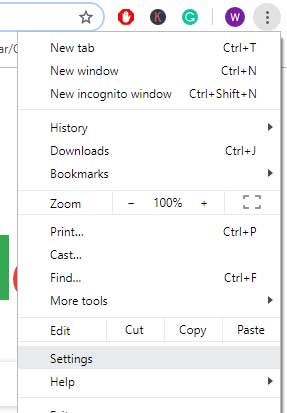
First, click on the ⁝ button on the top right-hand corner, then go to “Settings”.
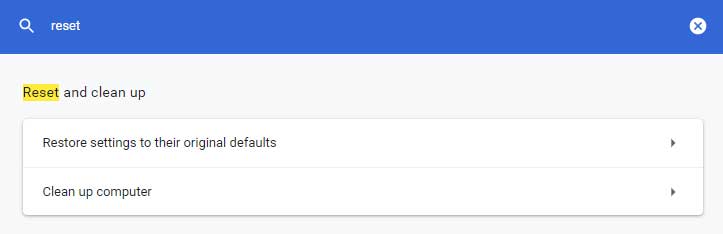
On the settings screen, search for “reset”, then simply click on “Restore settings”. You can also click on “Clean up computer” later for extra measures.
MANUAL FIXES
Don’t like the idea of resetting to the defaults? Then there are a few things that you can do manually.
- Run “clean up computer” as above, but do not restore to default.
- Settings > Search “startup” > Change back to “Open the New Tab page”.
- If the default startup page has been changed to “open specific page” by the malware, please feel free to remove all the funky pages.
- Settings > Search for “search engine” > Change the default search engine back to Google (or Bing/Yahoo if you like).
- You can go into “manage search engines” and manually remove all the weird stuff added by the malware if you want.
- Next, search for “clear browsing data” > under the advanced tab > select everything > Clear Data.
- In particular, make sure that the “Site Settings” are cleared. This will ensure that the bad sites will no longer have permission to send push notifications to Chrome.
- Finally, click on the ⁝ at the top-right corner again > More Tools > Extensions. Remove all the funky ones that you don’t recognize and those that are installed without your knowledge.
These should pretty much restore Chrome back to the “clean” state.
5) ADVERTISEMENT BLACK HOLE
So… For some reason, you hate advertisements to the core, and can’t wait to wipe them off the surface of your digital world. There is a way to do it, but it is very technical, and involves using a device to act as an “advertisement black hole”.
INTRODUCING THE PI-HOLE
What the heck is a Pi-Hole? It is basically a mini-computer called Raspberry Pi, converted to become an advertisement black hole. Thus aptly called the Pi-Hole. Get it? How it works in a nutshell:
- The Pi-Hole is deployed just before the modem.
- It kind of acts like a firewall and monitors all the incoming/outgoing traffic.
- Then, staying true to the “black hole” name, it blocks out all known ad servers.
Yep. That is how we can block advertisements to the extreme. Just remember to update the ad server list from time-to-time and this bad boy will continue to do the magic.
P.S. For you guys who are interested, you can actually buy a Pi-Hole from eBay. But be warned. It is not cheap, and you need some technical knowledge to properly set it up.
USEFUL BITS & LINKS
That’s all for this guide, and here is a small section on some extras and links that may be useful to you.
LINKS & REFERENCES
- Remove unwanted ads, popup, malware – Google Chrome Help
- How to Stop Pop-Ups in Chrome – Laptopmag
- How to Block Ads on Google Chrome – WikiHow
THE END
Thank you for reading, and we have come to the end of this guide. I hope this has helped you to better understand, and if you have anything to share with this guide, please feel free to comment below. Good luck and may the cyber force be with you.