Welcome to a beginner’s guide and list of camera lens filters. Nope, we are not referring to the funky software “filter effects”, but actual physical lens filters. Modern software filters are interesting, and they can do all kinds of effects – But there are just some things that can only be achieved with real optics. Read on for more!
ⓘ This guide includes some extreme Photoshopped examples to better illustrate the effects of the filters… The actual filter effects are a lot less extreme. 😆
TABLE OF CONTENTS
 Types Of Filters Types Of Filters |
 Filter Shapes Filter Shapes |
 Extras & Links Extras & Links |
 The End The End |
TYPES OF LENS FILTERS
All right, let us now get into the list of common camera lens filters, and what they are used for.
1) CLEAR FILTER
![]()
Look no further, both “with” and “without” are the same. A clear filter is nothing but a piece of clear glass or plastic. The main purpose is to protect the lens from scratches, that’s all. But most photographers actually don’t quite like to use clear filters, since they do nothing. The better alternative is a UV filter.
2) ULTRA-VIOLET (UV) FILTER
Yes, UV lights are invisible to the human eye. But to cameras, an excess of UV light may cause a blueish tint. Even though modern cameras are very good at filtering out excess UV and IR lights, some photographers still use a UV filter as “lens protection”.
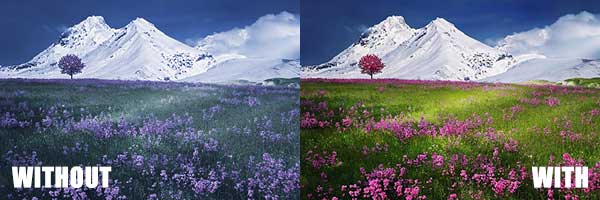
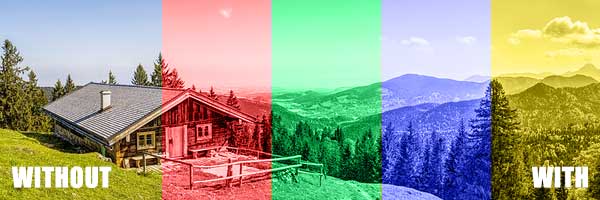
3) CIRCULAR POLARIZER (CPL)
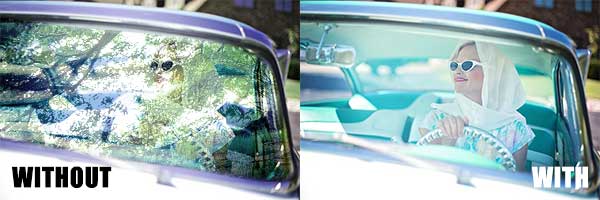
This is a filter that can be “turned and adjusted”. What happens next is some crazy bending of the light, and reflections on water/glass magically appear or disappear. For the people who are still thinking “Photoshop can fix the reflection”- Sure thing, help yourself with hours of editing while I put on a filter and fix things in just a few minutes.
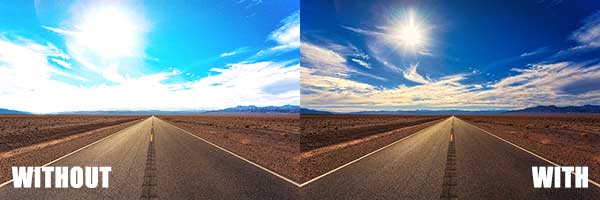
4) LINEAR POLARIZERS (PL)

This is the “non-adjustable” and so-called less popular variant of the polarizer. Not that they are useless, linear polarizers are still used to restrict or block out some range of light. If you ever wonder why it is a lot less glaring when looking through a car windscreen – It is polarized. Also, polarizers have a tendency to increase the contrast, create punchy images.
5) NEUTRAL DENSITY FILTER (ND)
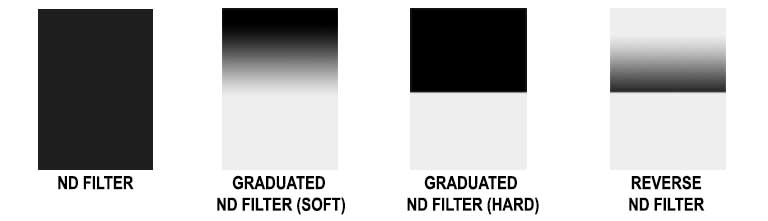
The best way I can describe an ND filter is – Sunglasses. Yes, these are simply pieces of dark glass that block out excessive light. Take note of the variants:
- A “normal” ND filter is fully solid.
- Soft graduated ND filter gradually goes from dark to clear.
- A hard graduated ND filter is half solid half clear.
- Reverse ND filter has a dark line in the center, then gradually becomes clear toward the top.
Why so much trouble to make a camera “wear sunglasses”? For the uninitiated – If a photo is blown, it is blown. Even if you shoot in raw, there is a limit to how much the details can be recovered. The most important reason being, would you rather use a few minutes to put on an ND filter, or spend hours trying to salvage an overexposed photo?
6) INFRA-RED (IR) FILTER

Now, a UV filter blocks out excessive UV light, but an IR filter will not block IR light. In fact, it does the opposite of blocking out all visible light, only allows IR to pass. The result, a surreal photo looking into the world of IR, with “white trees” and “white grass”.
IR filters are difficult to use though, and it is not intended for beginners – Once it is put on, almost nothing is visible to the human eye. The frame must be pre-composed, pre-focused, and the settings must be done right even before the filter is put on. After which, a lot of editing needs to be done, but the results are very rewarding.
7) SOFT FILTER

To create the 1980s “soft fuzzy romantic” look. Personally, I am not a fan of this filter. It can be done with Photoshop anyway, and it’s outdated.
8) COLOR FILTERS
Well, self-explanatory. These are just colored pieces of glass or plastic. We can probably add or change colors with some software editing, but a good piece of physical color filter does things differently – It changes the tone of the photo without looking like a noob, and adds to the contrast.
9) STAR FILTER

Is the shot not bling enough? Attach a star filter to bring out the starburst effect on all the light bulbs.
10) BOKEH FILTER

For the uninitiated, “bokeh” means blur. Usually, the “blur bokeh balls” are round or oval in shape. But with a “specialize bokeh filter”, we can all kinds of shapes – Hearts, planes, birds, etc…
11) ANAMORPHIC FILTER
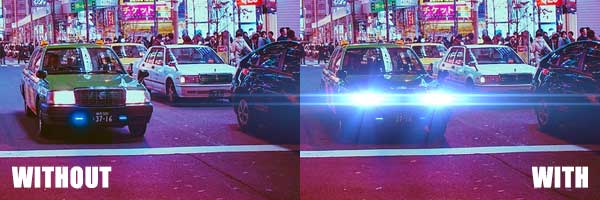
All filmmakers should know the word “anamorphic” very well. A true anamorphic lens has a super ultra-wide 2.39:1 aspect ratio, and has the very characteristic “cinematic light streak”. Now, an anamorphic filter will not turn a “normal lens” into “true anamorphic”, but it does create that cinematic light streak.
12) ASTRO FILTER
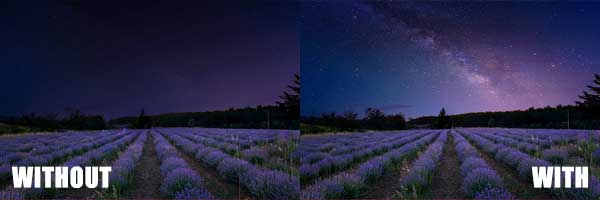
As the name implies, an Astro filter is used to shoot the stars. In modern-day cities, we have something called “light pollution”. That is, lights from the city cover the night sky, and we can’t see the stars. An Astro filter attempts to filter out the common city lights and allows only “celestial light” to pass – That kind of works, but you still need to be a in a dark place without too much city lights.
13) MACRO FILTER

Finally, we have the macro filter. As you may have already guessed, this is used to help you shoot close up. Don’t expect this to be on the same level as a good macro lens though, the best way I can describe macro filters is “putting a magnifying glass in front of the lens”. Yep, go get a legit macro lens if you are serious about macro photography.
COMMON FILTER SHAPES
So far so good? Now that we are done with the types of filters, let us go into the shapes – Yes, filters come in different shapes as well.
CIRCULAR SCREW-ON FILTERS

This is the common Joe filter that is screwed on, in front of the lens. Take note though, they come in different diameter sizes. The smart way is to get the larger ones (77mm to 82mm), so they will fit onto most lenses, even on the smaller ones with the use of a step-up ring.
SQUARE & RECTANGULAR FILTERS
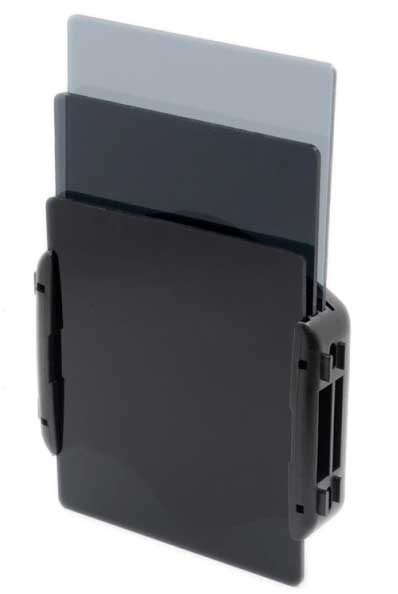
These are huge pieces of filters, but given their size, we don’t have to worry about them not fitting onto the larger lenses. Square and rectangle filters generally come with an attachment ring and filter holder.
- Screw the attachment ring onto the lens.
- Attach the filter holder to the attachment ring.
- Then place the filter into the holder
Kind of a hassle, the alternate way is to just handhold the filter in front of the lens. Doh.
USEFUL BITS & LINKS
That’s all for this guide, and here is a small section on some extras and links that may be useful to you.
WHY USE PHYSICAL LENS FILTERS?
By now, this should be clear as day – There are things that just can’t be fixed with photo editing.
- If a photo is overly over-exposed, it can’t be fixed. Use an ND filter.
- Simply can’t Photoshop an IR photo. Use an IR filter or modified camera.
- Edit out the reflections? Good luck. Why not just use a CPL?
DO NOT “STACK” TOO MANY FILTERS!

Filters are good but don’t stack too many of them together. Like it or not, there will be a small loss of optical quality (and light) through every layer of the filter; Stack too many filters together, you start to get insufficient light or even vignetting (dark corners). I personally don’t stack more than 2-3 filters at once… Do you really need to stack that many!?
LINKS & REFERENCES
- Photographic filter – Wikipedia
- A Beginner’s Guide to Camera Lens Filters – Adorama
THE END
Thank you for reading, and we have come to the end of this guide. I hope this has helped you to better understand, and if you have anything to share with this guide, please feel free to comment below. Good luck and happy shooting!