INTRODUCTION
GET THE SKIES BACK
Welcome to a beginner’s guide on how to fix an overexposed sky in photography. Are you are stuck with the problem of a blown-out sheet white sky? Tried to lower the shutter speed, used a smaller aperture, but end up with an underexposed ground instead?
Well, that is actually a rather common problem that some beginners face and there are a number of ways to deal with it – So here it is, a guide on the various methods to recover the blue skies back. Read on to find out!
NAVIGATION
TABLE OF CONTENTS

Section A |

Section B |

Extra |

Closing |
SECTION A
WHY OVEREXPOSED SKY HAPPENS
You look at the scene with your own eyes, and it is a nice blue sky with a sea of green. Whip out the camera, take a shot, and end up with a blown-out white sky instead. Yep. What the heck is happening here!? Are the camera settings wrong? Is the camera bad? Well, it is a combination of both settings and technical restrictions.
HERE’S WHY

You see, there is something called “dynamic range” in the world of rocket science, and it is basically the ability to see the difference between the brightest and darkest spot in a scene; The higher the dynamic range, the more we can see in a scene with imbalanced lighting.
The human eyes actually have a very good dynamic range, which is why we can see both the bright sky and the dark ground at the same time. But when it comes to cameras at our current level of technology, the dynamic range is just not as good as our human eyes – Which is why the sky is blown out.
SECTION B
HOW TO FIX
The camera may be limited, but fear not, there are a few ways to get around that problem and let us dive in now.
1) USE A NEUTRAL DENSITY FILTER
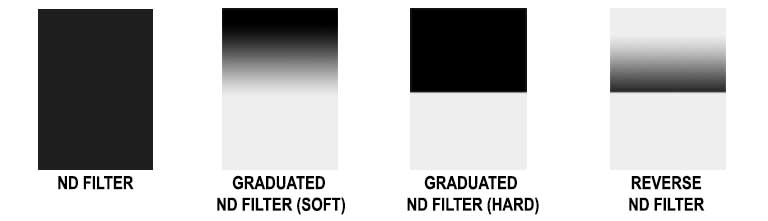
What is a neutral density (ND) filter? I am sure everyone knows what sunglasses are for, to block out some sunlight. ND filters are just like “sunglasses for cameras”, and they are literally just dark pieces of plastic (or glass) that you put in front of the lens to block out some sunlight. There are a few types of ND filters –
- A fully solid dark piece.
- A soft ND that gradually goes from dark to clear.
- Hard that is half-dark and half-clear.
- Reverse ND that is dark in the center and gradually clear towards the top.
I am sure some of you sharp photography ninjas already figured out what to do with the ND filter. You put a piece of a soft or hard ND filter in front of the lens to “cover the sky” and rebalance the exposure.

Now, it can be rather confusing for a beginner to buy ND filters. Because apart from the rectangular ones, there are also the square and circular screw-on ones… There are also various shades of ND filters that go from “a little dark” to “blackout dark”.
So If you are interested in buying ND filters, I will recommend getting a set of the rectangular Zomei ND filters as they will fit onto almost any lens. They are slightly more expensive, but well worth the price if you are into landscape photography.
2) USE MANUAL SETTINGS OR EXPOSURE COMPENSATION
So what if you don’t want to buy the ND filter, or when it does not make sense to use one? For example, when you have a subject in the scene. Well, the next best thing you can do is to work within the limited dynamic range.
Depending on the type of camera that you use, you may be able to work out a better camera setting. The easiest way is to use the exposure compensation, simply dial in a negative compensation to try to bring the skies back… But that will also mean a darker subject, so do it sparingly.
If you use a DSLR or mirrorless camera, you can also try to manually do the settings. My usual trick as a beginner is to use the auto mode to determine the “base settings”, copy them into the manual mode, then manually tweak around it.
2 EXTRA) USE A REFLECTOR OR FLASH
Following up with the above point, we can bring the exposure down to recover the sky, but that will result in a darker subject instead. How do we remedy that then? This is where we use a flash or reflector to fill the subject. If not, we can keep it as it is, and try to use Photoshop later to bring the details back.
3) LET IT BE
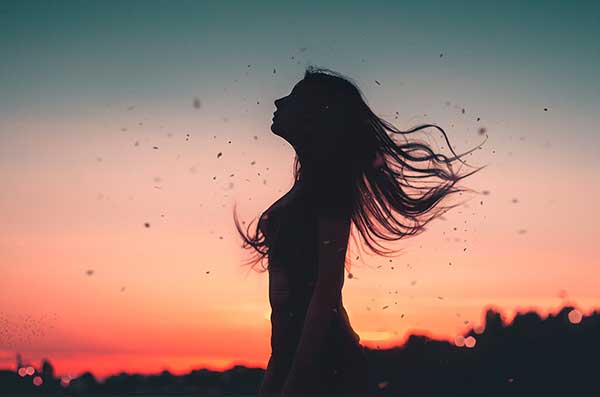
So what if the sky is blown out? So what if the subject is dark? Let it be, and make full use of the situation. The most common way we make use of a bright background is to create silhouettes.
4) PHOTOSHOP/LIGHTROOM TO THE RESCUE
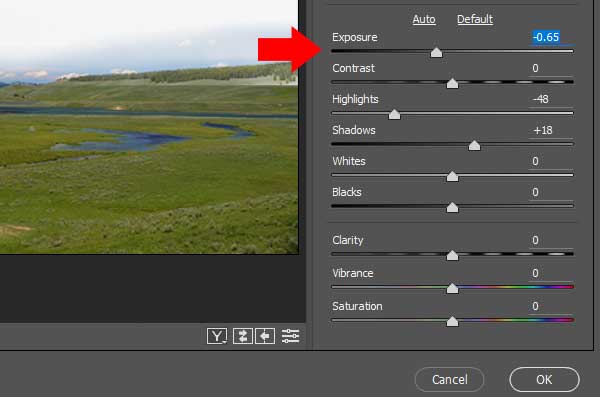
How do we bring the skies back in Photoshop or Lightroom? Firstly, try to shoot in the RAW file format if your camera supports it. RAW files contain a lot more information, and you will be surprised by how many details you can recover using Photoshop or Lightroom.
When you open a RAW file in Photoshop the Camera Raw plugin will open, if not, you can manually open it with Filter – Camera Raw Filter. Lightroom users, this should be the basic panel when you open a RAW file as well. My usual lazy way of doing it is:
- Slightly reduce the exposure.
- Reduce the highlights to pull the skies back.
- Bump the shadows slightly to bring out a little more details in the dark.
- Maybe play with the contrast a little.
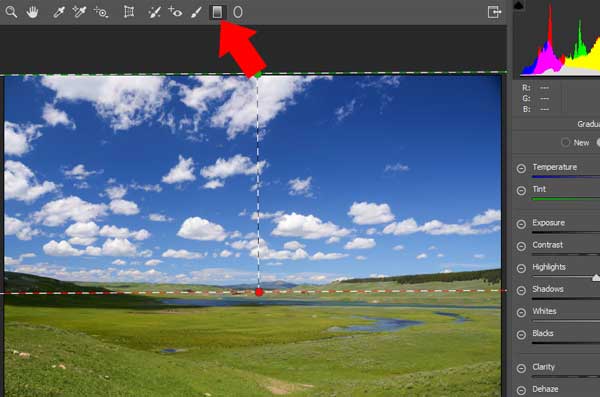
If you want more control over where to apply the exposure tweaks, you can draw a graduated filter. Lightroom users, you guys should have this function as well.
5) COMBINE 2 OR MORE SHOTS TOGETHER – HDR
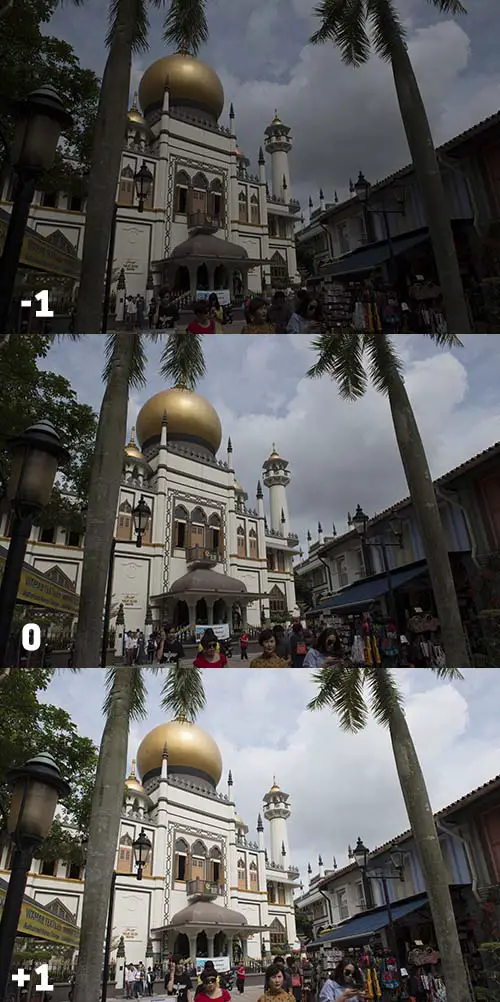
This is a slightly more “advanced” method where we take 2 or more shots with different exposure values and combine them together later in Photoshop – We call this high dynamic range or HDR. First, you need to set your camera to do bracketing, a method that allows you to quickly get shots with different exposures. I usually do a bracket of 3 photos:
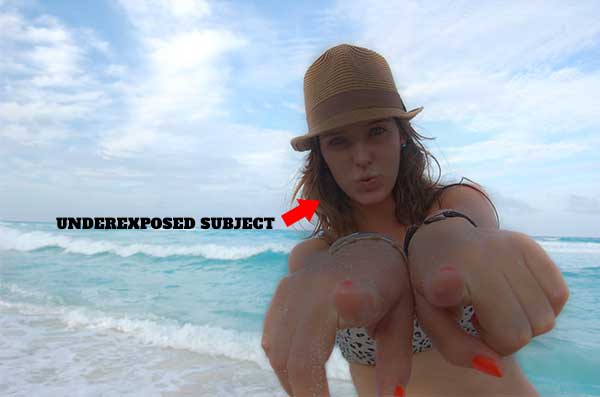
- An underexposed shot, where we have the details of the sky, but everything else is dark.
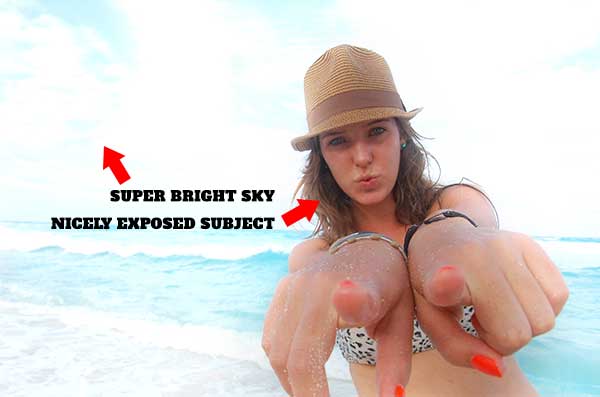
- A nicely exposed shot, where the sky is blown out, but we have nice overall details.
- An overexposed shot, where we get details in the darker spots.
Every camera has a different way of setting brackets, so check your own camera manual.
5 EXTRA) HDR IN PHOTOSHOP
Once you have the 3 shots, here is what we do in Photoshop:
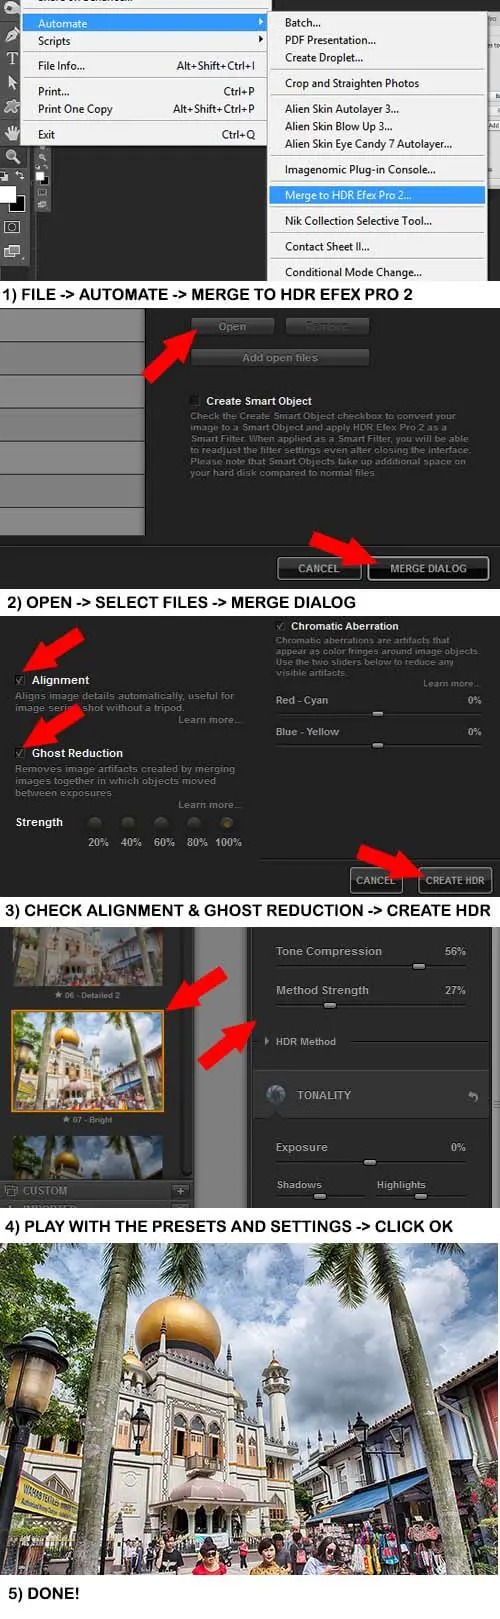
Lightroom users, here is a tutorial on Digital Photography School that teaches you how to do it.
5 EXTRA) SMARTPHONE HDR
Smartphone camera ninjas, there should be an HDR mode in the “default camera app” these days. While this kind of ease up with an entire “I don’t have to use Photoshop”, you also cannot tweak how the HDR combination works. If you want more controls, there are apps that especially do HDR… But I think you will have to purchase the app for it.
EXTRA
USEFUL BITS
That’s all for this guide, and here is a small section on some extras and links that may be useful to you.
PHOTOSHOP & ALTERNATIVE
Don't have a copy of Photoshop yet? Click on the banner below to check out an offer.Alternatively, you can try out the free “Photoshop alternative” – GIMP.
LINKS & REFERENCES
- Dynamic Range – Wikipedia
- What is Exposure Compensation and How to Use It – Photography Life
- Photoshop Tutorial: How to Fix an Overexposed Sky – Photoshop Mastery Club
CLOSING
WHAT NEXT?
We have come to the end of this guide, and I hope that it will help you to take better photos. If you have questions, please feel to comment below. Now go bring the sky back, good luck and happy shooting!