INTRODUCTION
HDR IS A KNOWN BUT UNKNOWN FEATURE?
Welcome to a guide on how to do HDR photography. HDR is everywhere these days, but just what is it!? You might have seen an “HDR mode” on smartphones and certain cameras, maybe even heard people say “try to use HDR, it is better”.
Why are people using it, but not even knowing what it is? This is the very reason why I wrote this guide – To walk you right through the mysteries of HDR. To get you one step ahead of the game, and stop being another “this is good” guy with no idea why it is good.
NAVIGATION
TABLE OF CONTENTS

Section A |

Section B |

Section C |

Section D |

Section E |

Section F |

Section G |

Closing |
SECTION A
DEBUNKING THE MYTH OF HDR
Rocket science alert… not really. HDR is the abbreviation for “high dynamic range”. Sounds very geeky, but it’s not. To fully understand HDR, you need to first crack the word “dynamic range” – Which in the simple terms, dynamic range is the difference between the lightest and darkest shades.
Putting it in another way, it is the brightest and darkest spot that a camera can capture. So whatever is beyond the dynamic range will appear as washed out white or pitch black spots.
Still confused?
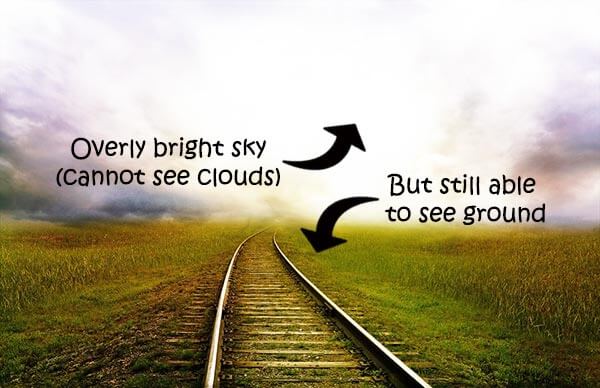
Try looking at a part of the sky on a sunny day. You should be able to clearly see the ground, but the sky will be so bright that you can only see a patch of white. When your eyes are accustomed to the brightness of the sky, you should be able to see the clouds, but the ground will appear dark.
That, is the dynamic range of a human eye. So when it comes to high dynamic range, it simply means the capability to see a lot more despite the huge difference the brightest and darkest spots. In photography, HDR is a technique to bring out all those details, to a level much more than your “normal” photo can capture.
Fun fact – The human eye has a dynamic range of about 20 stops, while most cameras today (2017) only have about 10-14 stops. Yep, technology is still not that good. Yet.
SECTION B
REQUIRED GEAR
Yes, we have one button HDR these days in smartphones and cameras, but that is not what we want. We want control over editing our own HDR photos in this guide. So to do that, I will recommend some gear.
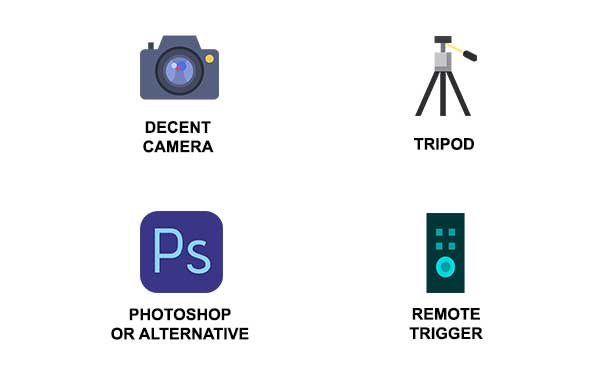
- Camera
DSLR, mirrorless, or any decent camera capable of doing bracketing. We want to take a few photos and play with our own photo editing later. - Tripod
Although not required, it will be good to have a sturdy tripod. I will recommend using the ball head tripods, since I find them more convenient. [Selens] offer pretty affordable and decent ones, or spend a little more on a good old reliable [Manfrotto]. - Remote Shutter Trigger
Good to also use a remote trigger to reduce camera shake. Does not matter if it is wired or wireless. [Nikon] [Canon] [Sony] - HDR Application
Software that is capable of processing HDR. Go with good old Photoshop, or you can check out the alternative Photomatix.
Don’t have a copy of Photoshop or Lightroom yet? Click on the banner to check out an offer.
Don't have a copy of Photoshop yet? Click on the banner below to check out an offer.
SECTION C
HOW TO SHOOT
Doing HDR is actually surprisingly easy. It is, by all means, almost the same as your “usual photography”. Start by applying some of your awesome “eye power”, and looking out for interesting compositions – colors, lines, shapes, lead lines, symmetry, etc…
Step 1) Lock and framed
Mount your camera on the tripod, and fix the frame. Don’t worry too much if you are not using a tripod, HDR can still be done with hand held (captain obvious to the rescue). We will get into the many ways with hand held below.
Step 2) The settings
The settings (ISO, shutter speed, aperture) are entirely up to what you are shooting. HDR will work even if you use auto. The only difference here is that, you need to take multiple shots in bracketing mode.
For those who have no idea how bracketing works – it is used to take a series of photos at different exposure values. For example, when you set bracketing for 3 shots at 1 stop difference each, it means:
- The first shot you take will be in your current exposure setting.
- Next shot will be at -1 EV.
- The last shot will be at +1 EV.
Depending on your camera and settings, the second shot can be a +1 EV and last shot at -1 EV. You can set the bracketing to 5 shots at 1 stop difference, or even 7 shots at 0.3 stop difference each.
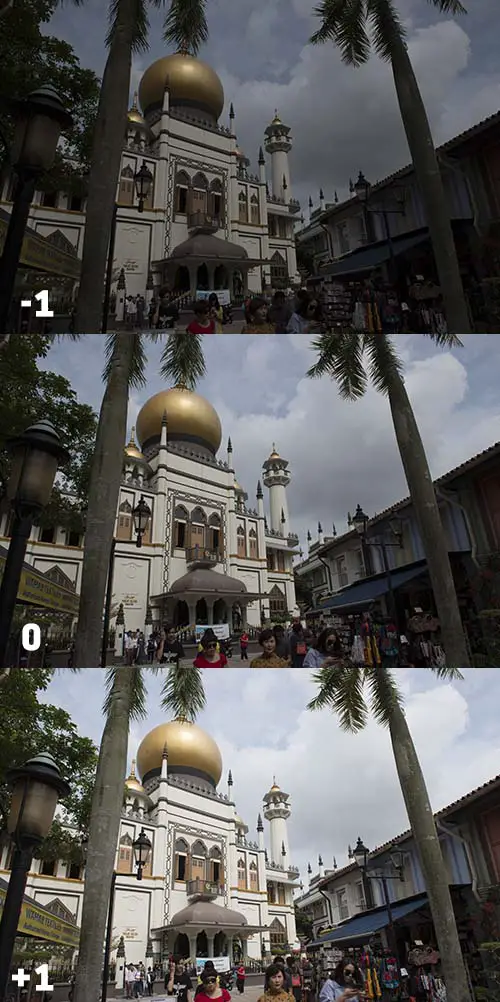
Technically, when you bracket more photos, you capture more data and details in HDR. But I will usually go for 3 shots at 1 stop difference each, which I think is mighty sufficient. 7 shots or 9 shots are kind of an overkill.
While a 3 stops bracketing is good enough, there are times when a 5 stops bracketing makes sense – For example, an overly exposed sky versus a line of shady trees will require a larger dynamic range
Step 3) Watch out for ghosts… even in board daylight
There is one potential problem when it comes to bracketing and taking multiple shots at different exposures. When something in your frame moves, you will get ghosting. Just what is ghosting? A picture speaks a thousand words :
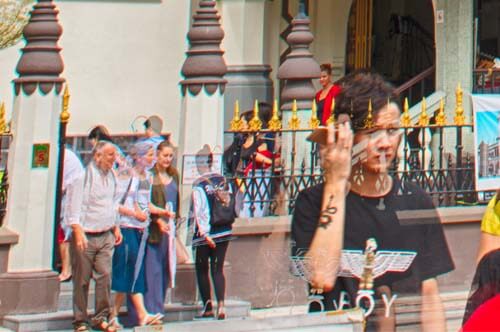
Yep, this is what happens when you merge exposures together when things are moving. So remember to minimize movements as much as you can. Also remember to put your camera on a tripod to reduce camera shake if you can.
In any case, don’t sweat too much if you are on hand-held. As long as you are not moving around too much, modern editing software should be able to take out some of those ghosting and camera shake.
Shooting in fast shutter speed and continuous high-speed burst mode will reduce your chances of ghosting.
SECTION D
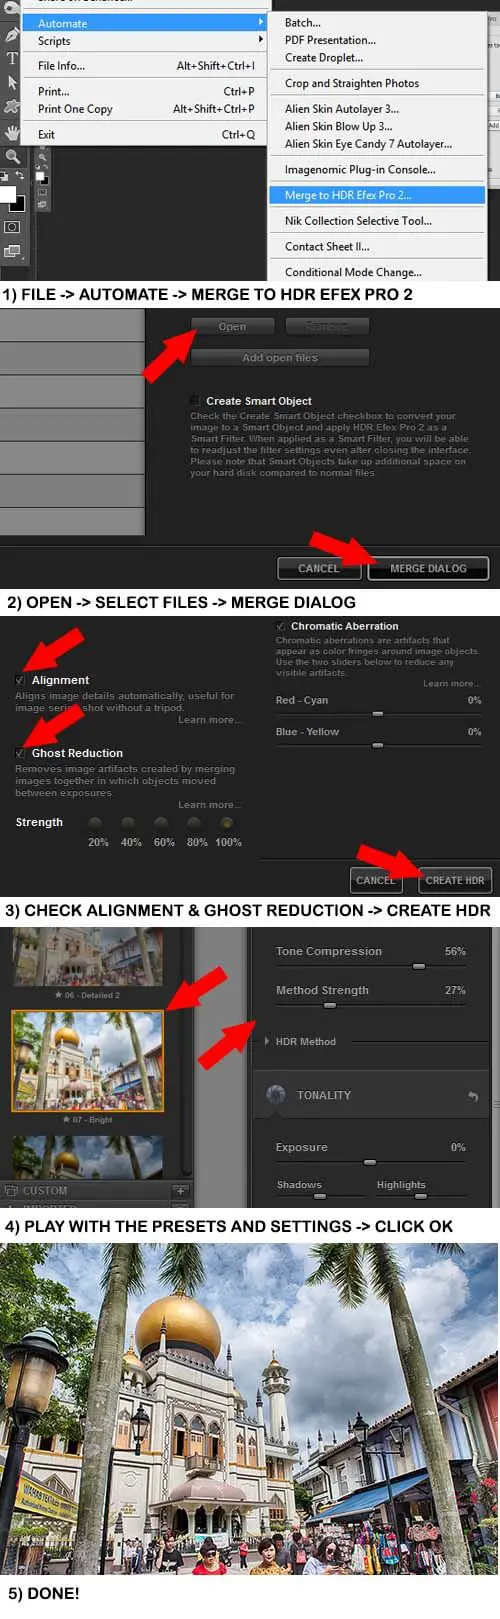
HOW TO EDIT HDR IN PHOTOSHOP
The last stage involves editing the photos with an application. While I mostly use Photoshop, I have found another application (called Photomatix) to be particularly good for HDR. There are probably more applications out there, but I shall only touch on Photoshop in this tutorial.
SECTION E
COOKING WITH ONE PHOTO IN PHOTOSHOP
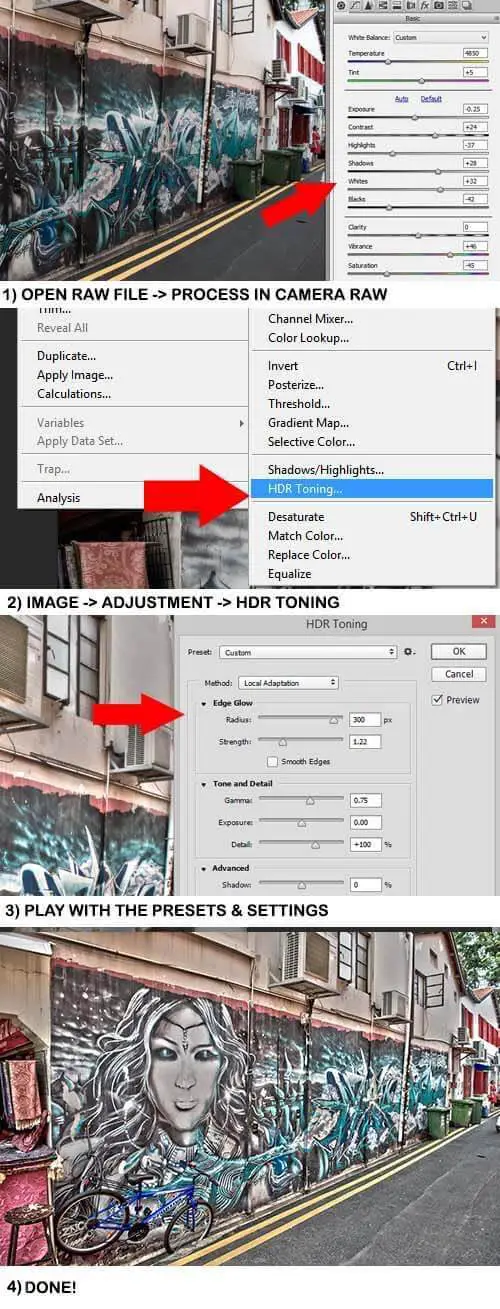
So what if you only have one photo? Can you still “HDR” one photo to rule them all? The answer is yes, and it is called “pseudo HDR” or “fake HDR”. Whichever you prefer. But to pull this one off, I will recommend that you do this on a RAW file. Since RAW files carry a lot more data than JPG files, the results are going to be better.
SECTION F
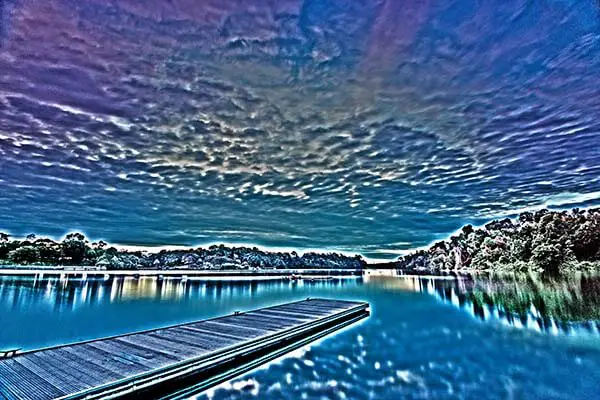
THINGS TO AVOID – PUKE DYNAMIC RANGE (PDR)
Sorry for adding a negative example to this guide, but I have to make my point on these HDR horrors. You have probably seen some of these horrors yourself… and I call these “Puke Dynamic Range”.
You know what is the worse part? The photographer going into denial. Oh, it looks so artistic, so much like an oil painting, so surreal. Please call me the digital Picasso.
Seriously?
A puke of colors and details, coupled with very bad excuses on how it is supposed to look good. This is like a kid giving poor excuses to the teacher on how he is supposed to not fail an exam, and how “normal” people do not understand his genius.
Sure thing, everyone has a different taste. Some like it RAW, some like it medium, and some like it well done. This is subjective, and how can we tell if the HDR is puke? The point to which I will call “burnt” is when you start to see extremely pronounced outlines, highlight hot spots, camera noise, and a vomit of colors.
That above image is an excellent example of burnt vomit. Please don’t go beyond that point… or anywhere close to it. Puke is puke, don’t even try to paint it as art.
I am not saying that all pronounced HDR is bad. It’s just that they are very difficult to pull off. Stay off this path unless you really have some digital Picasso cells in your DNA.
SECTION G
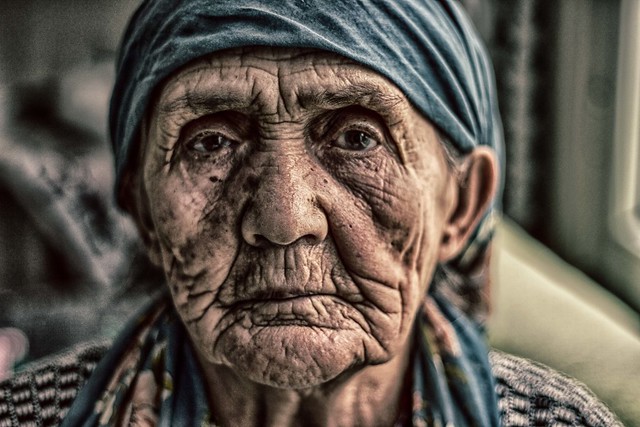
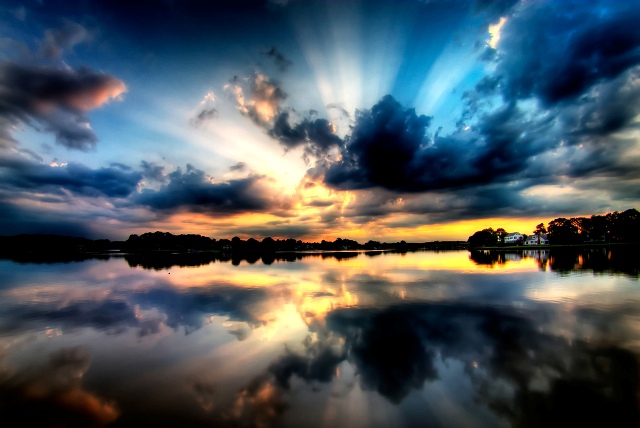
A FEW GOOD EXAMPLES OF HDR
I do think it is very important to “hold back” and not go crazy. Notice how HDR is used to bring out more details, and not go beyond the breaking point? Good HDR to me, needs to have some subtlety. You can unmistakably tell that it is HDR, but at the same time, it still has that natural look. And now for the good HDR, I shall use a few great examples from Flickr.

CLOSING
THE END. WHAT’S NEXT?
Here comes the end of this guide, and HDR is not that difficult. Seriously.
But an eye bleed or eye candy, it’s all up to your editing. Eye candies probably don’t come on the first try, and that is not a good reason to stop either. Thing is, just go out, take a bunch of HDRs and try out a load of different editing styles.
HDR can sometimes be tricky and hard to get right, but nonetheless, it can be mastered. Photography is not a game of who does better, it’s about having fun while you learn.
Happy shooting!