INTRODUCTION
FLAVORS OF FIREWORKS PHOTOGRAPHY
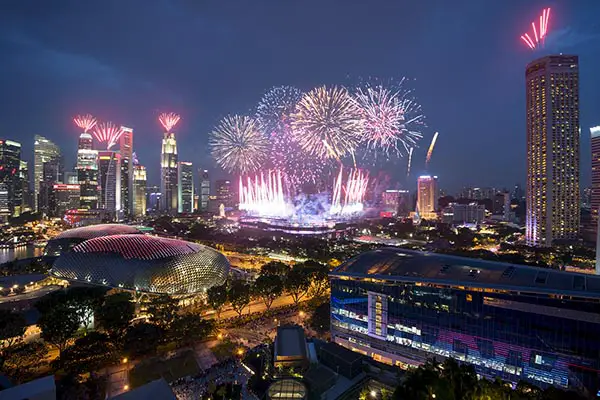
Welcome to a guide on how to photograph fireworks. Fireworks are fascinating, but the way some beginners will capture that special moment is – Take out a camera and snap away. Well, nothing wrong with this and it is one of the most casual ways to enjoy photography… But there are better ways to photograph those fireworks and get better results.
If you just do a search on the Internet, various methods and tutorials will turn out. Everyone has a different take on how to photograph fireworks, and which is the better method? That is what we will explore in this guide, to walk through some of these methods – Read on to find out!
NAVIGATION
TABLE OF CONTENTS

What We Need |

Method 1 |

Method 2 |

Method 3 |

Method 4 |

Extra |

Closing |
WHAT WE NEED
PREPARATION & EQUIPMENT
First, let us start with some preparation work – What are the required equipment, and the homework to do before a shoot. Don’t worry, we do not need big expensive gadgets. But some degree of decent equipment is still needed if you want nice shots of the fireworks.
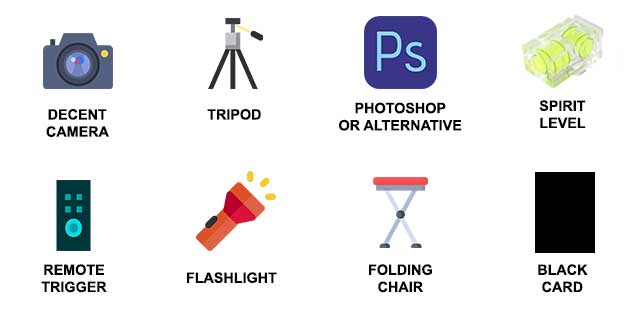
REQUIRED EQUIPMENT
- A decent camera
Any camera will do, but a DSLR or mirrorless camera is preferred. - A sturdy tripod
Any tripod that does not get blown away by the wind. I personally prefer ball head ones that are more convenient. - Remote shutter release
To keep hands off the camera and reduce camera shake. Does not matter if it is wired or wireless. - Black card
If you intend to use the black card method described below. This is literally just a piece of black card, large enough to cover the lens.
OPTIONAL EQUIPMENT
- Flashlights
These will come in very handy in dark places. Not for photography, but for safety and finding the way. - Bubble spirit level
Cameras have a virtual horizon feature, but this physical bubble-in-liquid thing will save you from fumbling around the menu settings. - Portable Folding Camping Chair
If you are expecting long outdoor waits, just bring a chair along and make yourself comfortable.
EDITING APP
Don't have a copy of Photoshop yet? Click on the banner below to check out an offer.Alternatively, you can check out GIMP, a free editing app.
PREPARATION & HOMEWORK
Just go and shoot, we wish it is that simple. But when it comes to grand fireworks, there will be a lot of people and chaos – It is best to do some research, preparation, and not go in blind as a bat.
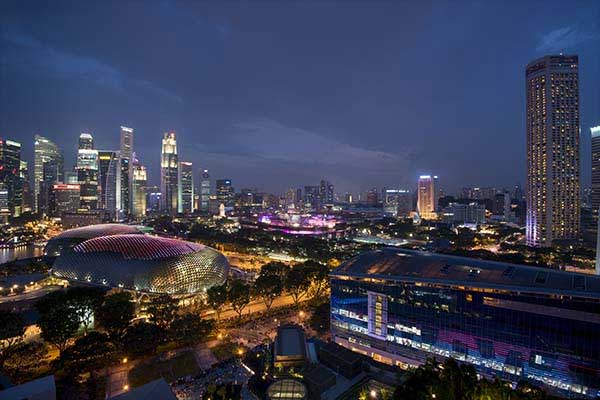
DATE, TIME, LOCATION
The number one Captain Obvious thing to know – When, and where will the fireworks go off? Will there be rehearsals that are less crowded? Where are the best vantage points? Go early to avoid “traffic jam”, and to reserve a nice spot for yourself to enjoy.
GET COMFORTABLE – BRING FOOD, DRINKS, ENTERTAINMENT… AND FRIENDS.
If you are going to camp at the chosen spot for hours, make sure to bring along plenty of “comfort gadgets”:
- Food
- Water
- Foldable chair
- Power Bank
- Smartphone
- Icebox filled with beer
- Barbecue pits
Ok… That’s too much. But get a few friends to go along if you can – Just-in-case you need to answer nature’s call or take turns to go buy some stuff.
METHOD 1
HANDHELD – SHOOTING WITHOUT A TRIPOD
Difficulty: ![]()
It’s easy. Take out the camera, shoot, enjoy. Actually, I will recommend beginners to start with this casual style of shooting, without worrying too much about the technical stuff. But here are a couple of extra tips and stuff to look out for.
FRAMING IS IMPORTANT!
What differentiates the casual photos from the good ones is the composition – How you frame the shot is how it will stand out. My general framing “tactics” are:
- Include some surrounding buildings and/or people as points of interest.
- Try to estimate where the fireworks will go off. Make sure they are right in the middle or on the thirds of the frame.
- Tilt the camera upwards a little to cater for some “allowance space”, so the fireworks don’t get cut off in an awkward manner.
But of course, this is my style of shooting – Everyone has a different eye for photography. People who zoom in and shoot “fireworks only” are not wrong, and people who go for creative effects are also not wrong. It’s all up to your preference.
CAMERA SETTINGS – MANUAL OR AUTO!?
NO SHAME WITH USING AUTO
For the absolute beginners, I will recommend using the auto or night mode – This may not give you the most amazing shots, but it is the fuss-free way to take decent photos without any technical knowledge.
APERTURE MODE
For you guys who are a little more advanced, turn the camera to shoot in the aperture priority mode. My usual settings are:
- An aperture between f/2.8 to f/5.6. Try not to shoot wide-open, it can be quite difficult to get good fireworks with a paper-thin depth of field.
- Generally between ISO 400 – 1600. The key here is to keep the ISO decently low while maintaining a fast enough shutter speed to prevent camera shake.
- Use the reciprocal rule as a general guideline. To prevent blur images, the minimum shutter speed should be 1/focal length. For example, if you are shooting at 50mm, the shutter speed should be at least 1/50 sec.
That said, I have seen some ninja masters who are able to remain absolutely still for one second while on handheld… If you have that kind of “inner strength”, feel free to drop the ISO and recover some image quality.
HOW ABOUT THE MANUAL MODE?
Well, go ahead if you know what you are doing. I personally just use the aperture mode and quickly adjust by turning the exposure compensation on-the-fly.
TURN OFF THE FLASH!
Firing the flash at fireworks… A common newbie mistake that I personally hate to the core. Now that you have read this, please don’t do it for very good reasons. Firstly, the flash will never light up the entire sky. Secondly, it annoys other people and destroys their shots. So please, turn off that flash.
STABILIZATION
Shaky hands? Need some extra stability?
- Keep the camera closer to your body.
- Tuck in the arms and don’t do “chicken wing”.
- Open the feet shoulder-width apart, create a stable base.
- Take a deep breath and hold before taking a shot.
- Sit down…
- Or use a chair as a substitute tripod.
TROUBLE WITH AUTOFOCUS?
Autofocus can be rather tricky at night, especially with a mess of fireworks. When autofocus fails, my usual trick is to turn the focus ring to infinity, then dial back a little bit. Use your own eyes to judge the sharpness. A smaller aperture will also ease focusing with a deeper depth of field.
METHOD 2
BULB MODE
Difficulty: ![]()
For you guys who are looking for a little more, then try out this method with the use of a tripod. But be warned, this method is not really “newbie friendly”, and will require knowledge of the exposure triangle. If you are uncomfortable with manual settings, this might be a challenge for you… But the results are totally worth it.
STEP 1) SET TO BULB MODE
Start with setting the camera to shoot in full manual mode. My general settings are:
- A smaller aperture of about f/5.6 to f/8.
- Keep the ISO as low as possible – 100 to 400.
- Use “bulb” for the shutter speed.
- Shoot in RAW if possible.
What is the bulb mode? For you beginner photo ninjas, bulb mode simply means “keep the shutter open for as long as I press the button”. This is extremely useful in photographing fireworks, as it gives complete control over the timing.
STEP 2) DEPLOY, FRAME, COMPOSE
Estimate where the fireworks will go off, mount the camera on the tripod and frame the composition of the shot. Also, remember to attach the remote trigger – Any small camera shakes will destroy long exposure shots. It will be wise to take the shots without actually touching the camera.
STEP 3) TEST SHOTS & FIX THE FOCUS
Before the fireworks begin, I will usually do a “pre-focus” and take test shots to make sure that everything is correct. After this, I will manually turn the autofocus off. Yes, it really does not make any sense to activate autofocus past this point, since the camera is fixed on a tripod and will not move.
Also, even though most autofocus systems are good enough even in the dark these days, trying to refocus while the fireworks are going off is going to risk some blurry shots. Don’t take those chances.
STEP 4) TIMING THE SHOTS
Start taking a photo before the fireworks go up, and stop after it fully pops open. The key to success for this method lies in the timing and exposure.
- If the exposure is too long, we will get a mess of smoke and fireworks.
- If the exposure is too short, we will get a boring “single pop” photo.
- Catch the fireworks too early, we get nothing.
- Catch it too late, we get smoke and ugly sagging fireworks.>
It’s kind of all up to experience, also a little bit of trial-and-error. Readjust the timing, the ISO, and aperture on-the-fly if you must.
METHOD 3
BLACK CARD METHOD
Difficulty: ![]()
There is a critical flaw with the above bulb method, and that is, it gets messy if we expose the photo for too long. Thus, creative people came up with a simple solution, that is to use a black card to control the exposure. Yes, the black card method is literally a follow up of the bulb mode, but with the use of a black card/paper.
STEP 1) THE SETTINGS
Start with an aperture of f/8 or more, and “bulb” for the shutter speed. The key here is a long exposure, so be sure that you are using a remote trigger to reduce camera shake; A remote trigger that can be locked will help you greatly here.
STEP 2) COMPOSITION, FOCUS, TEST SHOTS
Then, as usual, deal with the composition. Mount the camera to the tripod, then get the focus right, take a couple of test shots to make sure. Once the frame and focus are correct, set to manual focus and not move the camera anymore.
STEP 3) TAKING THE POPS
- As the fireworks start to go off, place the black card in front of the lens, and jam the shutter open.
- Whenever you see a nice firework that you like, lift the black card to “include” it in your photo.
- Cover the lens as the fireworks start to disperse.
- Repeat the lifting and covering action a couple of times.
- Keep a small mental note of how many times you have uncovered the black card.
STEP 4) REVIEW AND RE-ADJUST
Release the shutter after you have “cover-uncovered” the black card for 3-5 times. Quickly review the photo, and determine if the settings need to be tweaked – Is it under or overexposed? Re-adjust the settings on-the-fly using exposure compensation, and repeat the cover-and-reveal cycle again; Take as many photos as you like.
METHOD 4
PHOTOSHOP STACKING
Difficulty: ![]()
This is my preferred method of photographing fireworks. It involves taking a “base photo” before the fireworks start, and blending many fireworks photos on top using Photoshop. If you are a “purist” and hate Photoshop to the core – Feel free to skip this method.
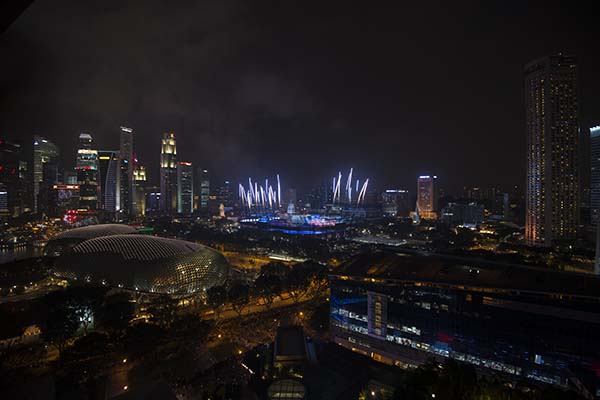
STEP 1) TAKE THE BASE SHOT BEFORE FIREWORKS START
For this method to work well, we need to start earlier, even before the fireworks go off. Camp at your chosen vantage point, and start taking pictures of the sunset plus blue hour. This also makes the trip worth it – Even if the fireworks show is somehow canceled, there is still the nice sunset shots.
As for the composition, just estimate where the fireworks will pop, and leave sufficient room in the sky. When you are happy with the base composition, mount the camera to a tripod, set to manual focus, and don’t move it anymore – Remember that fireworks will be later composed on top of this base photo. Any slight movement will probably destroy the entire shot. 🙁
Lastly, remember to take a couple of base shots and pray hard that the framing is right at where the fireworks pop.
STEP 2) TAKE MULTIPLE SHOTS OF FIREWORKS
Take plenty of shots as the fireworks go off. My general settings for the fireworks are:
- About f/2.8 to f/5.6. Since the “base shot” is already obtained during blue hour, we are only interested in getting the fireworks here. No need for small apertures to capture the entire landscape again.
- Anything between ISO100 to ISO 800. This depends on the shutter speed and the wind… If the fireworks disperse too fast, you will probably need a higher ISO and faster shutter speed.
- Shutter speed is anywhere between 0.2 sec to 2 sec. Depending on the type of fireworks and wind.
Do remember to chimp on the shots in between to confirm the settings, or if the fireworks are nicely in the frame. Adjust the settings on the fly if you must.
STEP 3) EDIT THE BASE SHOT IN PHOTOSHOP
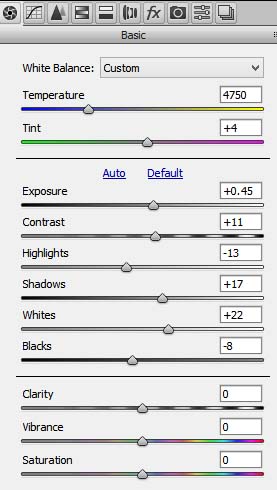
Now that we have all the necessary shots, start with editing the base photo. Nothing too fanciful here, just the usual “camera RAW stuff” at this stage – Adjust the exposure, color balance and removing dust spots.
Sorry guys, since everyone is going to have different photos and settings, I cannot give a “one size fits all” camera raw adjustment here. But a general rule that I always follow is to keep the skies slightly darker, which will make fireworks blending a lot easier next.
STEP 4) STACK FIREWORKS ON TOP OF THE BASE PHOTO
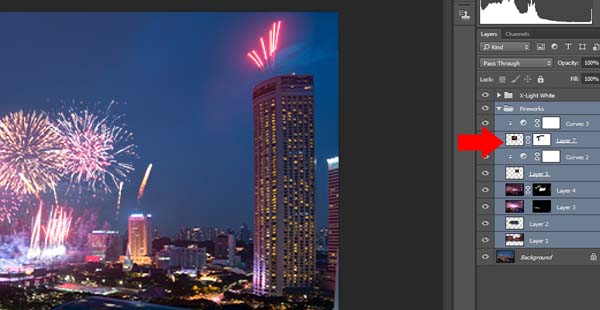
With the base photo done now, the rest is to add the fireworks on top of it – This is also what we call “stacking”. Simply select a few of the nicer looking fireworks.
- Open up the fireworks photo.
- Select, copy-and-paste the firework into the base photo as a new layer.
- Set the blend mode of the fireworks to “screen”.
That’s it. If you want, you can add a small curve adjustment to correct the contrast of the fireworks layer. (Layer -> New Adjustment Layer -> Curves)
EXTRAS
TIPS & BITS
That’s it for all the methods, and here are a few more general tips on taking fireworks photos, and how to deal with a few of those unexpected situations. Also, some links that may be useful for you.
WHAT TO DO WHEN FIREWORKS ARE OUT OF FRAME?
Don’t panic and decide for yourself quickly if you can afford to “miss out” those fireworks in the final photo, or your composition needs to be changed. If you decide that you can live with some fireworks being clipped out of frame, just continue shooting and ignore. If you decide to recompose, just do so quickly and continue shooting.
WATCH THE WIND
Strong winds can cause the fireworks to “deform” faster – If you are using a long enough exposure, you will catch some pretty funky light trails. So before the show, judge for yourself how long of an exposure you need.
TUNE DOWN NOISE REDUCTION
For you guys who are using the bulb mode or black card method, remember to turn off, or at least tune down the in-camera noise reduction setting for long exposures. An overly aggressive noise reduction will result in soft blurry photos.
LINKS & REFERENCES
- 15 Tips for Successful Fireworks Photography – Digital Photography Schools
- 8 Tips On Fireworks Photography – Canon EOS World
- Tips for Taking Great Fireworks Photos – Nikon
CLOSING
WHAT’S NEXT?
Thank you for reading, and we have come to the end of the guide. Whichever method you choose to adopt, I hope this guide has been helpful to you. Nothing beats actual hands-on, so go out and try these methods for yourself. There is nothing more satisfying when you catch that grand display of fireworks on a photo.
If you have anything to add to this guide, please feel free to leave to comment below. Go shoot and have fun!