INTRODUCTION
UNLIMITED CREATIVITY!
Welcome to a guide on how to edit landscape photos. I understand that editing can be a difficult topic to get started with, especially when there are no limits to creativity. There are endless ways to go about editing, and not a single “correct way” to get started. To top it up, there are a ton of editing bibles out there, and everyone has a different approach to editing.
So this is what I will do instead. I will share my own editing process, and pack this guide with editing tips that you can use. Feel free to adapt parts of my process into your own, or totally disagree with it. There are no right or wrong answers here, only what you deem to be useful or not.
NAVIGATION
TABLE OF CONTENTS

Step 1 |

Step 2 |

Step 3 |

Summary |

Closing |
|
STEP 1
GET THE SHOT RIGHT ON THE SPOT
Before we go into editing, there are things that we need to address. In particular, the things that need to be done during the shoot itself. If you are already a skilled photo ninja, feel free to skip this section. If not, you are still in the right place for editing tips. Exactly because of that, I need to make these my very first points.
EDITING IS ONLY A PART OF THE ENTIRE SHOOT PROCESS
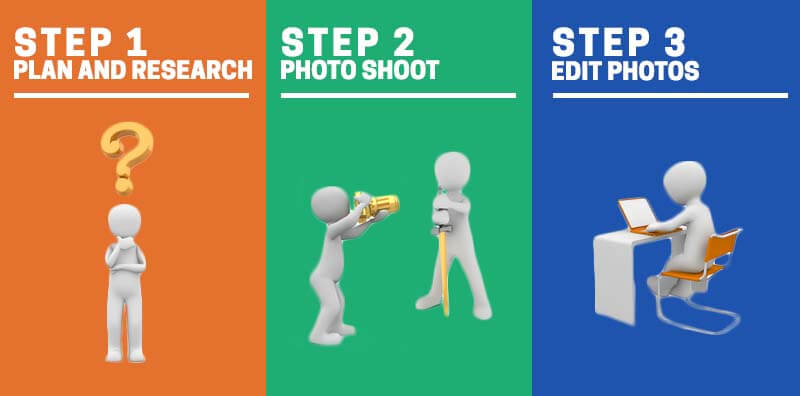
Generally, photo shoots have 3 stages.
- Pre-shoot: Planning, research, and preparation.
- The shoot itself.
- Post-shoot: Editing and closing up.
What is the big deal with this process then? Well, just think about it. If you screw up in the first 2 stages of the shoot, your job in editing is going to be very difficult or impossible.
- Did not do your homework and missed the fireworks? Editing is not going to bring it back.
- Got to the location only to discover that you need a permit to enter? You won’t have any photos to edit at all.
- Camera shake? That is going to be difficult to fix.
- Wrong timing? Missed the sunset? Editing is not going to help much… Not until you change the entire sky or landscape.
So please treat every stage of the shoot with importance. Most newbies like to chant “I will fix it in Photoshop“, and that is not correct way in photography. You cannot fix everything with Photoshop. Don’t use Photoshop as a poor excuse to stop advancing your photography skills.
GET IT RIGHT ON THE SPOT
If you have to change the settings during the shoot, the do it. If you have to remove a piece of rubbish, then do it. A gentle reminder here – Spend 5 minutes to change the settings on the spot, don’t spend hours trying to fix things in post process.
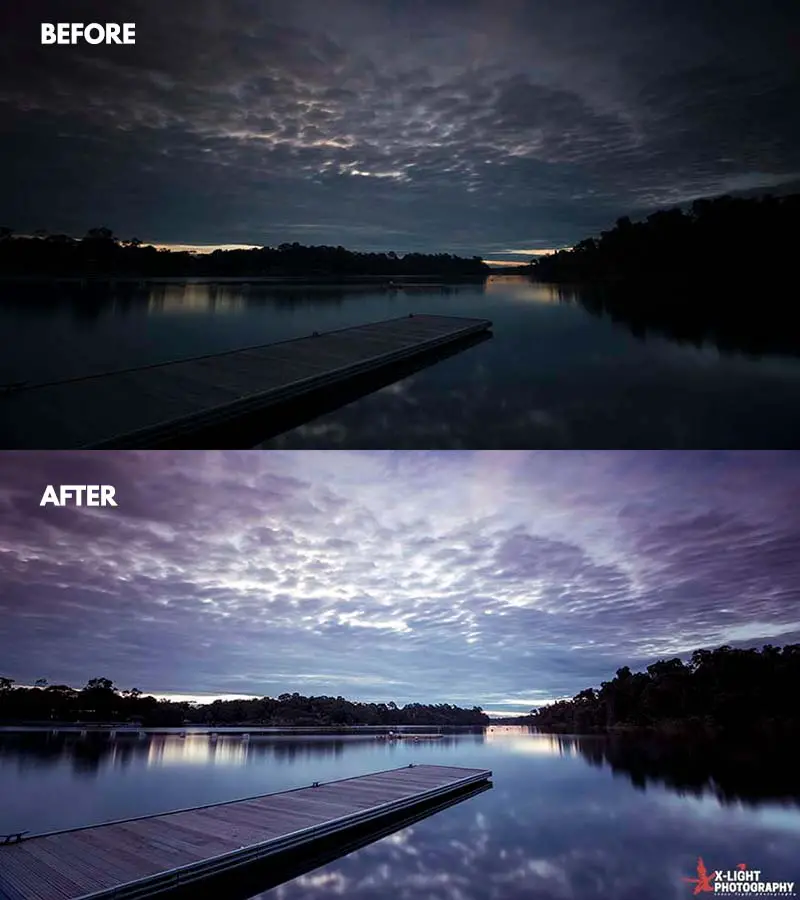
SHOOT IN RAW!
F*** the people who say “it is totally OK to shoot and edit in JPG”. If you want high-quality edits, then always work with RAW files. RAW files are lossless, contain a whole lot of information, and it can even recover photos you thought were gone. If you are not convinced, here is a sample :
DON’T LIMIT YOURSELF WITH THE PROCESS FLOW OF OTHERS
Finally, there are a lot of editing tutorials online, and most people will share their editing process flow. I think those are great, but don’t let it limit your creativity.
What works for me may not work for you. I like tea, you may like coffee. Use these guides as a starting point to build your own workflow. Please don’t depend on the guides like some kind of iron forged law. A true photo ninja must be flexible in the craft.
STEP 2
COOK THE CAMERA RAW FILE
Now that we are done with the basic stuff, we shall move into the editing parts. If you shoot in RAW as recommended, Photoshop should fire up Camera RAW when you open a RAW file. This is one very powerful tool that you need to master. Lightroom users, don’t worry, you should have the exact same Camera RAW as well.
SLIDE EM
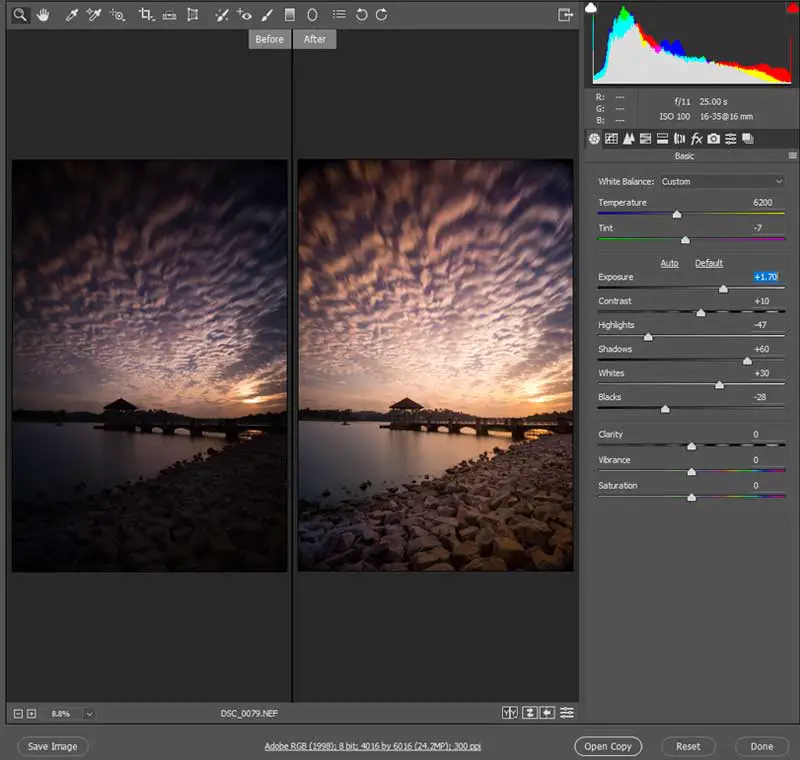
Camera RAW can look very intimidating to newbies at first, but it really is not much when you break it down piece-by-piece. Right on the very first “basic” tab, there are a whole bunch of sliders and controls. Just what are highlights, shadows, blacks, and whites? How do we play with all of these? If you do not already know these, you can read about it in my other guide – Photography Lighting Basics.
My first goal of using Camera RAW is to tweak the exposures to where you want it to be. For example, I tend to under-expose my photos most of the time to preserve details in the sky. So in Camera RAW:
- Push the shadows slider to the right, recover some details in the darker parts.
- Highlights slider to the left, to recover those nice clouds back.
- Maybe add some contrast back by boosting the whites (slider to the right), and reducing the blacks (slider to the left).
- Balance the overall picture by tuning the exposure slider.
- Lastly, slightly push the vibrance to make things a little more colorful, but pull back on the saturation to prevent a color puke.
However, everyone has their own way of shooting and their own style of editing. Again, for example, some people may like to over-expose their photos instead, and do a completely different style of editing:
- Pull the overall exposure back.
- Recover details by pulling the highlights down.
- Pull the contrast back for a less “punchy” image.
- Pull the colors back for a more “muted” feel.
There are probably endless ways to use the basic adjustments tab, and the above is ultimately a sharing of my usual style. You will have to play around with the sliders to figure out what fits your appetite.
THE SHARPENER
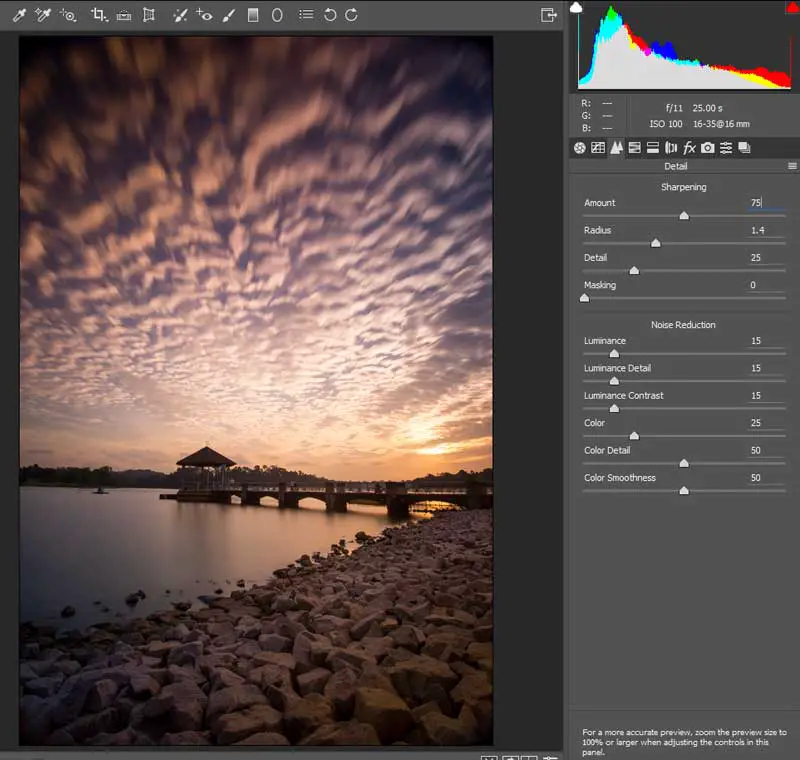
Want a nice detailed sharp photo? Then it does not hurt to sharpen the photo a little more even when it is already TACK sharp. There is nothing too complicated with this tab in Camera RAW, just push the amount if you are unsure. The only rule of thumb here is not to overdo it until you see a lot of noise, and those crappy pronounced edges. My usual settings are:
- Amount: 50-75
- Radius: 1.4 (You can push this if you have more megapixels)
- Detail: 25
- Luminance, Luminance Detail, Luminance Contrast: 15
FIX THE DISTORTION

Every lens will more or less have some sort of distortion – convex or concave. Fixing this is as easy as applying the lens correction profile in Camera RAW. If not, you can manually adjust the distortion too. Feel free to not fix the distortion if your lens already has minimal distortion… or you might want to retain it for unique lenses such as the fisheye.
COLOR CORRECTION / ADDING COLORS
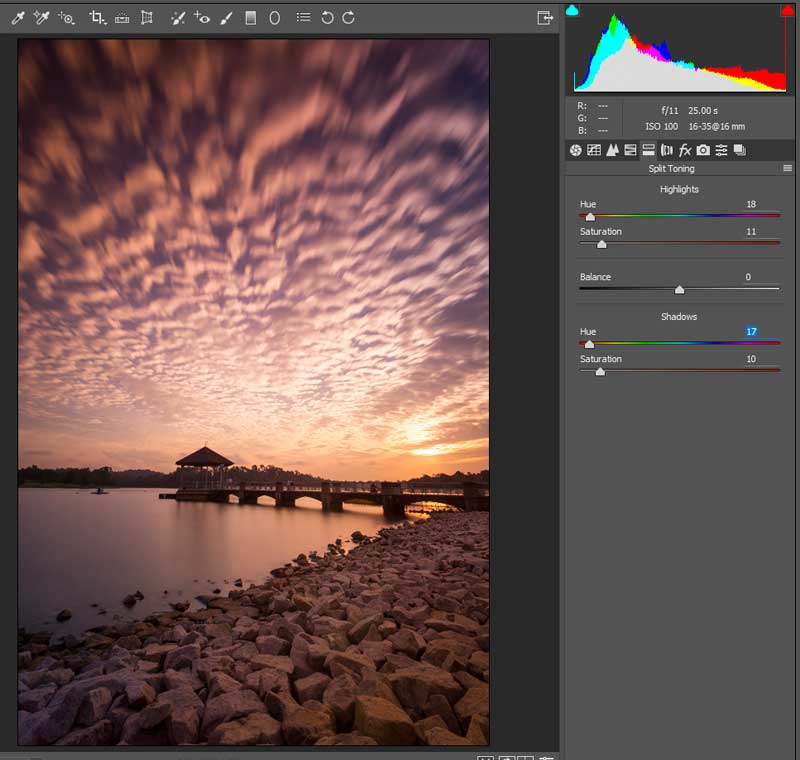
Cameras these days do a good job of white balance and removing color casts, so color correction is usually optional for me. But if you want to do that in Camera RAW, the “Split Toning” and “HSL” tabs are two places for you to tweak the colors to your liking.
While this may be a good place to add colors to boring grey landscapes, don’t go too crazy with it. A common newbie mistake is pushing the colors way too much, and ending up with a puke of rainbow colors. Sometimes, less is more.
STEP 3
PHOTOSHOP MAGIC
At this point, your photo has gone through Camera RAW and should be “good enough”. It may not even need further editing. But for the sake of completeness, I shall reveal a few more of my usual tricks to make photos even greater.
REMOVE DUST SPOTS AND UNWANTED RUBBISH
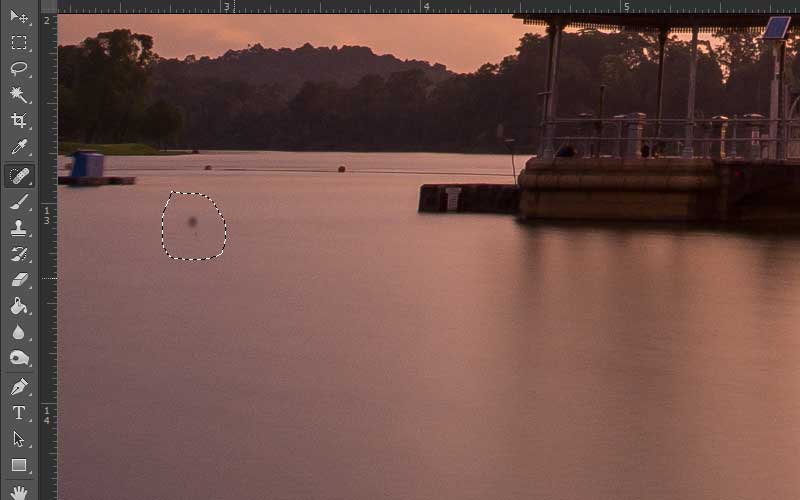
Trust me, you will not want to skip this step. Zoom in your photo, and try to clean up any pieces of micro dust on your photo. The only tool that you need to use, is the healing brush tool. You will be surprised how many eagle-eyed photographers there are in this world, and how they can even spot 1 pixel of dust.
For the bigger pieces of rubbish, you will want to use the content aware tool instead (Select Area -> Edit -> Fill -> Content Aware).
THE SEXY CURVES
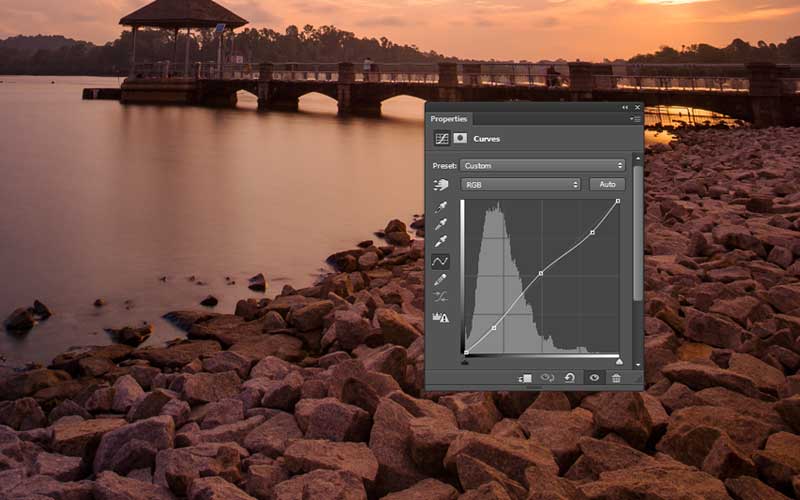
Next step, you can use curves (Layer -> New Layer Adjustment -> Curves) to further adjust the highlights/shadows. While you can also do this in Camera RAW, I like to combine curves with the use of masks to manually control certain parts of the picture.
THE ORTON EFFECT?
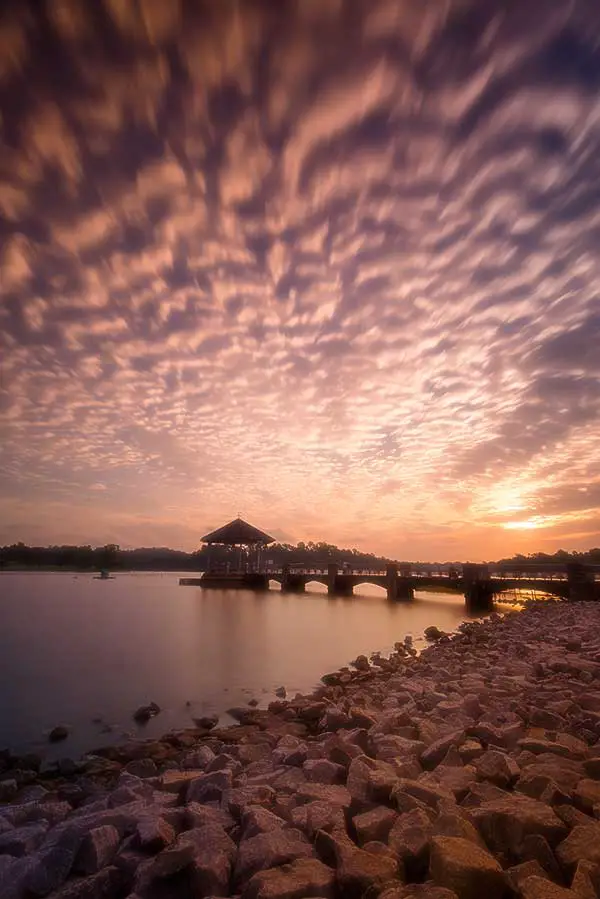
As for the final step of my editing process, I sometimes like to use the Orton Effect. What is the Orton Effect? It is basically that dreamy magical landscape look. Originally, this is a technique meant for film photography, but today, this technique is adapted for digital photography as well.
P.S. On second thoughts, while this might be an interesting technique to use for landscape photographers, it does not really apply to all photos. As I feel that it did not really look good for this example, I am just going to leave it out of my “final version”.
P.P.S. You can even do all sorts of crazy effects as you please – a “tiny planet”, black-and-white, or pseudo-HDR.
WATERMARK
SUMMARY
IN A NUTSHELL
- Do your homework before the shoot. Know the location, know what to expect.
- Get the composition correct on the spot – don’t depend on Photoshop to “fix” it.
- Shoot in RAW.
- In Camera Raw – Adjust the basic exposures, sharpen a little, and fix any lens distortions.
- In Photoshop – Use the healing brush tool or content aware to remove unwanted dust spots and rubbish.
- You may use curves to further enhance the contrast.
- You may also want to use a color balance/gradient layer to do some color grading.
- Do all kinds of effects that pleases you.
- Lastly, add your watermark.
CLOSING
WHAT’S NEXT?
We have come to the end of this guide. If you are still lost in which way to go, I will suggest starting with Camera RAW and just play around with the settings and colors. It is actually very powerful, and you can do pretty well with just Camera RAW itself. Well, nothing beats getting your feet wet. So go take some photos and try editing it. Cheers, and happy shooting!